Workflow Designer
The Workflow Designer is the heart of Uniconnect’s automation system. It provides a drag‑and‑drop canvas where administrators can visually build workflows by combining triggers with toolbox components. This makes workflow creation intuitive, even for non‑technical users.
Toolbox Components
1. Action
- What it does: Executes a task such as sending emails, updating CRM records, or syncing statuses.
- User Scenario: A sales manager wants every new lead to receive a welcome email automatically.
- Steps:
- Drag the Action component onto the canvas.
- Configure it to send an email template to the lead’s email address.
- Connect it to the Trigger node (e.g., “Lead Created”).
- Example Outcome: Every time a new lead is added, the system sends a personalized welcome email without manual effort.

2. Condition
- What it does: Introduces branching logic based on data values or rules.
- User Scenario: Leads with a score above 80 should be assigned to senior reps, while others go to junior reps.
- Steps:
- Drag the Condition component onto the canvas.
- Define the rule: If Lead Score > 80 → Yes branch; else → No branch.
- Connect each branch to different Action nodes (assign to senior or junior rep).
- Example Outcome: High‑value leads are prioritized automatically, improving conversion rates.

3. Delay
- What it does: Pauses workflow execution for a specified duration before continuing.
- User Scenario: After a call ends, wait 24 hours before sending a feedback survey.
- Steps:
- Drag the Delay component onto the canvas.
- Set the delay to 24 hours.
- Connect it between the Trigger (Call Ended) and the Action (Send Survey Email).
- Example Outcome: Customers receive surveys at the right time, avoiding immediate post‑call fatigue.

4. Bulk Actions
- What it does: Applies actions to multiple records at once for efficiency.
- User Scenario: A campaign manager wants to update all leads in a campaign to “Contacted.”
- Steps:
- Drag the Bulk Actions component onto the canvas.
- Configure it to update the “Status” field for all leads in the campaign.
- Connect it to the Trigger (Campaign Pulse or Campaign Resume).
- Example Outcome: Hundreds of records are updated in one go, saving hours of manual work.

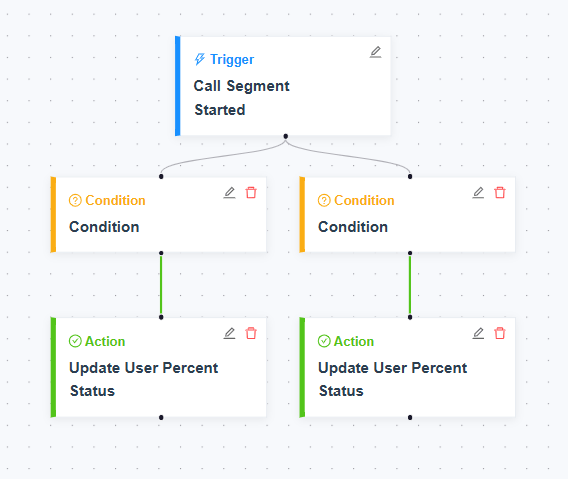
Canvas Overview
- The canvas is a visual workspace where nodes (Trigger, Action, Condition, Delay, Bulk Actions) are placed and connected.
- Users can drag components from the toolbox and drop them onto the canvas.
- Connections between nodes define the logical flow of automation.
Saving and Managing Workflows
- Save: Stores the workflow design for future use.
- Manage: From the Details tab, workflows can be activated, backed up, reset, or deleted.
- Best Practice: Always save incremental changes and create backups before major edits.
Configuring Triggers
Triggers define when a workflow starts. Uniconnect supports two types: Event‑based and Schedule‑based.
Event Trigger Configuration
- Purpose: Start workflows in response to system events.
- Steps:
- Select Event‑based when creating a workflow.
- Use Filter by Module to narrow down triggers (e.g., Call, Campaign, User, Email, CRM Module).
- Choose from the Available Triggers list (e.g., Call Ended, Disposition Submitted, User Login).
- Connect the trigger node to workflow components.
- User Scenario: A manager wants CRM records updated automatically when a call ends.
- Example Outcome: The “Call Ended” trigger starts the workflow, which updates lead status and sends a follow‑up email.
Schedule Trigger Configuration
- Purpose: Start workflows at defined times or intervals.
- Steps:
- Select Schedule‑based when creating a workflow.
- Choose from Quick Presets:
- Every 15 minutes
- Daily at midnight
- Weekly (Monday)
- Monthly (1st)
- Yearly (Jan 1st)
- For advanced scheduling, define a Custom Schedule using cron expressions.
- User Scenario: A team wants a nightly sync of call logs with CRM.
- Example Outcome: The workflow runs daily at midnight, ensuring CRM data is always up to date.
Workflow Scenario Example 1: Organization Assignment
User Scenario When a new organization is added to the CRM and its industry is set to Finance, the system should automatically assign it to the Finance Account Manager group. This ensures specialized reps handle finance clients from the start.
Step‑by‑Step Configuration 1. Create Workflow
- Navigate to Workflow Manager → Create Workflow.
- Select Event‑based Workflow.
2. Configure Trigger
- Filter by Module → Choose CRM Module (Organization).
- Available Trigger → Select New organization created.
3. Add Condition
- Drag a Condition node onto the canvas.
- Define rule: Industry = Finance.
4. Add Action
- Drag an Action node.
- Configure action: Assign organization to Finance Account Manager group.
5. Save Workflow
- Name it “Finance Org Assignment”.
- Save and activate.
Outcome
- A new organization is added with industry = Finance.
- Workflow detects the trigger and checks the condition.
- If true, the organization is auto‑assigned to the Finance Account Manager group.
- Finance specialists immediately take ownership, improving client handling.

Workflow Scenario Example 2: Tickets Resolved
User Scenario When a support ticket is resolved with the resolution code Hardware Issue, the system should trigger a warranty follow‑up workflow immediately. This ensures customers receive proactive support for hardware replacements or warranty claims.
Step‑by‑Step Configuration 1. Create Workflow
- Navigate to Workflow Manager → Create Workflow.
- Select Event‑based Workflow.
2. Configure Trigger
- Filter by Module → Choose Ticket.
- Available Trigger → Select Ticket updated.
3. Add Condition
- Drag a Condition node.
- Define rule: Resolution code = Hardware Issue.
4. Add Action
- Drag an Action node.
- Configure action: Trigger warranty follow‑up workflow (e.g., create warranty case, notify customer success team).
5. Save Workflow
- Name it “Hardware Warranty Follow‑up”.
- Save and activate.
Outcome
- A support ticket is marked resolved with resolution code = Hardware Issue.
- Workflow detects the trigger and checks the condition.
- If true, it immediately launches a warranty follow‑up workflow.
- Customers are contacted proactively, ensuring smooth warranty claims and higher satisfaction.

Key Takeaway
- The Workflow Designer provides a flexible canvas with toolbox components to build automation logic.
- Triggers determine when workflows start — either in response to system events or at scheduled intervals.