Preview Campaign Create
1. Introduction
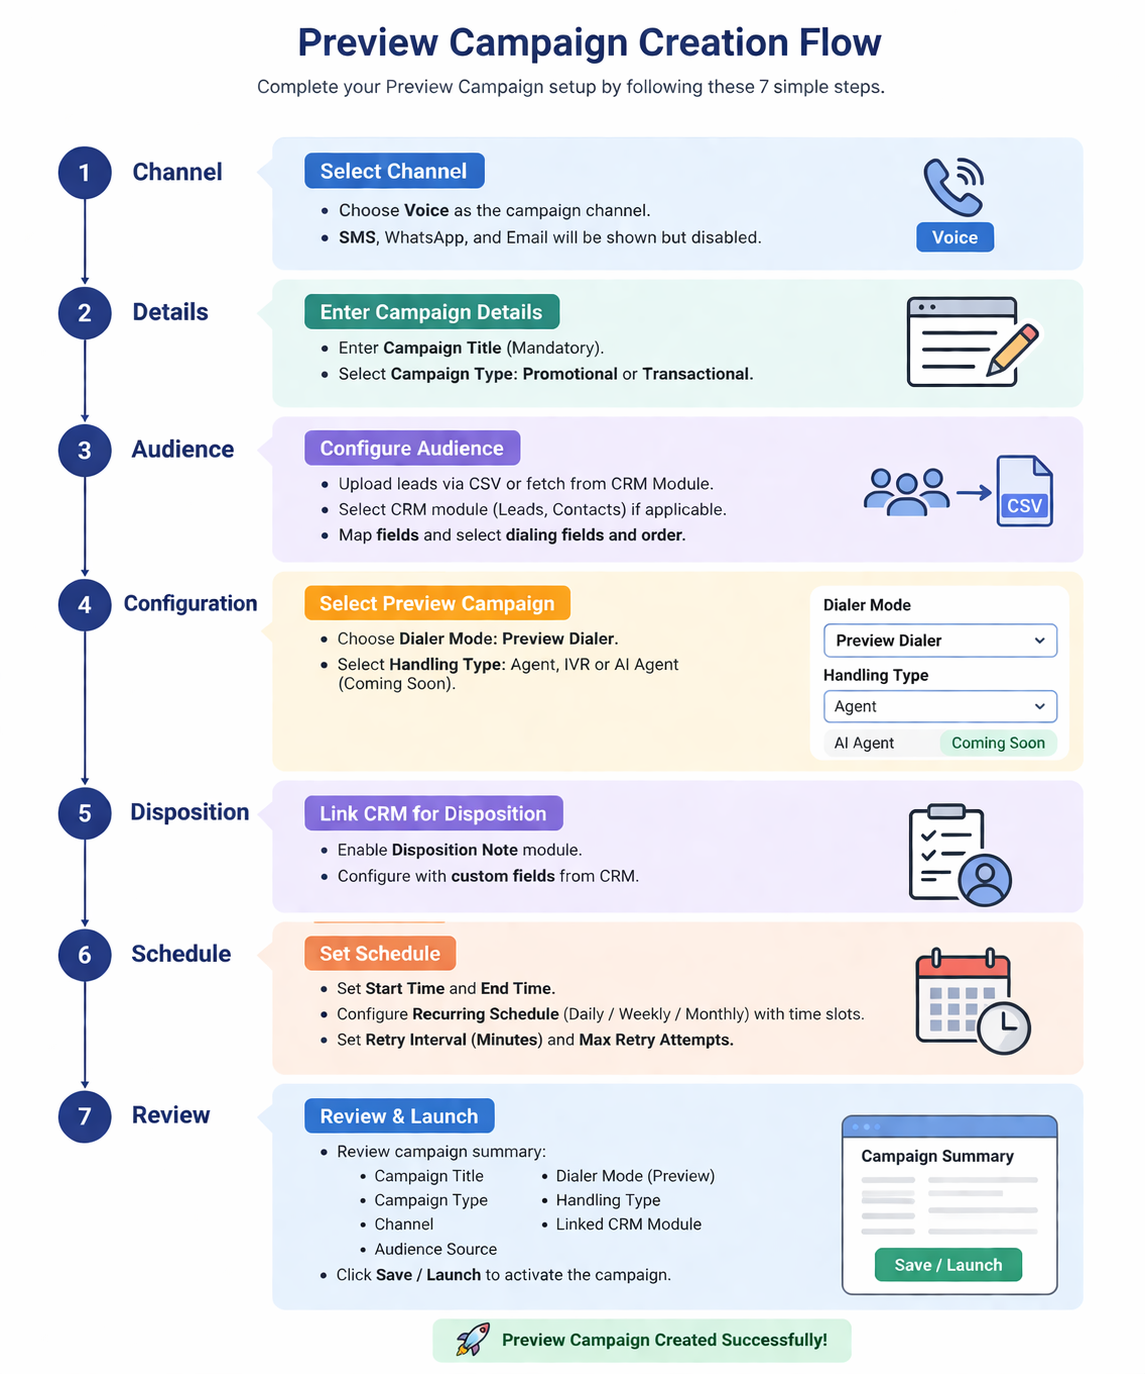
The Preview Campaign allows controlled outbound calling where the system first connects to an agent and then dials the customer after confirmation. This approach ensures better call handling and agent readiness.
2. Configuration Overview
| Step | Description |
|---|---|
| Step 1 | Create Campaign |
| Step 2 | Configure Preview Dialer |
| Step 3 | Assign Audience |
| Step 4 | Configure Schedule |
| Step 5 | Review and Launch |
3. Create Campaign
Step 1
Navigation:
Campaign → Create Campaign
Required Actions:
- Select Channel → Voice
(SMS, WhatsApp, Email are visible but if only enable )
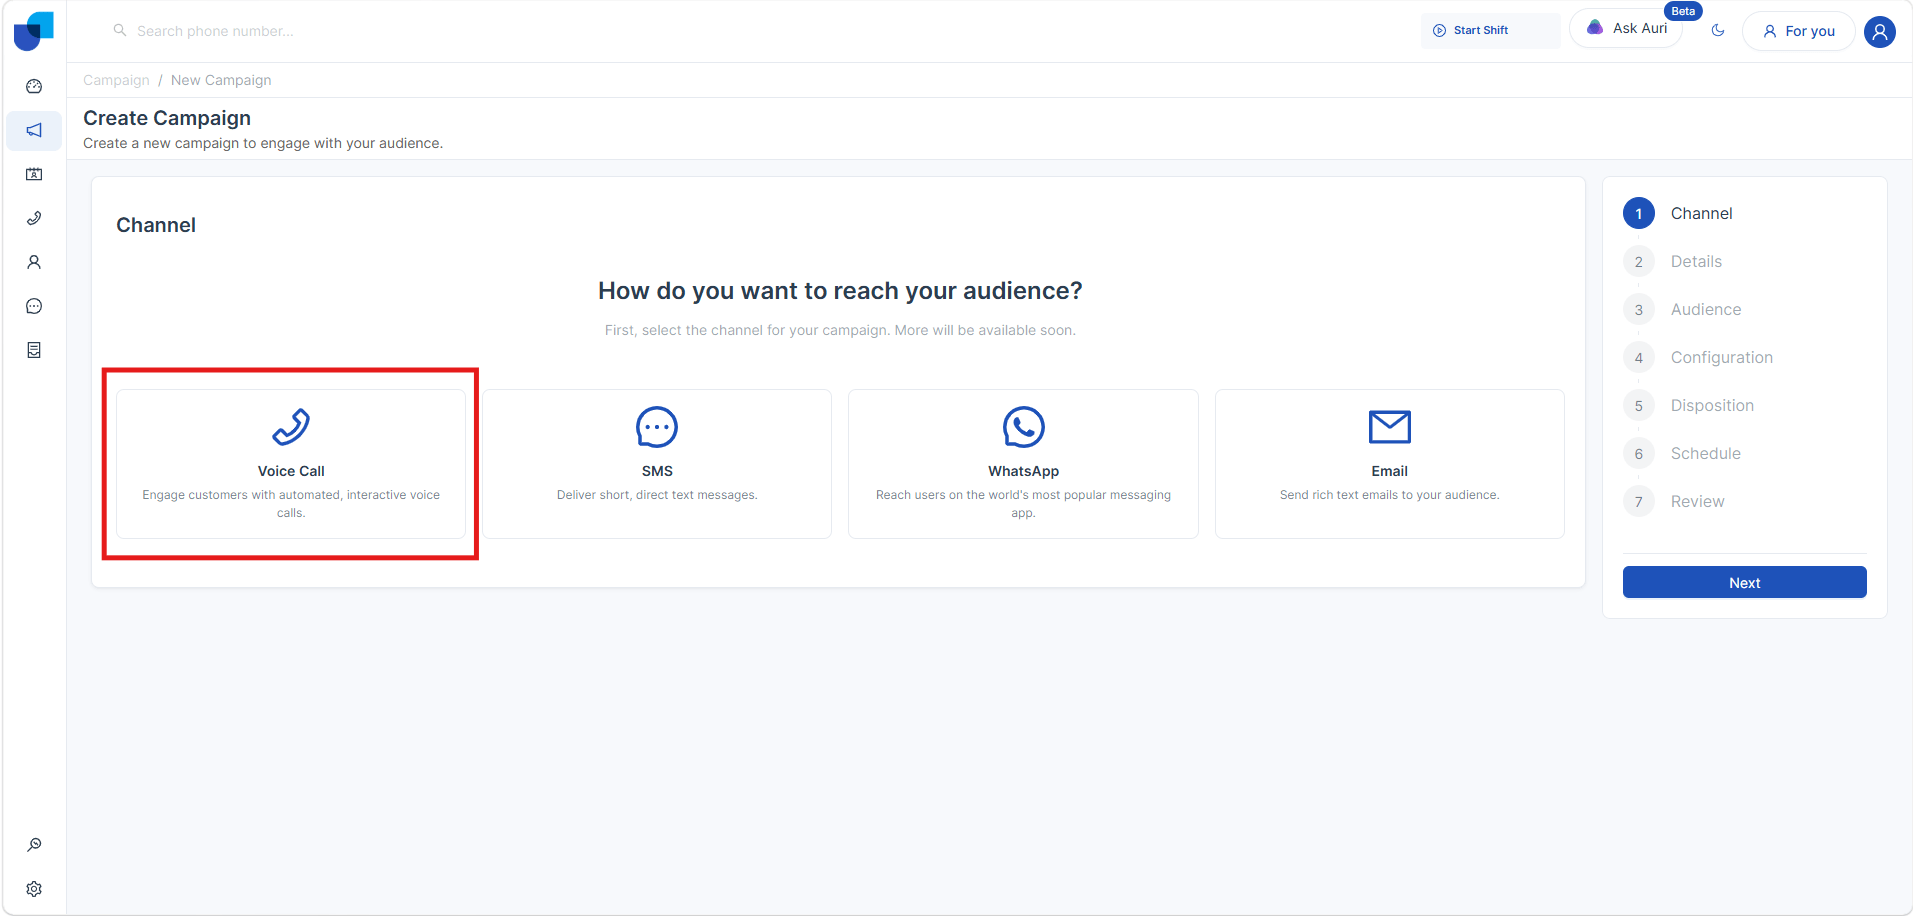
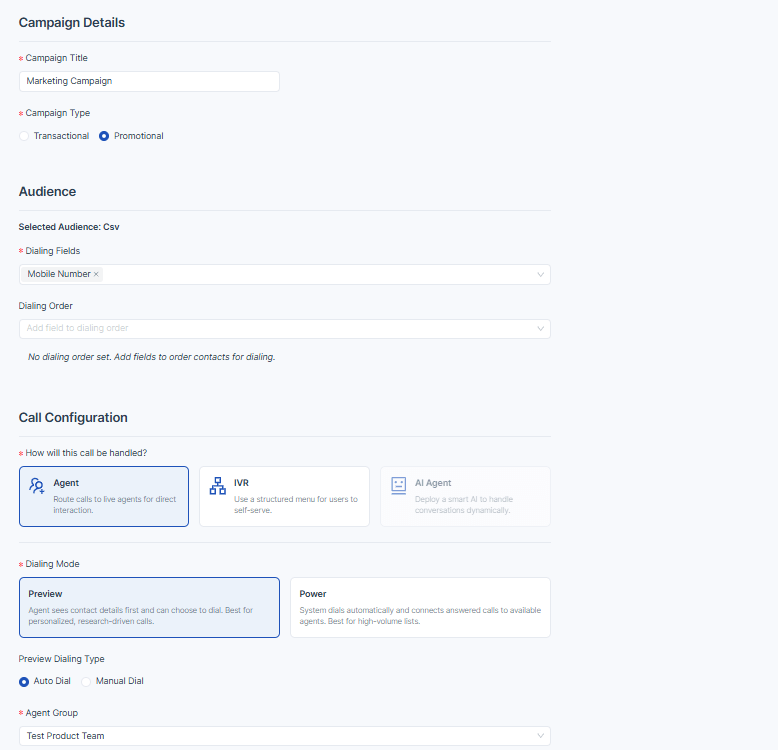
- Enter Campaign Details:
- Campaign Title (Mandatory)
- Campaign Type → Promotional / Transactional
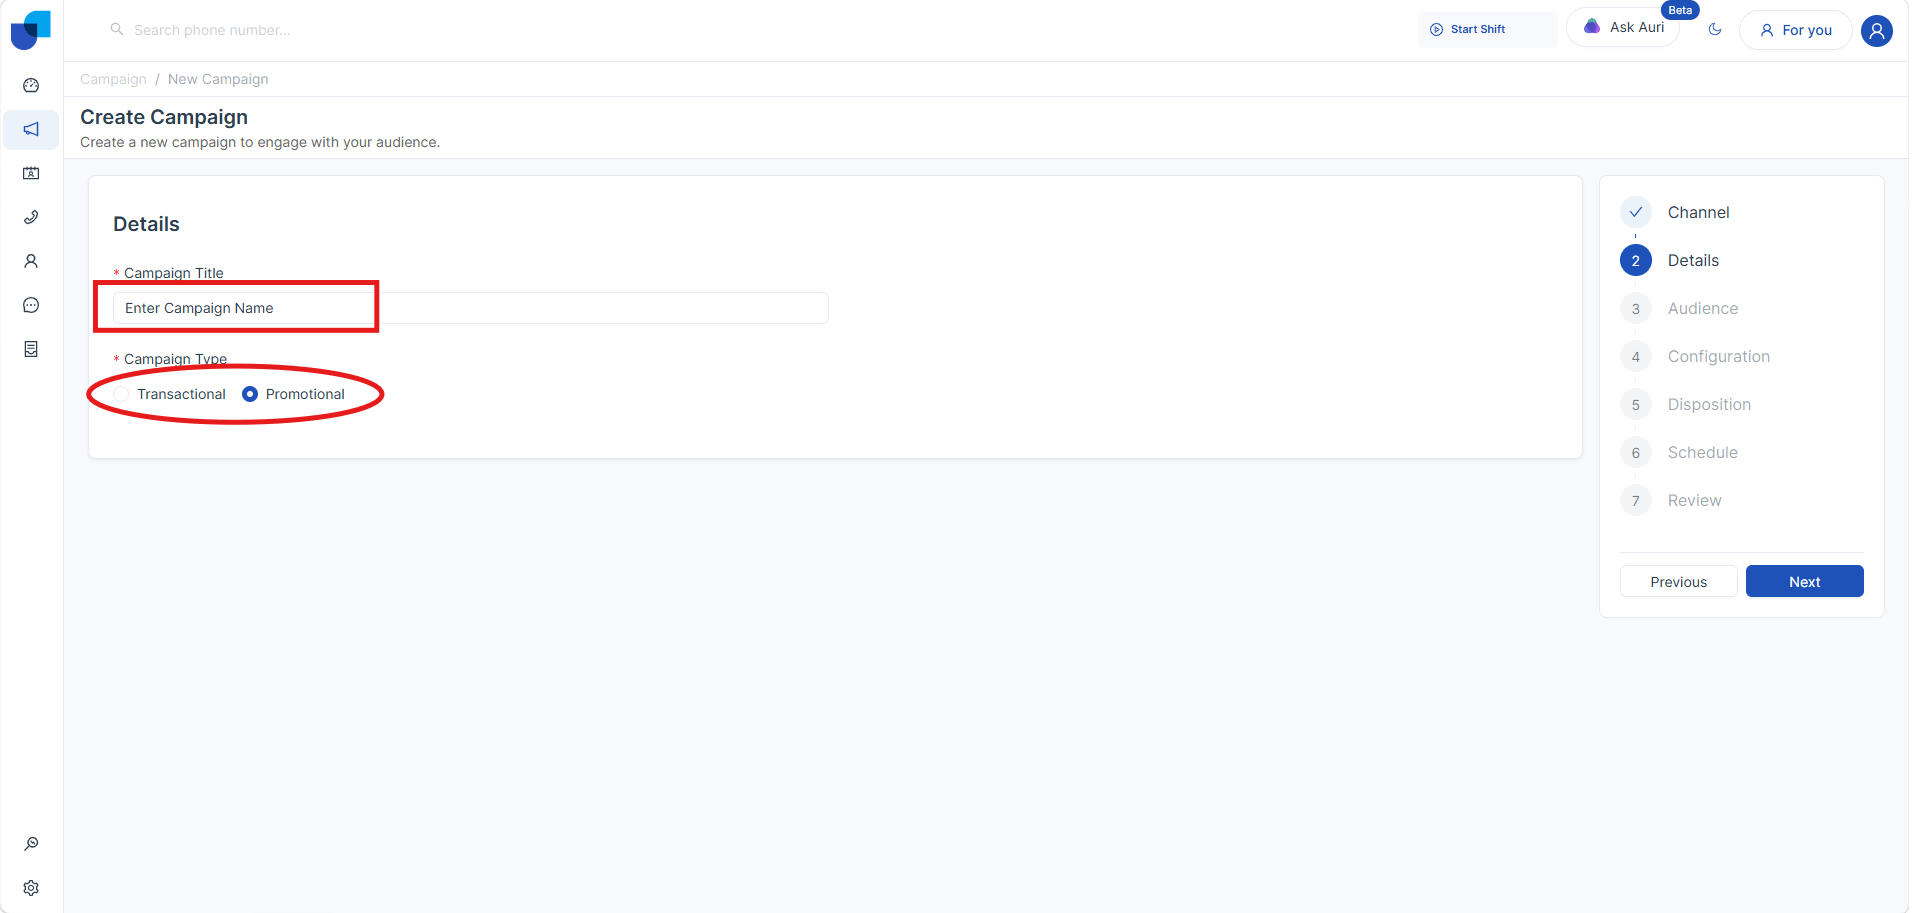
Promotional Campaign
A promotional campaign is used to advertise products, services, or offers to a group of customers. The main goal is to attract attention, increase sales, or promote something. Example:
“Get 20% discount on all items this weekend. Visit now!”
Transactional Campaign
A transactional campaign is used to send important information related to a specific action or service. The main goal is to inform the customer about >something relevant.Example:
“Payment of LKR 5,000 has been successfully >completed.”
3. Audience Upload Configuration
This section explains how to add leads to a campaign using two methods:
- CSV Upload
- CRM Module Import

1. CSV Upload
Leads can be uploaded into the campaign using a CSV file. This method is useful for bulk importing external data.
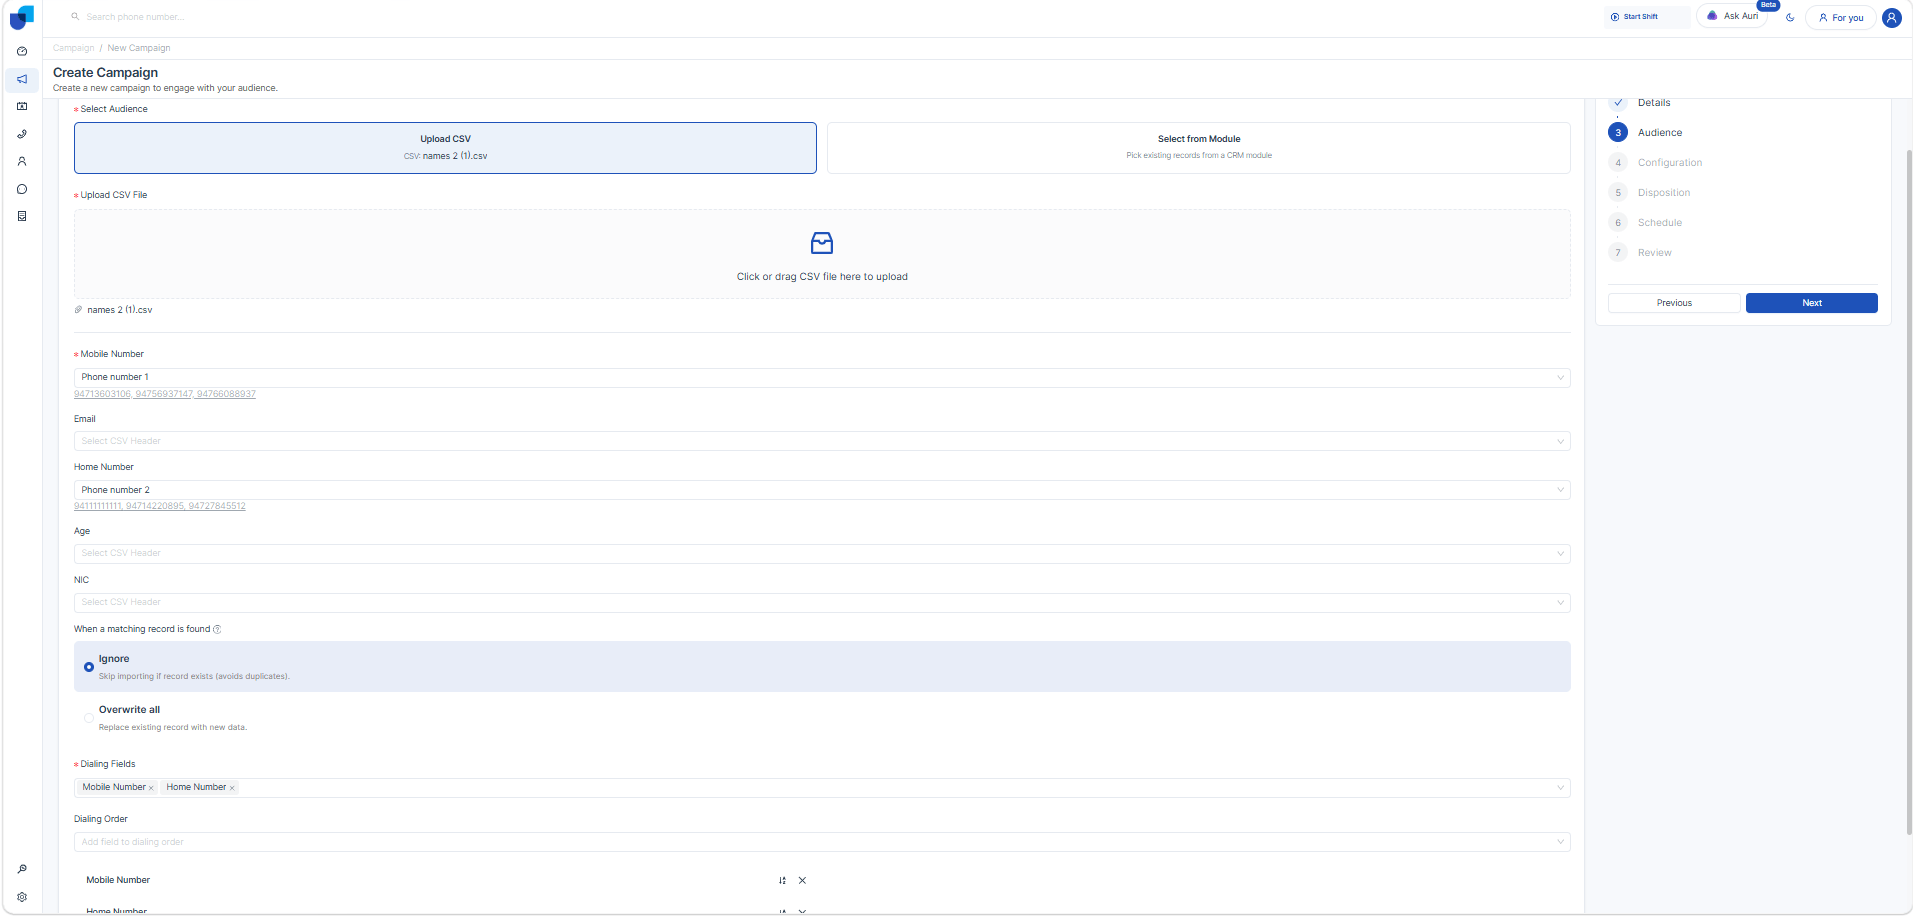
Upload Methods
- Drag and drop CSV file into the upload area
- Select file manually using file picker
File Validation
- Only CSV format is supported
- System validates file structure before processing
- Invalid formats will show an error message
Field Mapping
After uploading the CSV file, a field-mapping interface is displayed.
Mandatory Mapping
- Phone Number must be mapped (required for dialing)
Pre-configured Fields
- First Name
- Last Name
Custom Fields
- Additional fields can be mapped
- Custom fields are based on Lead Module configuration
2. CRM Module Import
Leads can be directly imported from an existing CRM module, eliminating the need for manual CSV uploads.
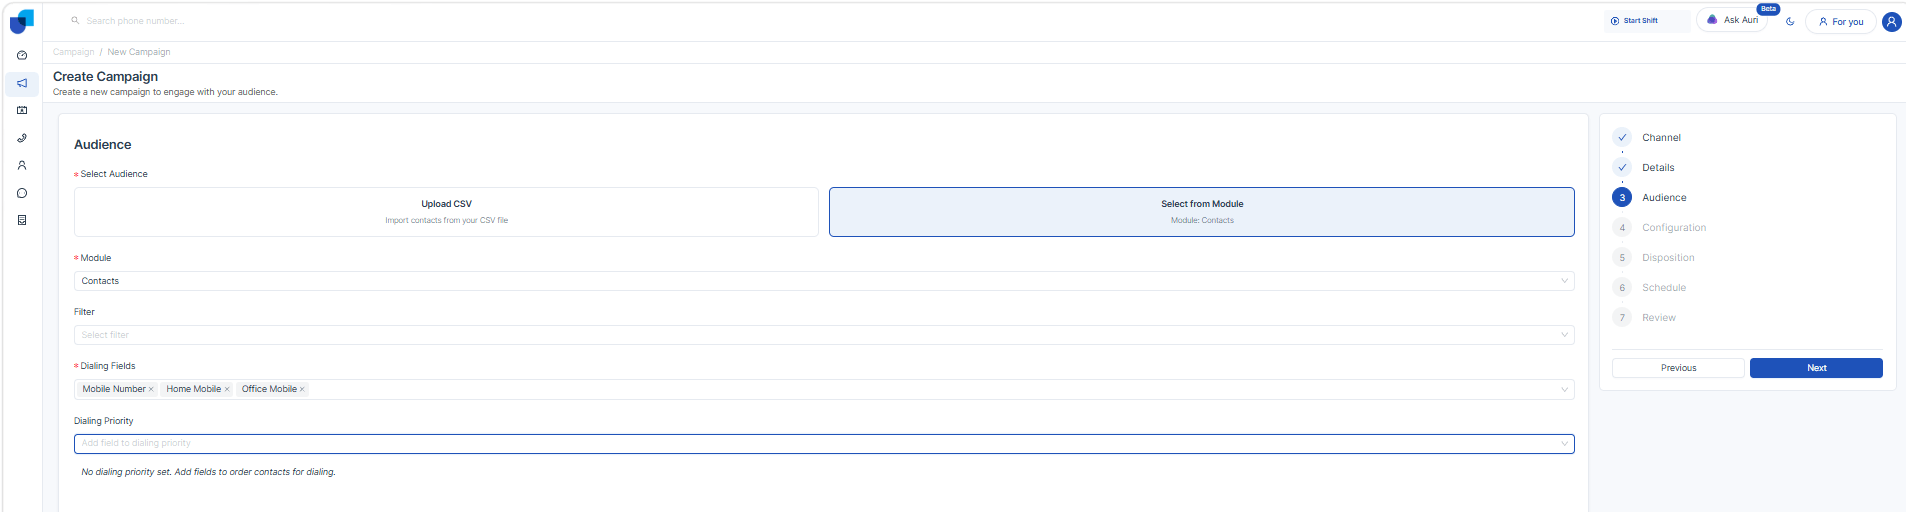
Module Selection
- Select a CRM module:
- Leads
- Contacts ..
Data Selection Options
- Import all records
- Apply filters such as:
Preconfigurable in specific CRM module- Status
- Tags
- Created Date
Import Behavior
- Selected leads are imported into the campaign
- Leads are automatically linked to the campaign
Common Configuration (Applicable to Both Methods)
Dialing Fields
- Multiple phone number fields can exist in the same dataset
- A dropdown is provided to select dialing fields
- Only phone number fields are displayed in this dropdown
Dialing Order
- Dialing sequence is based on the selected dialing field order
- System follows the defined order when attempting calls
- For CRM module the dialing order can be based any type of a field in selected CRM module.
5. Campaign Configuration
5.1 Select Handling Type
Field: Handling Type
Options:
- Agent → Calls handled by live agents then definitely need to select a queue from the agent group
- IVR → Calls handled using menu prompts
- AI Agent → (Coming Soon)
5.2 Select Dialer Mode
Field: Dialer Mode
Configuration:
- Select Preview Dialer
System first calls the agent. After agent confirmation, the system dials the customer.
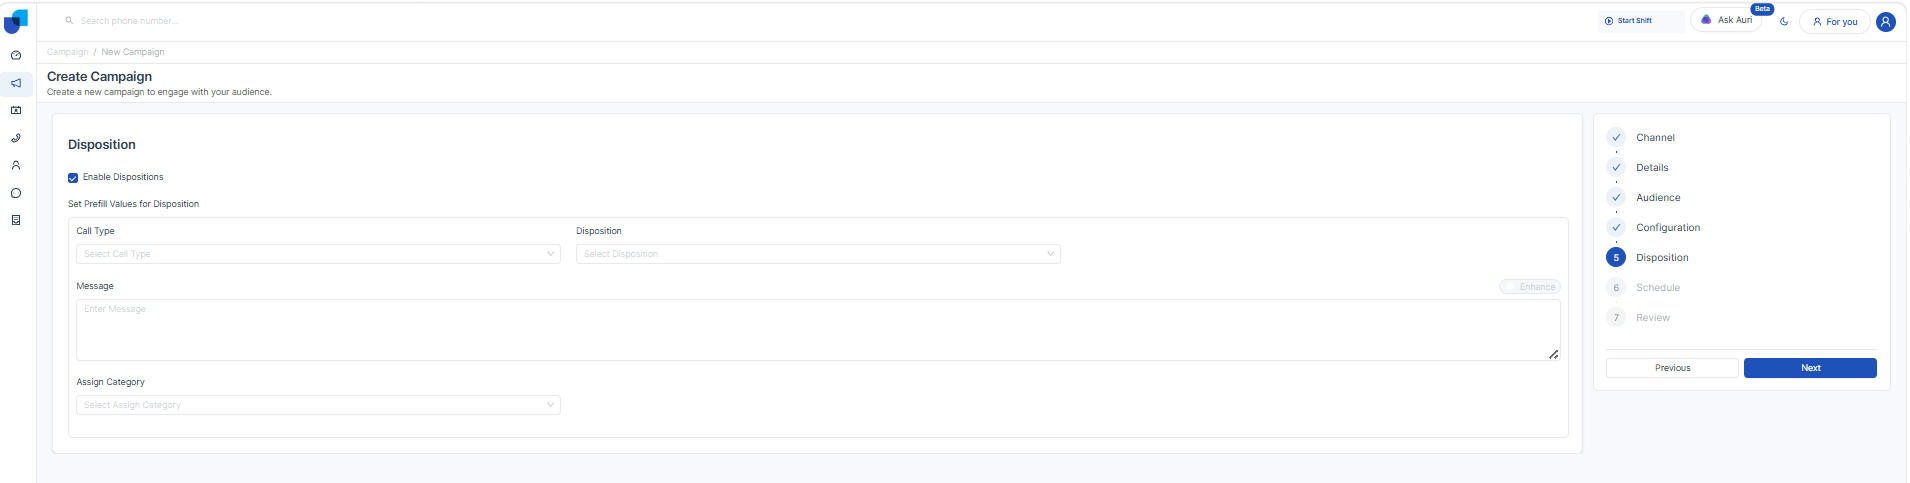
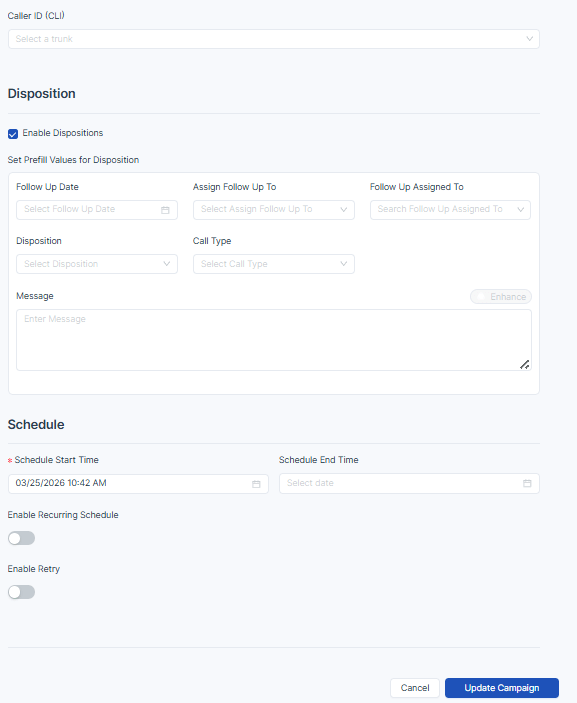
6. Link CRM Module for Disposition
Disposition Note Module
- Enables capturing call outcomes
- Custom fields can be configured from CRM Module Configurations
7. Schedule Configuration
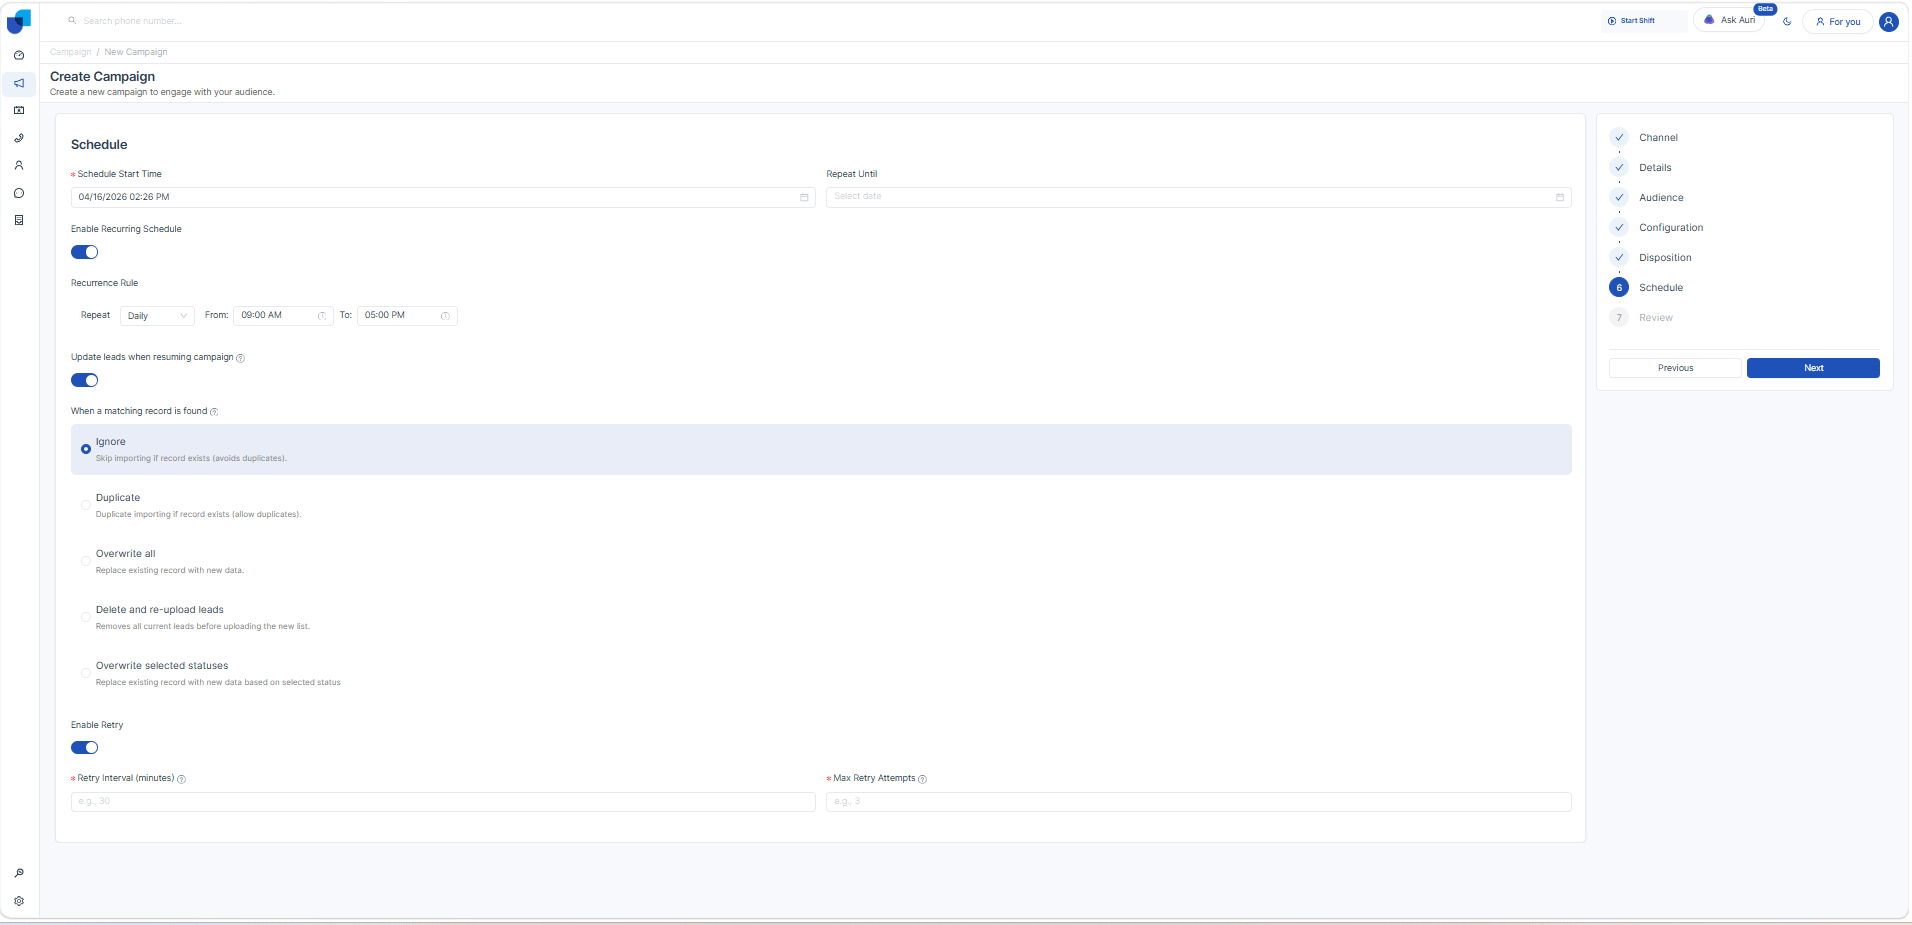
Fields:
- Start Time → Campaign start time
- End Time → Campaign end time
Recurring Schedule
Explanation:
Recurring schedule allows the campaign to run automatically at predefined intervals instead of running only once.
Options:
- Daily → Campaign runs every day at the defined time
- Weekly → Campaign runs on selected days of the week
- Monthly → Campaign runs on selected dates of the month
Time Slots:
Specific time ranges can be defined (e.g., 9:00 AM – 5:00 PM), and the campaign will only execute within those time periods.
Example:
- Daily campaign from 9:00 AM to 6:00 PM
- Weekly campaign on Monday and Friday between 10:00 AM – 2:00 PM
Retry Configuration
Explanation:
Retry configuration controls how the system re-attempts calls when a call fails or is not connected.
-
Retry Interval (Minutes)
Defines the waiting time before attempting the next call to the same lead.
Example:
If Retry Interval = 10 minutes, the system will wait 10 minutes before retrying the same number. -
Max Retry Attempts
Defines the maximum number of retry attempts for a failed call.
Example:
If Max Retry Attempts = 3:- 1st call → Failed
- 2nd call → Retry after interval
- 3rd call → Final attempt
After that, no further calls will be made.
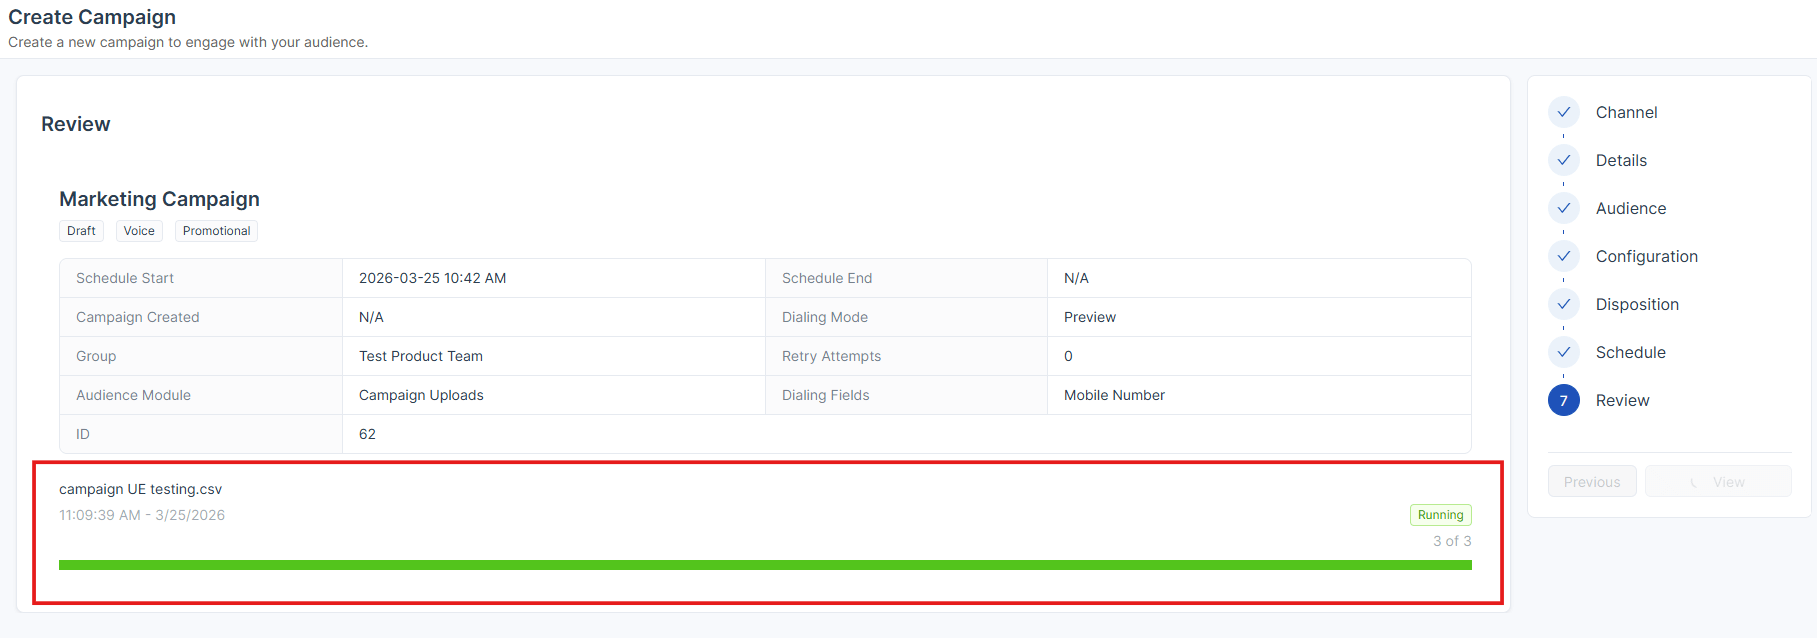
8. Review
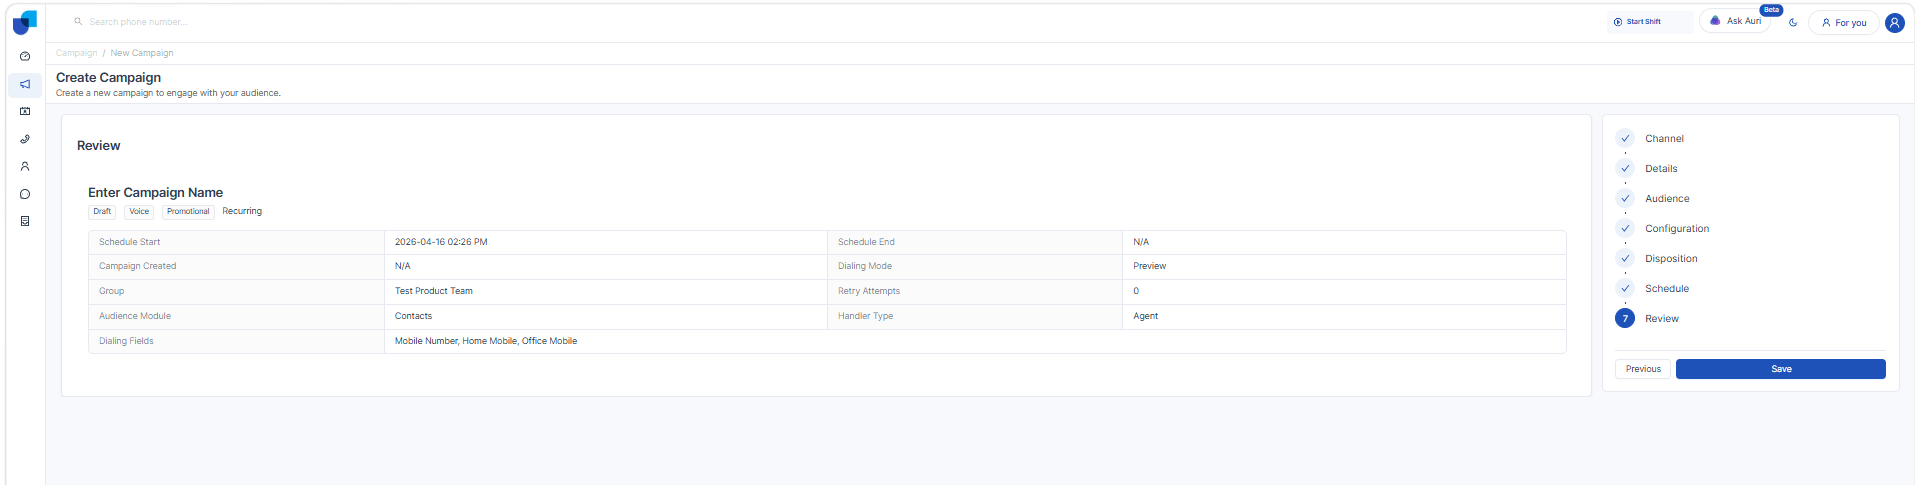
Summary Includes:
- Campaign Title
- Campaign Type
- Channel
- Audience Source
- Dialer Mode (Preview)
- Handling Type
- Linked CRM Module
Action:
- Verify all details
- Click Save / Launch
9. End-to-End Flow
9. Launch (Preview Campaign)
Description
The Review step allows verification of all campaign details before launching. This ensures correctness and avoids execution errors.
Edit Option
- An Edit icon is available in the review screen
- On clicking the Edit icon:
- System navigates back to the respective configuration step
- Changes can be made before launching the campaign
Behavior After Launch
- Campaign is activated
- Leads are processed based on Preview Dialer logic
- Agents receive calls first before dialing customers
10. Summary of Review Step
- Review ensures all configurations are correct
- Edit option allows quick modifications
- Lead source determines how data is stored
- Campaign is launched only after confirmation