CRM Configurations
CRM Module Configuration
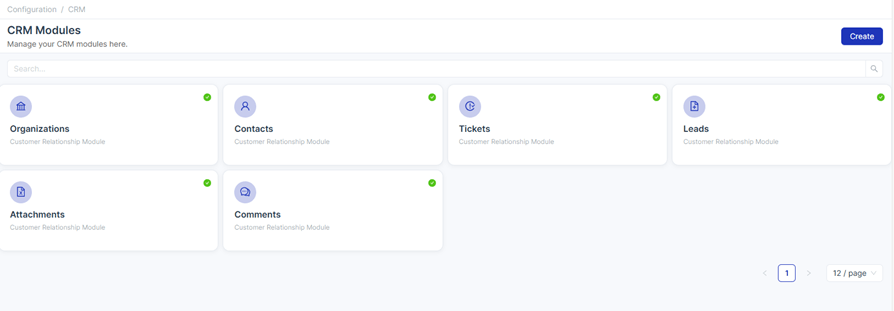
Go to the Configuration section. From there, users can locate and open the CRM Configuration option to manage CRM-related settings and customization.
Creating a New CRM Module
Initially, users can view all the default fields available in the CRM module. To create a new CRM module, follow the same process used for managing default modules. This allows users to customize and extend CRM functionality while maintaining consistency with the existing module structure.
Creating a New Module
To create a new module in Uniconnect Enterprise, follow the steps below:
Steps
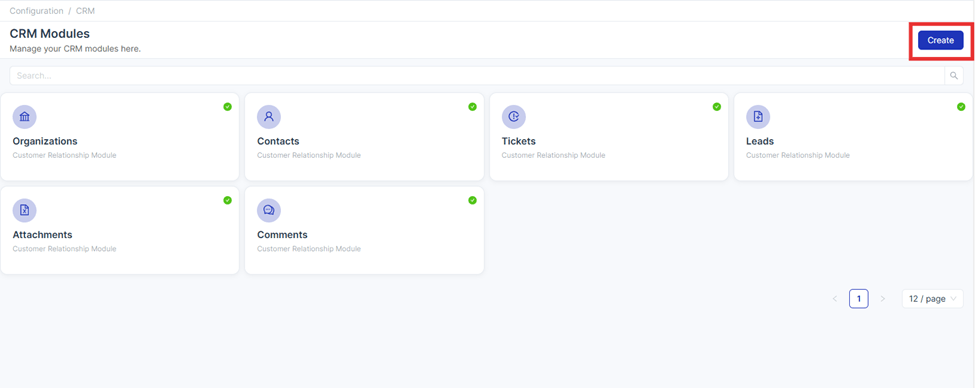
- Click the Create icon located at the top-right corner of the Module Configuration page.
- The system will navigate to the Module Creation Interface, where key details for the new module can be defined.
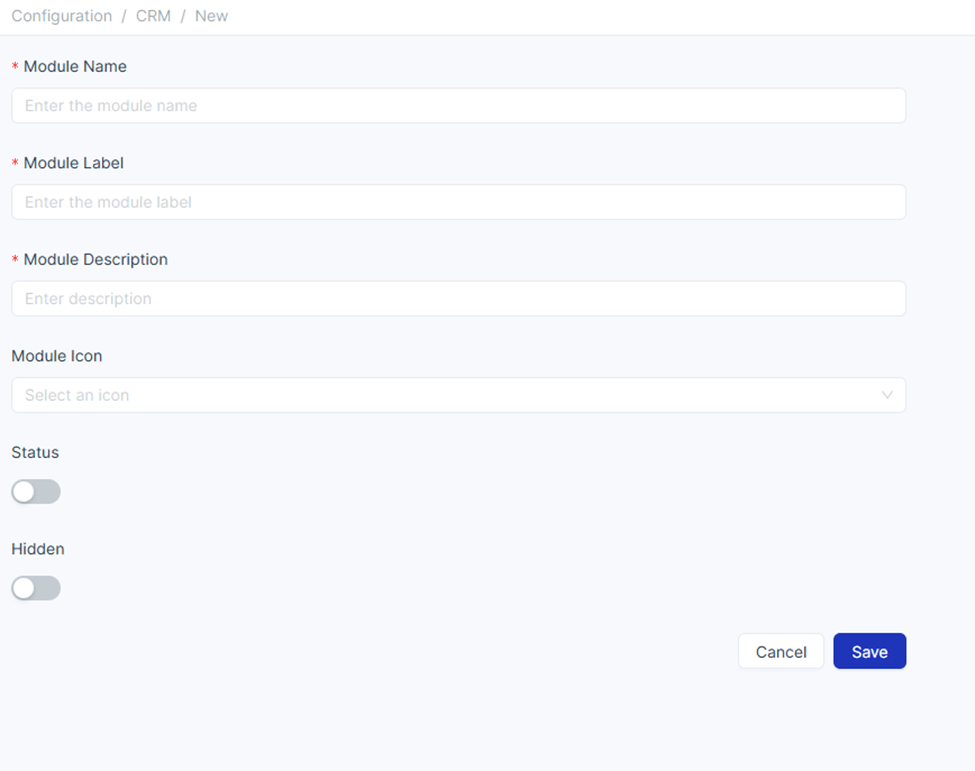
Module Name
- Specify a user-friendly display name for the module.
- This Name is shown in the user interface to help users easily identify the module.
Module Description
- Provide a brief description of the module.
- This helps users understand the module’s purpose and functionality.
Module Icon
- Select an icon from the available dropdown list.
- The selected icon will visually represent the module throughout the application.
Enable Module
- Enable this option to make the module active immediately after creation.
- Once enabled, the module becomes functional within the system.
Hidden Option
- Enable this option to hide the module from the main interface.
Module Visibility and Status Behavior
Once a new module is created, it will appear in the Module Configuration list with its respective status: Active or Inactive.
Initial State of a Module
- A newly created module remains in a preliminary state until at least one field is defined.
- Even if the module is marked as Active, it will not be visible in the CRM Module area until the first field is added.
Hidden Module Behavior
- Users can enable the Hide option to remove the module from the CRM overview module list.
- This action only affects the module’s visibility in the main interface.
Important: If a hidden module has relationships with other modules:
- It will still be accessible within related modules.
- Users can view and interact with its data in:
- Create forms
- Detail views
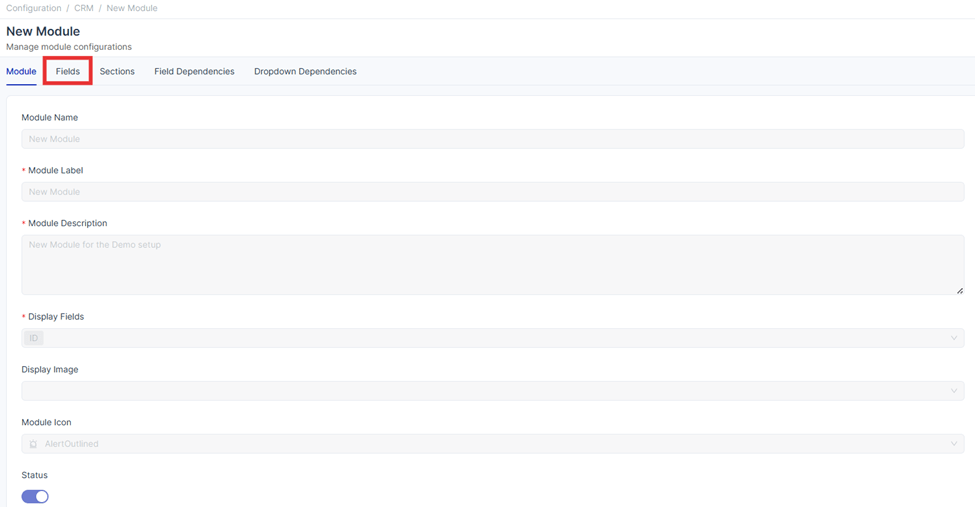
CRM Field Configuration
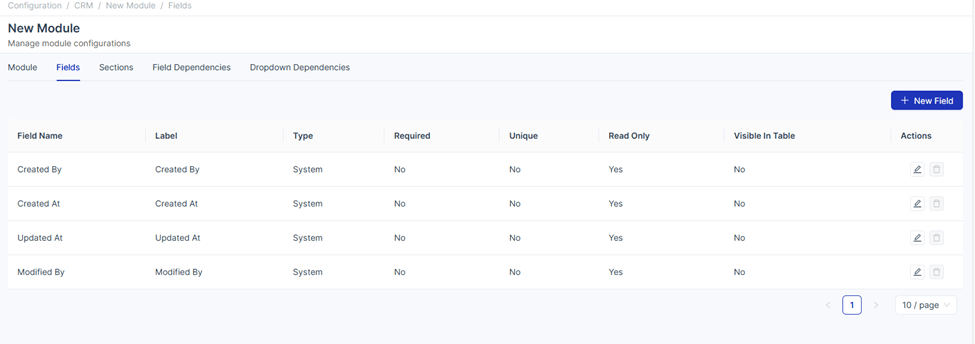
Within the selected module, click on the Fields option. This section allows users to define, manage, and configure the fields that determine the structure and behavior of the module.
Default Fields
After selecting the Fields option within a module, users can view a set of default system-generated fields. These fields are automatically created to maintain essential record information and system traceability.
The default fields include:
- Created By – Displays the name of the user who originally created the record.
- Created At – Indicates the exact date and time when the record was created.
- Updated At – Shows the most recent date and time when the record was updated.
- Modified By – Identifies the user who last modified the record.
Note: These fields are system-controlled and cannot be manually edited or deleted. This ensures accurate audit tracking across all CRM modules.
Creating a New Field
To create a new field within a CRM module, click on the “New Field” button. This will open the field creation interface, where users can select the required Field Type and configure its attributes based on the module’s data requirements.
Uniconnect Enterprise CRM supports a wide range of field types designed to handle different data formats and business needs.
Field Types
1. Text Fields
Short Text
- Used for brief text inputs such as names or titles.
- Users must define:
- Minimum Length
- Maximum Length

Long Text
- Used for extended text inputs such as descriptions or comments.

2. Boolean Field
- Allows users to define a field with two possible values (e.g., True/False).
- Input values can be customized based on business requirements.

3. Rich Text
- Supports advanced text formatting and styling options for better content presentation.

Available Formatting Options
| Category | Option | Description |
|---|---|---|
| Text Style | Heading 1 | Large main heading |
| Text Style | Heading 2 | Medium subheading |
| Text Style | Heading 3 | Smaller subheading |
| Text Style | Normal | Default paragraph text |
| Formatting | Bold | Makes text bold |
| Formatting | Italic | Makes text italic |
| Formatting | Underline | Underlines text |
| Formatting | Link | Adds hyperlink |
| List | Bullet List | Creates unordered list (• • •) |
| List | Numbered List | Creates ordered list (1, 2, 3) |
| Formatting | Clear Formatting | Removes applied formatting |
4. JSON
- Enables structured data storage using JSON format.
- Useful for advanced configurations and integrations.

5. Number Fields
Integer
- Used for whole number inputs.
Decimal
- Used for numerical values with decimal precision.
- Users must define the number of decimal places allowed for input.

6. Email
- Accepts valid email addresses.
- Enforces standard email format validation.
7. Date and Time Fields
- Date & Time – Records both date and time values.
- Date Only – Records only the date.
- Time Only – Records only the time.

Relative Time Option
The Relative Time option allows users to display the remaining or exceeded time based on a selected date and time field.

Enabling Relative Time
- Displays a separate field showing remaining or exceeded time.
- Calculation is based on the selected Date & Time field.
1. Relative Time Format
- Defines how the relative time is displayed.
- Depends on the selected Date & Time field subtype.
2. Color Customization
- Remaining Color – Used when time is still available
- Exceeded Color – Used when time has passed
Example:
- Remaining → Green
- Exceeded → Red
3. Default Value
- Allows setting a default value for the field.
- Can be configured as:
- Current Time
- Ensures alignment with system time.
Example Scenario
- A user selects a deadline (Date & Time).
- The system calculates the difference between the current time and the deadline.
- The result is displayed as:
- Remaining time (if the deadline is in the future)
- Exceeded time (if the deadline has passed)
- The value is highlighted using configured colors.
8. Enumeration
-
Provides a dropdown list of predefined values.
-
Ensures consistent data entry.
-
Once a default value is set, it will automatically appear as the initial value in the create form.

9. Relationship Fields
- Used to establish relationships between modules.
- When creating relationships with system modules, the One-to-Many option is not available.
- One-to-Many relationships can only be created with CRM modules.
Supported Relationship Types:
- One-to-One
- One-to-Many
- Many-to-One
- Many-to-Many

For detailed instructions on configuring relationship fields, please navigate to the Relationship Fields Configuration page.
10. Phone Number
- Accepts phone numbers with country code validation.
- Ensures standardized formatting.

11. Media
- Supports uploading various file types, including:
- CSV
- Images
- Audio Clips
12. Sequence
The Sequence Field Type is used to generate auto-incremented unique values for records.

1. Length
- Defines total number of digits.
- Pads with leading zeros if needed.
Example:
- Length = 5 →
00001
2. Start Number
- Defines the starting value.
Example:
- Start = 1000 →
1000,1001
3. Prefix
- Adds text at the beginning.
Example:
INV-1000
4. Suffix
- Adds text at the end.
Example:
INV-1000-2025
Example Output
If configured as:
- Length = 5
- Start Number = 1000
- Prefix =
INV-- Suffix =
-2025Generated Value:
INV-01000-2025
13. URL Field Type
The URL Field Type is used to capture and store web links.
- Accepts only valid web URLs.
- Includes built-in validation to ensure correct URL format.
Field Configuration Options
The following configuration options are available when creating or editing a field. The visibility of these options may vary depending on the selected Field Type.

Visible in Table
- When enabled, the field will be displayed in the module’s table (list view).
- Helps users quickly view important data without opening individual records.
Unique Field
- Ensures that all values entered in this field are unique across records.
- Prevents duplicate data entry.
Note: This option is not available for all field types. It is only supported for specific field types where uniqueness can be enforced (e.g., URL, number, email).
Required Field
- Makes the field mandatory.
- Users must provide a value before saving a record.
Read Only
- When enabled, the field cannot be edited by users.
- The value is displayed but remains non-editable.
Editable
- Allows users to modify the field value.
- This option is typically enabled by default unless restricted by other settings.
Field Status
- Controls whether the field is active or inactive in the system.
Active Status
- The field is visible and usable in:
- Create forms
- Edit forms
- CRM module views
Inactive Status
- The field will be removed from:
- Create forms
- The respective CRM module interface
Note: Deactivating a field does not delete its existing data. It only hides the field from user interaction.