All Plugin Configurations
How the Plugins page works and how to set up every plugin: AI, speech, SMS, email, WhatsApp, directory sign in and telephony.
Plugin Configuration Overview
How the Plugins page works: turning plugins on, saving, webhook URLs and test messages.
The Plugins Page
The Plugins page lists every outside service that the platform can connect to. A green check means the plugin is turned on. A grey check means it is off. Select a plugin to open its panel on the right. Use this page to connect services such as Mailgun for email and 3CX for telephony.
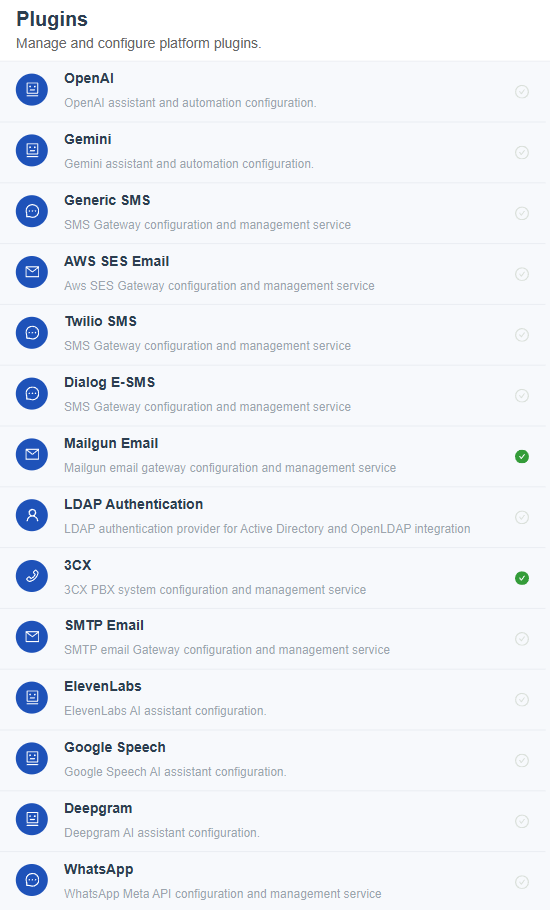
Figure 1. The Plugins page. Mailgun Email and 3CX show a green check because they are on. The other twelve are off.
| Group | Plugins | Used by module |
|---|---|---|
| AI | OpenAI, Gemini | AI Assistant |
| Speech | ElevenLabs, Google Speech, Deepgram | AI Assistant |
| SMS | Generic SMS, Twilio SMS, Dialog E-SMS | Messaging |
| SMTP Email, Mailgun Email, AWS SES Email | ||
| Messaging | ||
| Authentication | LDAP Authentication | Users |
| Telephony | 3CX | Telephony |
Turning On and Saving
- Select the plugin in the list.
- Turn the switch on. The fields for the plugin appear below the switch.
- Fill in the fields. Fields marked with a red star are required.
- Click Save Configuration. The plugin is then ready to be chosen in its module, for example in Email Configurations on the Email module.
Keep the switch off for any plugin you do not use. A plugin that is on but incomplete can leave its module without a working provider.
Webhook URLs
Some plugins show a Webhook URL. It is the address that the outside provider calls to report back, for example the delivery status of an email. The field is read only and has a copy icon at its end.
- Click the copy icon next to the Webhook URL.
- Open the provider portal and find its webhook settings.
- Paste the address and save it there. From then on the provider reports status changes to the platform.
The address is built from the domain of your own installation, so it differs between customers. Always copy it from the plugin panel instead of typing it.
Passwords, Keys and Test Messages
- API keys, passwords and secrets are masked. Use the eye icon at the end of the field to show or hide what you typed.
- Saved secrets stay masked. Type a new value only when the provider issues a new key.
- SMS plugins offer Verify Configuration, which sends a test message to a number you choose, so that you can check the gateway before customers depend on it.
- The 3CX plugin has a Detach button beside the host. It disconnects the platform from the 3CX server.
Store the provider keys in a password manager and paste them from there. It avoids typing mistakes.
OpenAI
Connect an OpenAI account so that the AI Assistant can use its models.
What the Plugin Does
The OpenAI plugin lets the AI Assistant module use OpenAI models. It is the first plugin to set up for an assistant that drafts replies to customer questions.
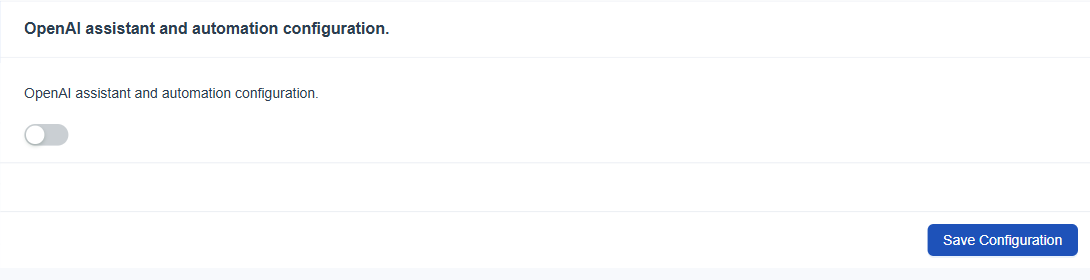
Figure 2. The OpenAI plugin panel with its switch off. Turn the switch on to reveal the Model and API Key fields.
Fields
Turn the plugin on with the switch under its description. The fields below appear once the switch is on.
| Field | Required | What to enter |
|---|---|---|
| Model | Yes | Choose the model: GPT-4o (recommended), GPT-4o Mini, GPT-3.5 Turbo, GPT-4 Turbo, GPT-4.1, GPT-5, GPT-5 mini, GPT-5 nano or GPT-5.1. |
| API Key | Yes | The secret key from your OpenAI account. It is masked after entry. |
Set It Up
- Open the OpenAI plugin and turn the switch on.
- Choose the model. GPT-4o is marked as recommended.
- Paste the API key.
- Click Save Configuration.
- Open the AI Assistant module and choose OpenAI in AI Configurations. See Automations, AI Assistant and Integrations Settings.
A bigger model gives better answers and costs more per use. Start with the recommended model and change it if you need a different balance.
Gemini
Connect a Gemini account so that the AI Assistant can use Google models.
What the Plugin Does
The Gemini plugin lets the AI Assistant module use Google Gemini models. It can run beside OpenAI, and you choose the provider that suits each purpose.
Fields
Turn the plugin on with the switch under its description. The fields below appear once the switch is on.
| Field | Required | What to enter |
|---|---|---|
| Model | Yes | Choose the model: Gemini 2.5 Flash, Gemini 2.5 Flash-Lite, Gemini 2.5 Pro, Gemini Flash Latest, Gemini Flash-Lite Latest or Gemini Pro Latest. |
| API Key | Yes | The key from your Google AI account. It is masked after entry. |
Set It Up
- Open the Gemini plugin and turn the switch on.
- Choose the model.
- Paste the API key.
- Click Save Configuration.
- Choose Gemini in AI Configurations on the AI Assistant module.
The Flash models are quicker and cheaper. The Pro models suit longer, more careful answers.
ElevenLabs
Connect ElevenLabs for speech services.
What the Plugin Does
The ElevenLabs plugin connects the platform to the ElevenLabs speech service. It provides the voice for a voice assistant.
Fields
Turn the plugin on with the switch under its description. The fields below appear once the switch is on.
| Field | Required | What to enter |
|---|---|---|
| API Key | Yes | The secret key from your ElevenLabs account. It is masked after entry. |
Set It Up
- Open the ElevenLabs plugin and turn the switch on.
- Paste the API key.
- Click Save Configuration.
The plugin has a single field, so it takes a minute to set up. Keep the key private.
Google Speech
Connect Google Speech with a service account file.
What the Plugin Does
The Google Speech plugin connects the platform to Google speech services. Instead of a key, it uses a service account file that you download from your Google Cloud project.
Fields
Turn the plugin on with the switch under its description. The fields below appear once the switch is on.
| Field | Required | What to enter |
|---|---|---|
| Google Service Account File | No | Upload the JSON file of the service account from Google Cloud. |
Set It Up
- Create a service account in the Google Cloud project and download its JSON file.
- Open the Google Speech plugin and turn the switch on.
- Upload the JSON file in Google Service Account File.
- Click Save Configuration.
The service account file gives access to the Google project. Share it only with people who manage the integration, and delete the downloaded copy once it is uploaded.
Deepgram
Connect Deepgram for speech to text.
What the Plugin Does
The Deepgram plugin connects the platform to Deepgram speech recognition. It can turn recorded calls into text.
Fields
Turn the plugin on with the switch under its description. The fields below appear once the switch is on.
| Field | Required | What to enter |
|---|---|---|
| API Key | Yes | The secret key from your Deepgram account. It is masked after entry. |
Set It Up
- Open the Deepgram plugin and turn the switch on.
- Paste the API key.
- Click Save Configuration.
If you use more than one speech provider, keep only the ones it needs turned on.
Generic SMS
Connect any SMS gateway that has an HTTP interface.
What the Plugin Does
The Generic SMS plugin connects a gateway that accepts web requests. It is the right choice when your SMS provider is not listed by name. You fill in how the gateway expects each request to look.
Fields
Turn the plugin on with the switch under its description. The fields below appear once the switch is on.
| Field | Required | What to enter |
|---|---|---|
| API URL | Yes | The address that receives the send request. |
| Gateway name | Yes | A name for this gateway, for example Customer SMS. |
| HTTP Method | Yes | POST, GET, PUT or PATCH. The default is POST. |
| Content Type | No | JSON, Form URL Encoded or Multipart Form. The default is JSON. |
| Phone Number Format | No | How numbers are sent: Digits Only (0412345678 becomes 61412345678), Local Format (61412345678 becomes 0412345678), E.164 International (0412345678 becomes +61412345678) or Original, which sends the number unchanged. |
| Auth Type | No | None, Bearer Token, API Key or Basic Auth. The default is None. Fields for the chosen type appear. |
| Error Message Path | Yes | Where to find an error text in the reply. The default is {{data.error[0]}}. |
| Success Path | Yes | Where to find the success flag in the reply. The default is {{data.success}}. |
| Message ID Path | Yes | Where to find the message identifier in the reply. The default is {{data.messageId}}. |
| Status Code Path | No | Where to find a status code in the reply. |
| Message Mapping | Yes | The Location (Body, Query Parameter or Header) and the Parameter Name that the gateway uses for the message text, for example message. |
| Sender Mapping | Yes | The Sender IDs or Numbers to send from, plus the Location and Parameter Name the gateway uses for the sender. |
| Recipient Mapping | Yes | The Location and Parameter Name the gateway uses for the phone number, for example to. |
| Additional Parameters | No | Extra fixed values that the gateway needs. Each has a Value, a Location and a Parameter Name. Use the add button to add more. |
Set It Up
- Read the gateway documentation and note the address, method and parameter names.
- Open the Generic SMS plugin, turn the switch on and enter the API URL and a gateway name.
- Choose the method, content type and phone number format.
- Choose the authentication type and enter its credentials.
- Fill in the response paths so that the platform can read success, errors and message identifiers.
- Fill in the message, sender and recipient mappings.
- Click Save Configuration, then choose Generic SMS in Messaging Configurations on the Messaging module.
Use Verify Configuration after saving. Send a test message to a number that belongs to your organization, before real customers receive anything.
Twilio SMS
Send text messages through Twilio.
What the Plugin Does
The Twilio SMS plugin sends text messages through a Twilio account. Messages are sent from a Twilio number.
Fields
Turn the plugin on with the switch under its description. The fields below appear once the switch is on.
| Field | Required | What to enter |
|---|---|---|
| API URL | Yes | The Twilio API address for your account. |
| Account SID / Username | Yes | The Account SID from the Twilio console. |
| Auth Token / Password | Yes | The Auth Token from the Twilio console. It is masked after entry. |
| Call Back URL | No | The address that receives delivery status updates. |
| From Phone Numbers | Yes | One or more Twilio numbers to send from. Use the add button for more. |
Set It Up
- Open the Twilio console and copy the Account SID and Auth Token.
- Open the Twilio SMS plugin and turn the switch on.
- Enter the API URL, the Account SID and the Auth Token.
- Add the sending numbers in From Phone Numbers.
- Click Save Configuration, then choose Twilio SMS in Messaging Configurations on the Messaging module.
Use Verify Configuration after saving. Send a test message to a number that belongs to your organization, before real customers receive anything.
Dialog E-SMS
Send text messages through a Dialog eSMS account.
What the Plugin Does
The Dialog E-SMS plugin sends text messages through a Dialog eSMS account, with sender names that recipients see in place of a number.
Fields
Turn the plugin on with the switch under its description. The fields below appear once the switch is on.
| Field | Required | What to enter |
|---|---|---|
| Username | Yes | The eSMS account user name. |
| Password | Yes | The eSMS account password. It is masked after entry. |
| Sender Masks | Yes | One or more sender IDs that recipients see. Use the add button for more. |
Set It Up
- Open the Dialog E-SMS plugin and turn the switch on.
- Enter the user name and password of the eSMS account.
- Add the approved sender masks.
- Click Save Configuration, then choose Dialog E-SMS in Messaging Configurations on the Messaging module.
Use Verify Configuration after saving. Send a test message to a number that belongs to your organization, before real customers receive anything.
SMTP Email
Send email through any SMTP server.
What the Plugin Does
The SMTP Email plugin sends email through a mail server that your organization already runs. Use it when all mail must leave through your own gateway.
Fields
Turn the plugin on with the switch under its description. The fields below appear once the switch is on.
| Field | Required | What to enter |
|---|---|---|
| SMTP Host | Yes | The host name or address of the mail server. |
| SMTP Port | Yes | The port of the mail server, for example 587. |
| Use Secure Connection | Yes | Tick to use SSL or TLS for secure transmission. |
| Use Authentication | No | Tick when the server needs a user name and password. |
| Reply-to Email | No | The address that receives replies. |
| From Display Name | No | The sender name that recipients see, for example Support Team. |
| From Emails | Yes | One or more sender addresses. Use the add button for more. |
Set It Up
- Open the SMTP Email plugin and turn the switch on.
- Enter the host and the port.
- Tick Use Secure Connection and Use Authentication as the server requires, and enter the credentials that appear.
- Add the sender addresses and the display name.
- Click Save Configuration, then choose SMTP Email in Email Configurations on the Email module.
Ask the mail administrator which port and security setting the server expects. A wrong pair is the most common reason for mail not leaving.
Mailgun Email
Send email through Mailgun and receive delivery status.
What the Plugin Does
The Mailgun Email plugin sends statements, reminders and other email through Mailgun. You add a sender address, paste the private API key and copy the webhook address into Mailgun.
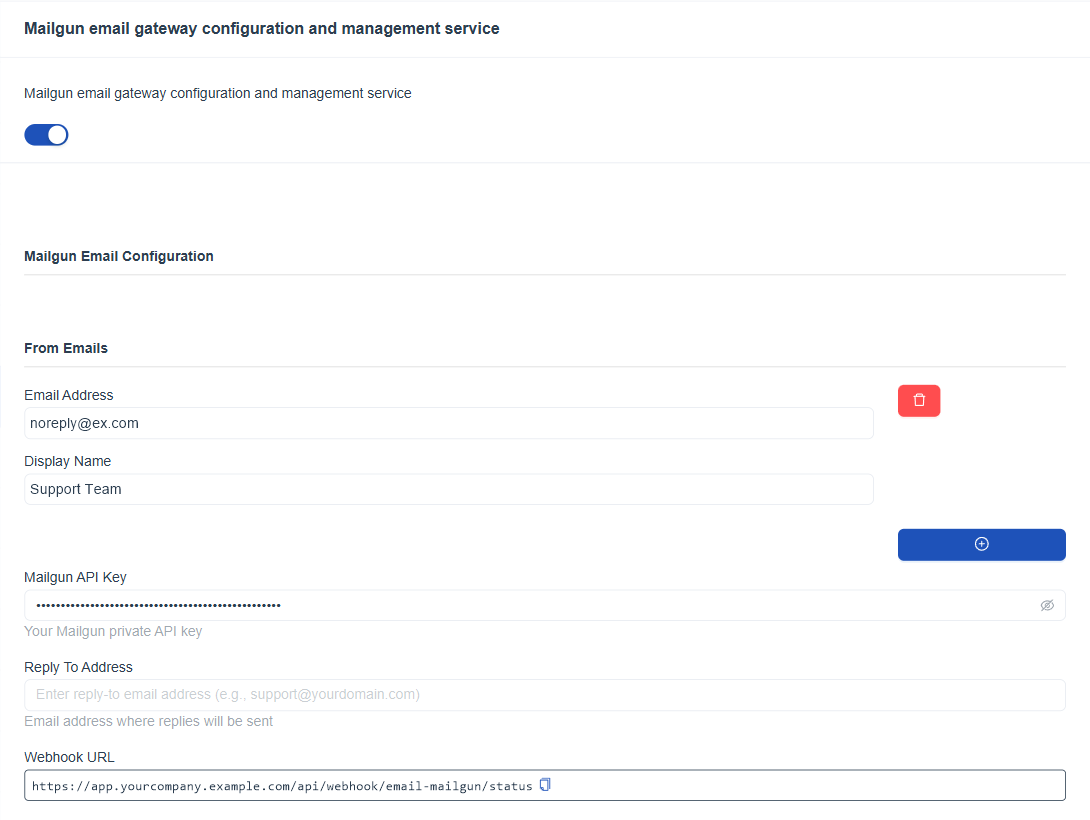
Figure 3. The Mailgun Email plugin, with a sender address and display name, the masked API key and the read only Webhook URL.
Fields
Turn the plugin on with the switch under its description. The fields below appear once the switch is on.
| Field | Required | What to enter |
|---|---|---|
| From Emails | Yes | One or more sender addresses, each with an Email Address and a Display Name. Use the blue add button for another one and the red button to remove one. |
| Mailgun API Key | Yes | The private API key from Mailgun. It is masked after entry. |
| Reply To Address | No | The address where replies are sent. |
| Webhook URL | Read only | The address that Mailgun calls to report delivery status. Use the copy icon. |
Set It Up
- Open the Mailgun Email plugin and turn the switch on.
- Enter the sender address and display name.
- Paste the private API key.
- Enter a Reply To Address if replies should go to a different mailbox.
- Click Save Configuration.
- Copy the Webhook URL and add it in the Mailgun portal. Mailgun then reports delivered, failed and opened events to the platform.
- Choose Mailgun Email in Email Configurations on the Email module.
The sender domain must be set up in Mailgun first. Mail from a domain that Mailgun does not know is rejected.
AWS SES Email
Send email through Amazon Simple Email Service.
What the Plugin Does
The AWS SES Email plugin sends email through Amazon Simple Email Service. It suits large volumes at a low cost.
Fields
Turn the plugin on with the switch under its description. The fields below appear once the switch is on.
| Field | Required | What to enter |
|---|---|---|
| Aws SES Region | Yes | The AWS region that hosts the SES account, for example us-east-1. |
| SES Access Key | Yes | The access key of an AWS user that may send through SES. |
| SES Secret Key | Yes | The secret key of that user. It is masked after entry. |
| From Emails | Yes | One or more sender addresses that SES allows. Use the add button for more. |
Set It Up
- Create an AWS user that may send through SES and note its keys.
- Open the AWS SES Email plugin and turn the switch on.
- Enter the region and both keys.
- Add the allowed sender addresses.
- Click Save Configuration, then choose AWS SES Email in Email Configurations on the Email module.
SES only sends from addresses and domains that you have registered with it. Register them before you add them here.
WhatsApp
Connect the WhatsApp Business platform of Meta.
What the Plugin Does
The WhatsApp plugin connects the Meta WhatsApp Business API, so that you can message customers on WhatsApp. You copy the values from the Meta app dashboard and paste the webhook address back.
Fields
Turn the plugin on with the switch under its description. The fields below appear once the switch is on.
| Field | Required | What to enter |
|---|---|---|
| App ID | Yes | The App ID from the Meta App Dashboard. |
| App Secret | Yes | The App Secret from the App Dashboard. It is masked after entry. |
| Business ID | Yes | The Business ID from Meta Business Manager. |
| Access Token | Yes | A permanent or temporary access token. It is masked after entry. |
| Verify Token | No | The Verify Token that you set in the App Dashboard for the webhook. |
| Webhook URL | Read only | The address that Meta calls with incoming messages and status updates. Use the copy icon. |
Set It Up
- Open the Meta App Dashboard and note the App ID, App Secret, Business ID and a token.
- Open the WhatsApp plugin and turn the switch on.
- Enter the values.
- Click Save Configuration.
- Copy the Webhook URL into the webhook settings of the Meta app, together with the Verify Token.
Prefer a permanent access token. A temporary token expires and messaging then stops until a new one is entered.
LDAP Authentication
Let people sign in with their directory account.
What the Plugin Does
The LDAP Authentication plugin connects Active Directory or OpenLDAP, so that staff sign in with the account they already use. The Login with AD button on the sign in page uses it.
Fields
Turn the plugin on with the switch under its description. The fields below appear once the switch is on.
| Field | Required | What to enter |
|---|---|---|
| LDAP Server URL | Yes | The address of the directory, for example ldaps://ad.example.com:636. |
| Base DN | Yes | The place in the directory where users are searched, for example DC=ad,DC=example,DC=com. |
| AD Domain | Yes | The Active Directory domain name, for example example.com. |
| LDAP Account | Yes | The account that the platform uses to connect to the directory. |
| LDAP Password | Yes | The password of that account. It is masked after entry. |
| LDAP Attributes | No | Extra attributes to read, separated by commas. |
| Self Registration | No | A switch. When it is on, a directory user who signs in for the first time is registered automatically. |
Set It Up
- Ask the directory administrator for a read only service account.
- Open the LDAP Authentication plugin and turn the switch on.
- Enter the server address, base DN, domain, account and password.
- Decide on Self Registration. Leave it off if every person should be invited first.
- Click Save Configuration.
Use the secure address that starts with ldaps whenever the directory supports it.
3CX
Connect the 3CX telephone system.
What the Plugin Does
The 3CX plugin connects the platform to the 3CX server. It synchronizes users and call data, and it can make 3CX a way to sign in. You connect the 3CX server with a client identifier and an API key.
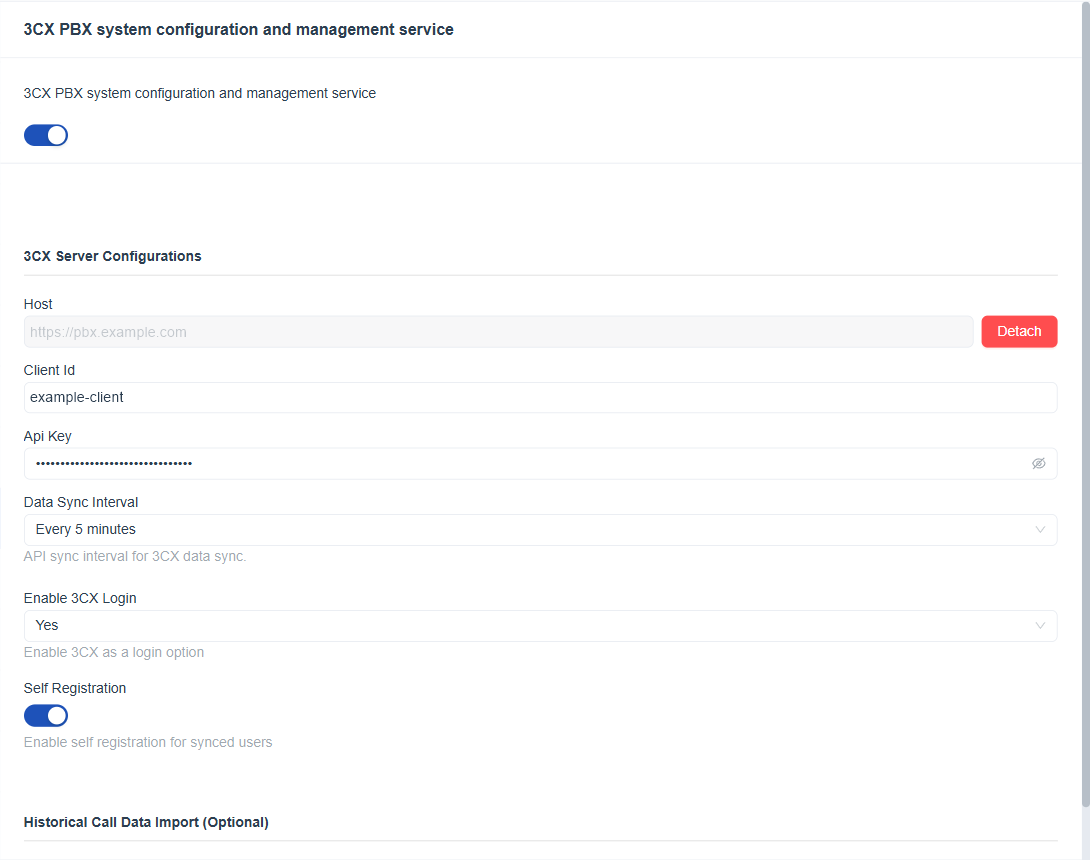
Figure 4. The 3CX plugin, with the host and its Detach button, the client identifier, the masked API key, the sync interval and the login and self registration options.
Fields
Turn the plugin on with the switch under its description. The fields below appear once the switch is on.
| Field | Required | What to enter |
|---|---|---|
| Host | Yes | The address of the 3CX server. Once connected it is locked, and the Detach button removes the connection. |
| Client Id | Yes | The client identifier of the 3CX API application. |
| Api Key | Yes | The API key of that application. It is masked after entry. |
| Data Sync Interval | Yes | How often 3CX data is synchronized, for example Every 5 minutes. |
| Enable 3CX Login | No | Yes makes Login with 3CX available on the sign in page. |
| Self Registration | No | A switch. When it is on, synchronized users can register themselves. |
| Enable Historical Data Import | No | A switch under Historical Call Data Import (Optional). It imports earlier call data from the 3CX server, from the date you choose up to the moment the configuration is saved. |
Set It Up
- Create an API application in the 3CX admin console and note the client identifier and key.
- Open the 3CX plugin and turn the switch on.
- Enter the host, client identifier and API key.
- Choose the data sync interval.
- Decide on Enable 3CX Login, Self Registration and the historical import.
- Click Save Configuration, then choose 3CX in Telephony Configurations on the Telephony module.
The telephony use case and the sign in options are explained in 3CX Plugin Configuration and the Telephony use case.
Use Detach only when you are moving to another 3CX server. It stops synchronization until a host is connected again.