Workflow Builder
Configuration → Automation → a workflow
Opening any workflow, newly created or already built, lands on the same three tabs: Designer, History, and Details. Designer is where the actual logic is built; History and Details manage the workflow as a whole.
Designer
Designer is a visual canvas. Every step in the workflow is a node, dragged in from a Toolbox on the left, connected to the step before and after it, and configured through its own edit panel.
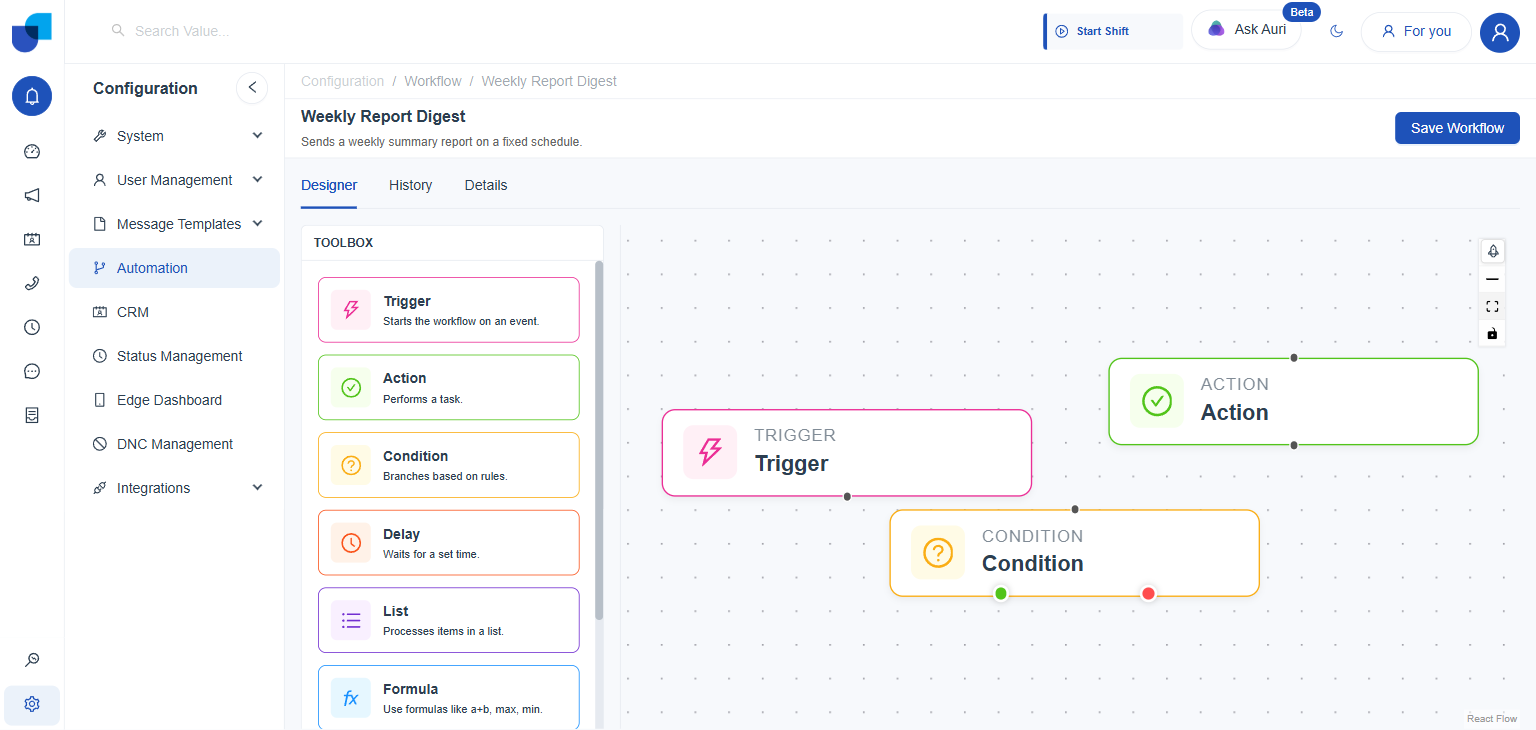
Figure 1. The Designer tab: Toolbox on the left, canvas on the right, Save Workflow in the top corner.
- Drag a node from the Toolbox onto the canvas.
Drop it anywhere; it can be repositioned afterward by dragging it directly. - Click the node's edit icon to configure it.
Opens a panel specific to that node type. A Trigger or Action asks which event or task to use; a Condition opens a rule builder; a Delay asks for a wait time; and so on for every other node. - Connect nodes by dragging from the dot at the edge of one node to the next.
Defines the order the workflow runs in. A Condition node exposes two separate connection points, so its two outcomes can lead to different paths. - Click a node's delete icon to remove it.
Available next to the edit icon on every node except the workflow's own Trigger, which cannot be deleted, only reconfigured. - Click Save Workflow.
Commits the canvas exactly as it stands. Every save becomes its own entry on the History tab.
The canvas corner carries its own controls: zoom in, zoom out, fit view (recentres and rescales the canvas to show every node at once), and a lock icon, which toggles whether nodes can be dragged, to avoid moving something by accident while reviewing a workflow.
The Toolbox
Seven node types are available, each shown with its own color on the canvas and a short description in the Toolbox itself.
| Node | Color | Purpose |
|---|---|---|
Trigger | Pink | Starts the workflow on an event. Every workflow has exactly one. |
Action | Green | Performs a task, such as updating a CRM record, sending a message, or running an AI agent. |
Condition | Yellow | Branches based on rules, sending the workflow down one of two paths. |
Delay | Orange | Waits for a set time before letting the workflow continue. |
List | Purple | Processes items in a list, one at a time. |
Formula | Blue | Calculates a value using functions such as a plus b, max, or min. |
Script | Teal | Runs a short piece of JavaScript, mapping its result back into the workflow for later steps to use. |
Configuring a Condition
A Condition node builds a rule out of one or more comparisons, deciding which of two paths the workflow continues down.
- Click the Condition node's edit icon.
Opens the Edit condition Node panel, with a single, empty rule already in place. - Pick a field, an operator, and a value for the rule.
Select field opens a picker; equals is the default operator, changeable from its own dropdown beside the field. - Add further rules with Rule, or nest a sub-group with Group.
Each addition joins the existing rules using the AND or OR setting at the top of the panel. - Switch AND to OR, or turn on NOT, to change how the rules combine.
AND requires every rule to match; OR requires only one. NOT inverts the result of the group it is set on. - Click Save.
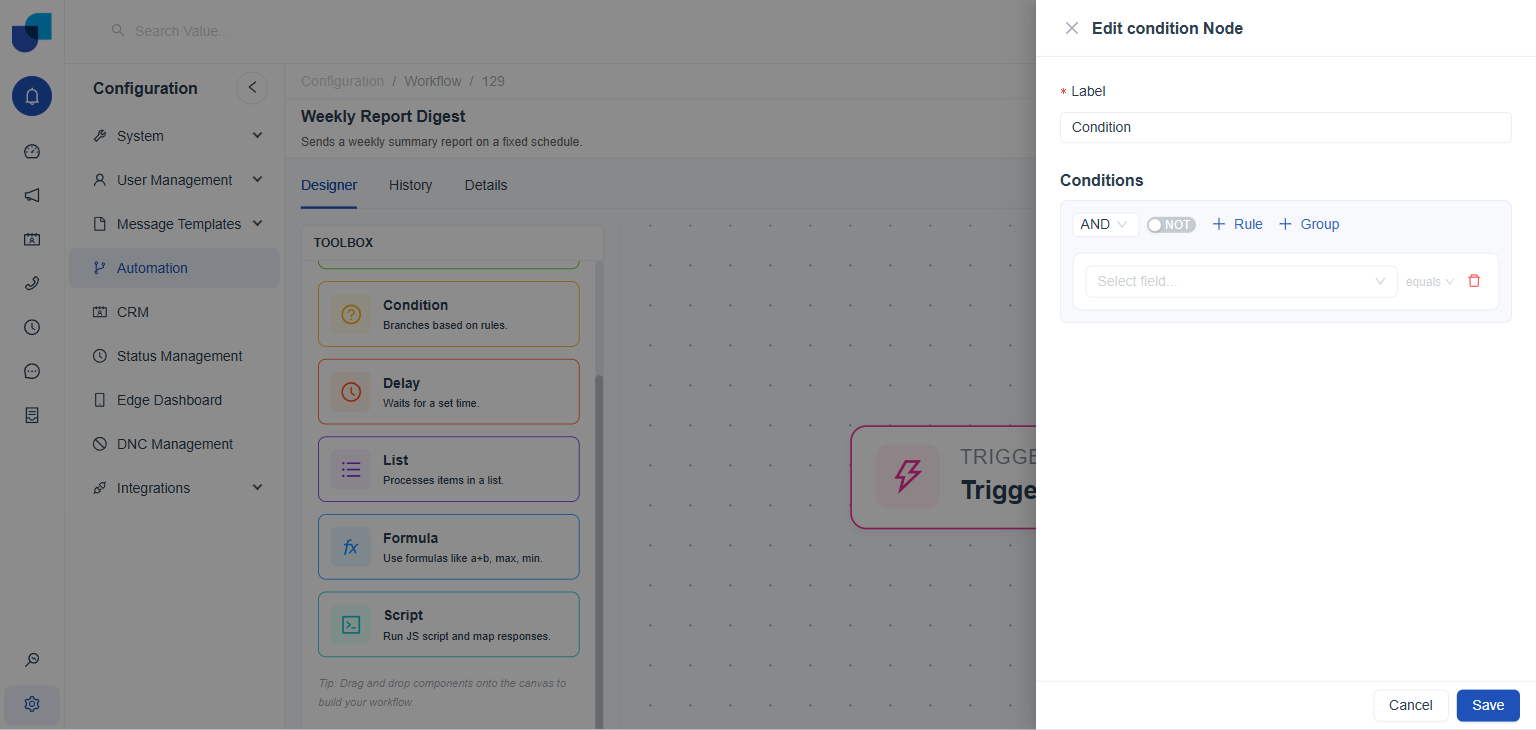
Figure 2. The Edit condition Node panel: AND/OR, NOT, Rule, Group, and a single rule row awaiting a field.
Configuring a Script
A Script node runs custom JavaScript inside the workflow, for logic none of the other node types cover on their own.
- Click the Script node's edit icon.
Opens the Edit script Node panel, with a Script Code editor and a Response Mapping section underneath it. - Write the script in Script Code.
Press Ctrl+Space at any point to trigger autocomplete for the variables already available to the script. - Paste a sample result into Response Mapping's JSON Input.
Generates the output schema automatically, so later nodes can reference the script's result by field name instead of working with raw, unstructured output. - Click Save.
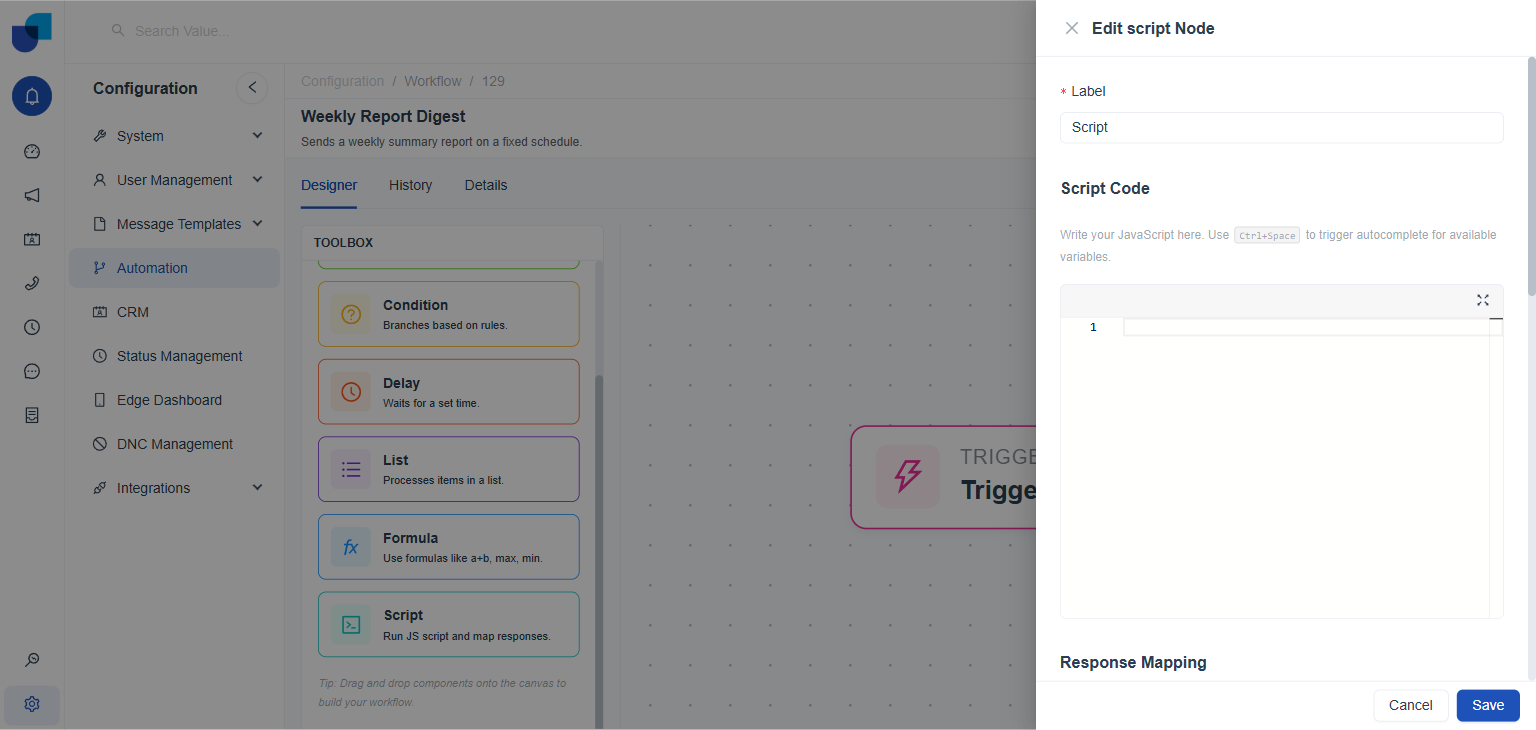
Figure 3. The Edit script Node panel: Script Code above, Response Mapping below.
History
History is the version record of the workflow's own design, separate from any record of it actually running.
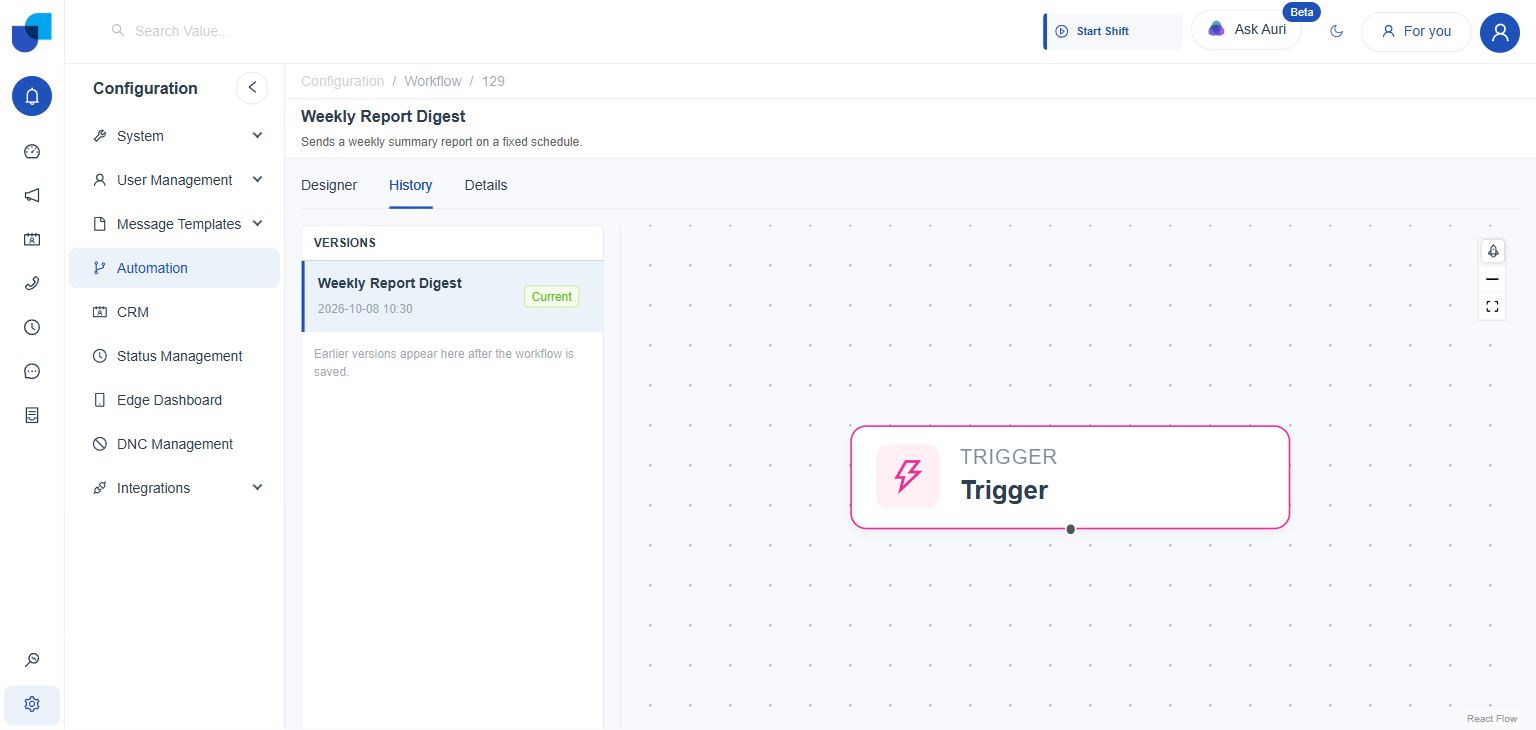
Figure 4. The History tab. The current version is tagged Current; earlier versions, once they exist, are listed above it with their own save timestamp.
- Versions list: one entry per save, newest first, each carrying the date and time it was saved.
- Read-only canvas: selecting a version renders its exact canvas at the time it was saved, viewable but not editable.
Details
Details covers the workflow as a whole: its identity, its active state, and its removal, separate from the step-by-step logic in Designer.
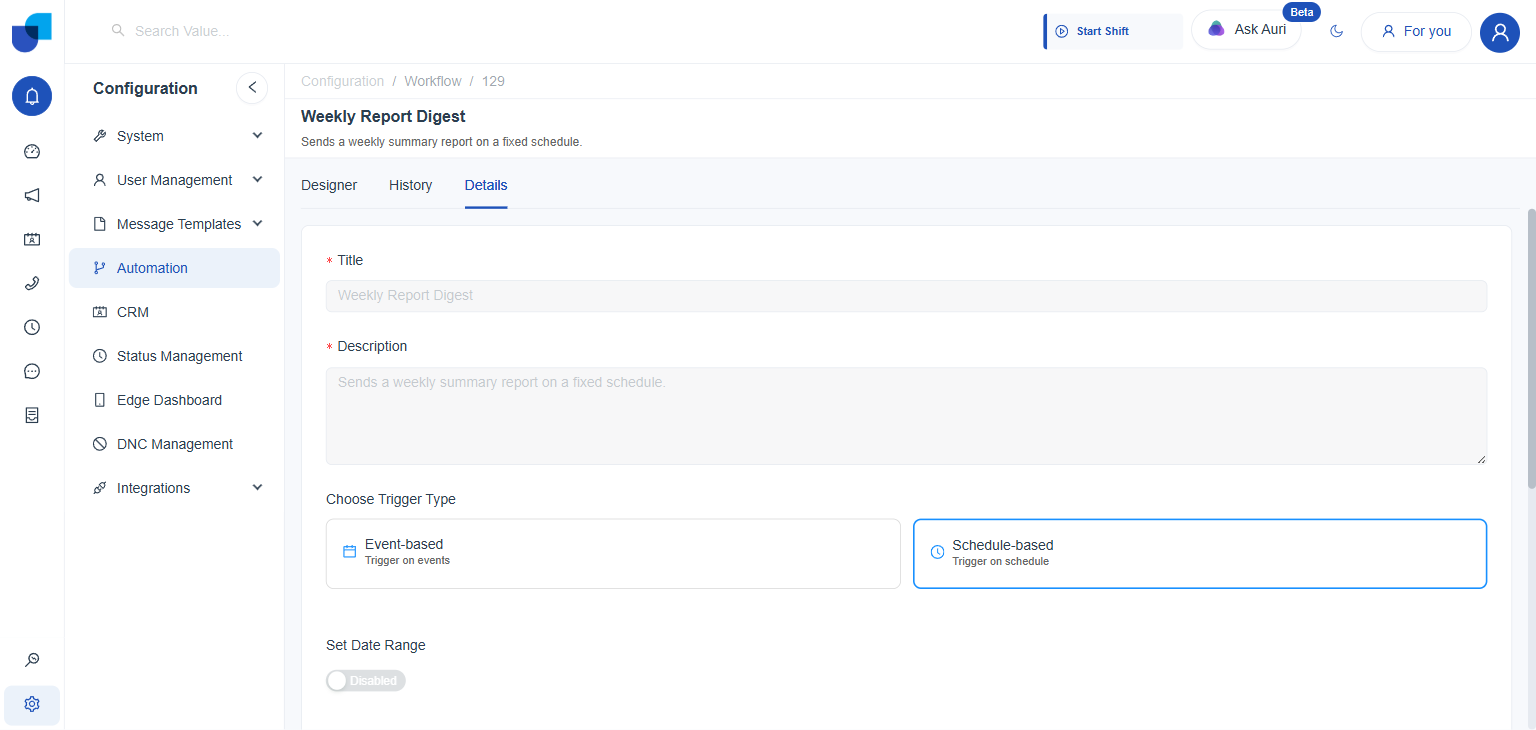
Figure 5. Details opens read-only. Title, Description, Trigger Type, and Date Range are all shown but cannot be changed directly from this view.
- Click Edit Workflow to unlock Title, Description, and Date Range.
Trigger Type stays fixed even in edit mode; it cannot be changed once the workflow has been created. - Use the Status switch to activate or deactivate the workflow.
A short note above the switch states plainly whether the workflow is currently active and will process incoming requests. - Use Delete Workflow to remove it permanently, if it is no longer needed.
A clear warning accompanies the control: deleting a workflow removes it and all its associated data, and the action cannot be undone.
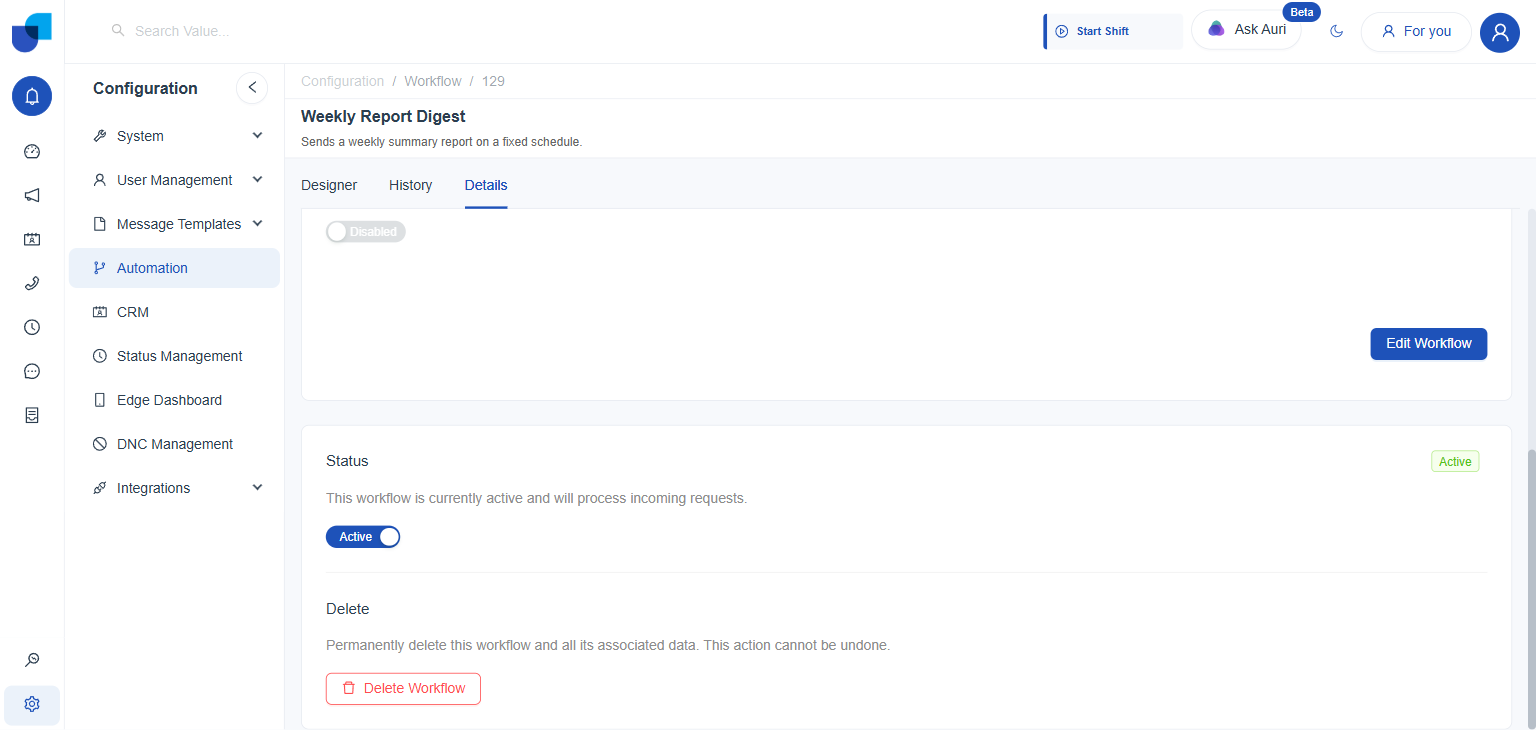
Figure 6. Edit Workflow, the Status switch, and the Delete Workflow control, grouped at the bottom of the Details tab.
Switching Status to inactive is the reversible way to pause a workflow without losing its configuration. Delete Workflow is not reversible; use Status first whenever there is any doubt about whether a workflow might be needed again.