Trigger Categories
Configuration → Automation → a workflow → Designer → Trigger node
Every category of Trigger available on a workflow's Trigger node, documented together in one place: CRM-Related, Scheduled, Campaign-Related, WhatsApp, Email, and Event-Based Webhooks.
Overview
Configuration → Automation → a workflow → Designer → Trigger node
The Trigger node's catalog is organized by module. Most of it is made up of CRM-Related Triggers, one matching set per CRM module, but the catalog also includes system level categories that sit outside the CRM schema entirely: Campaign, WhatsApp, Email, and Scheduled triggers, plus the separate but related mechanism of inbound Webhooks.
| CATEGORY | STATUS |
|---|---|
| CRM-Related | Confirmed live, with real screenshots and the On [Module] Created / Updated / Deleted pattern confirmed. |
| Scheduled | Confirmed live, with Quick Presets and Custom Schedule screenshots confirmed. |
| Campaign-Related | Confirmed live, with real trigger names. |
| Confirmed live, with the real trigger name and its module location. | |
| Confirmed live, with the real trigger name. | |
| Event-Based Webhooks | Webhook creation confirmed live; its appearance inside the Trigger catalog still pending separate confirmation. |
CRM-Related Triggers
Configuration → Automation → a workflow → Designer → Trigger node
CRM-Related Triggers are the single largest group inside the Trigger node's catalog, because every module configured under Configuration → CRM automatically receives its own matching set of record based triggers. These are the triggers used whenever a workflow needs to react to something happening to a CRM record itself, such as a new Lead arriving or a Deal being updated.
Opening the Trigger Catalog
-
Open the workflow's Trigger node and click its edit icon.
Opens the Edit trigger Node panel on the right side of the Designer. -
Filter by Module.
Module chips across the top list every module in the system, including every CRM module such as Leads, Deals, and Contacts. Clicking a chip narrows the Triggers list below it to that module only. -
Or search by name instead.
The search box above the Triggers list filters by the trigger's own name, useful when the module is already known, for example typing Leads Created. -
Pick a trigger from the list.
Each row shows the trigger's name, the module it belongs to, and a short description of exactly what fires it. -
Click Save.
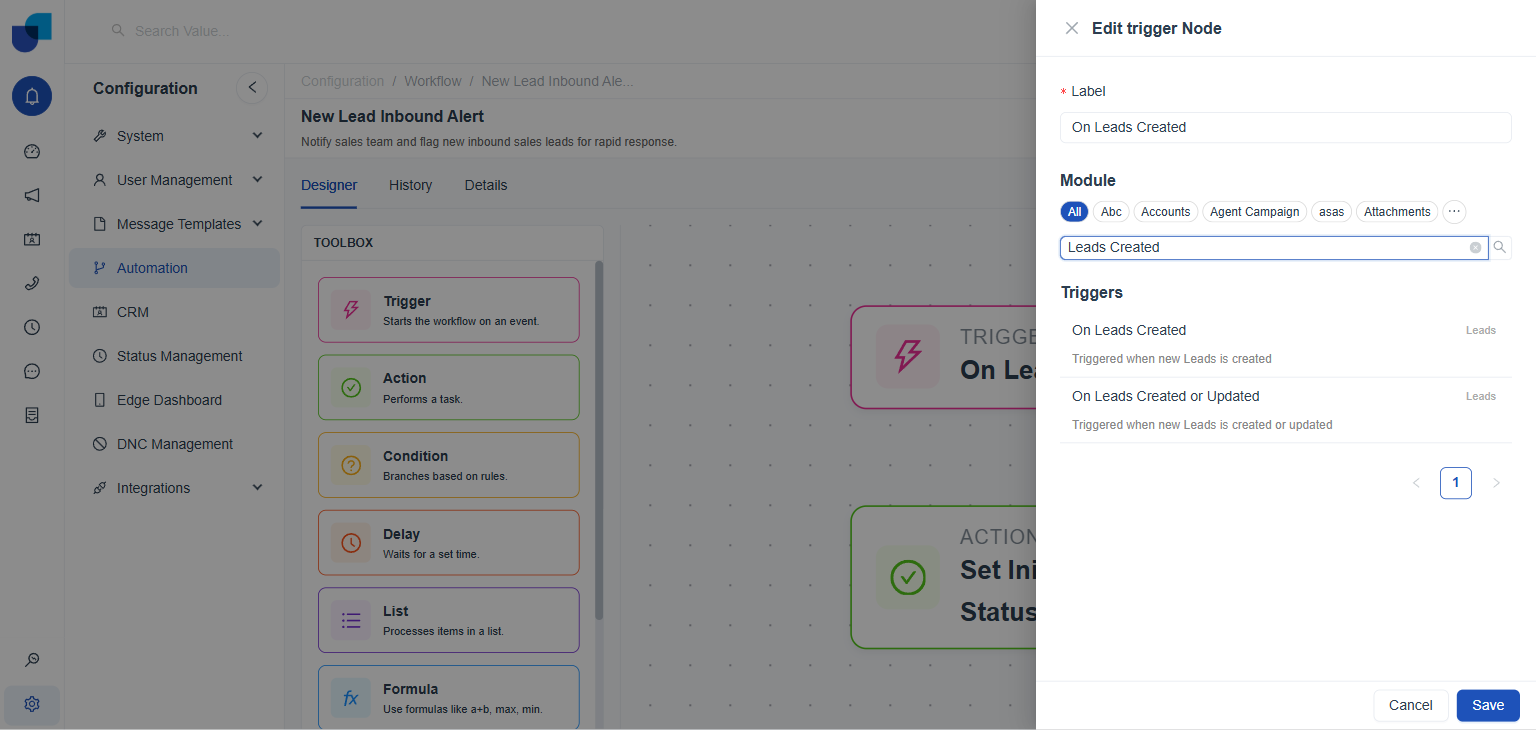 Figure 1. The Edit trigger Node panel, filtered to the Leads module. On Leads Created and On Leads Created or Updated are the two options this module offers.
The Standard Pattern
Every CRM module, Leads and Deals included, exposes the same four shaped set of triggers. Learning this one pattern covers the entire CRM-Related group at once, rather than one module at a time.
| PATTERN | FIRES WHEN |
|---|---|
On [Module] Created | A new record is created in that module. |
On [Module] Updated | An existing record in that module is changed. |
On [Module] Created or Updated | Either of the two above, combined into one trigger. |
On [Module] Deleted | A record in that module is removed. |
A Real Example
On Leads Created, used in the live New Lead Inbound Alert workflow, fires the moment a new record is created in the Leads module, immediately running the workflow's next step.
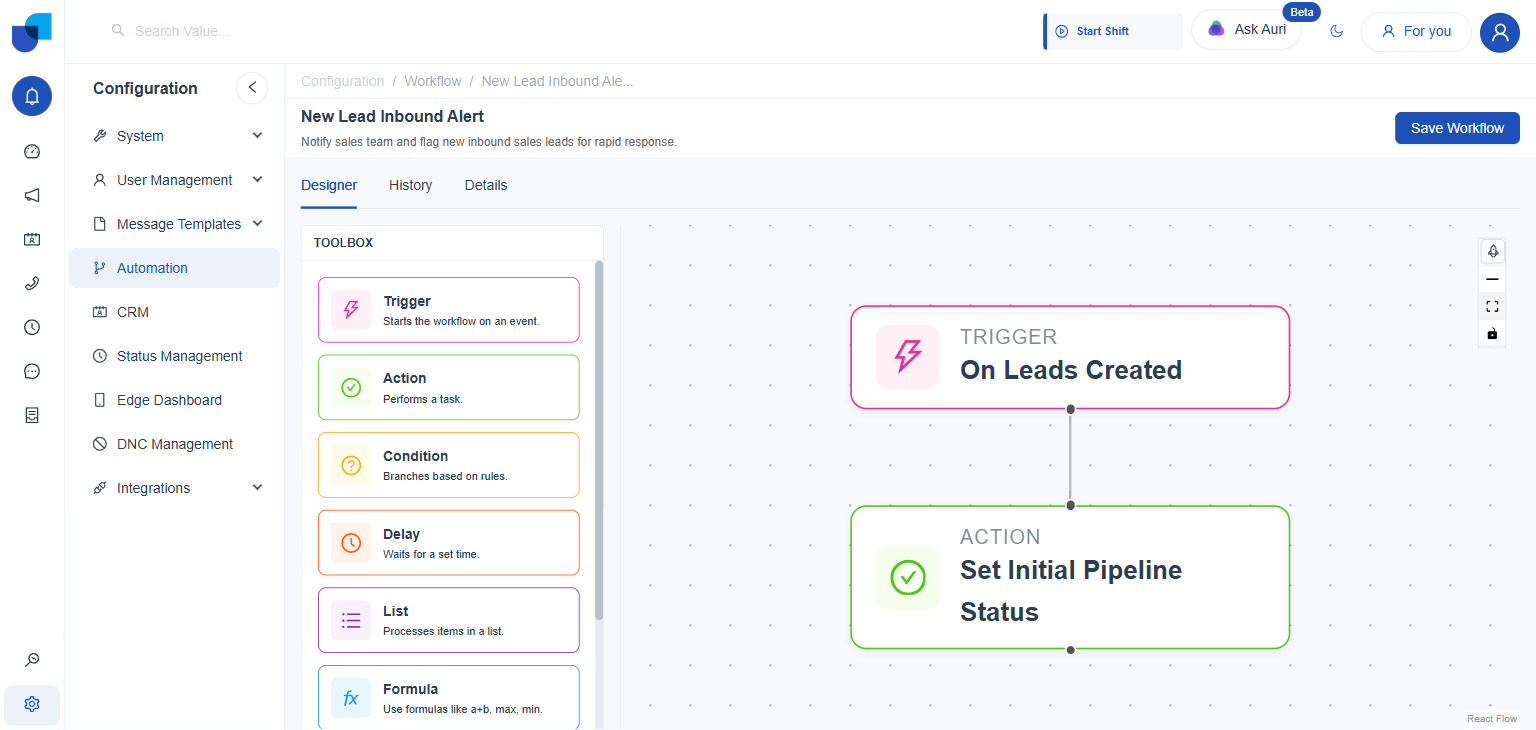 Figure 2. A real CRM-Related Trigger in use: On Leads Created runs Set Initial Pipeline Status as soon as a new Lead exists.
Pick Created or Updated when later steps don't care which happened. One node then covers both cases at once.
Every new CRM module automatically gains these same four triggers. It appears in the catalog without any platform update.
Scheduled Triggers
Configuration → Automation → a workflow → Designer → Trigger node
A Scheduled Trigger does not wait for anything to happen elsewhere in the system. Instead, it fires on a recurring timetable set by the workflow itself, chosen when the workflow is created rather than picked from the same catalog that CRM-Related and other event triggers come from.
Choosing a Scheduled Trigger
-
Set Trigger Type to Schedule-based when creating the workflow.
Chosen in the Create Item panel, before the Designer even opens. This replaces the Module and Triggers picker with a schedule builder on the Trigger node. -
Open the workflow's Trigger node and click its edit icon.
Opens the Edit trigger Node panel, showing a Schedule Configuration section instead of a catalog. -
Choose Quick Presets or Custom Schedule.
Quick Presets covers ten common intervals in a single click; Custom Schedule builds a schedule from individual fields, currently a Frequency, an Hour, and a Minute. -
Click Save.
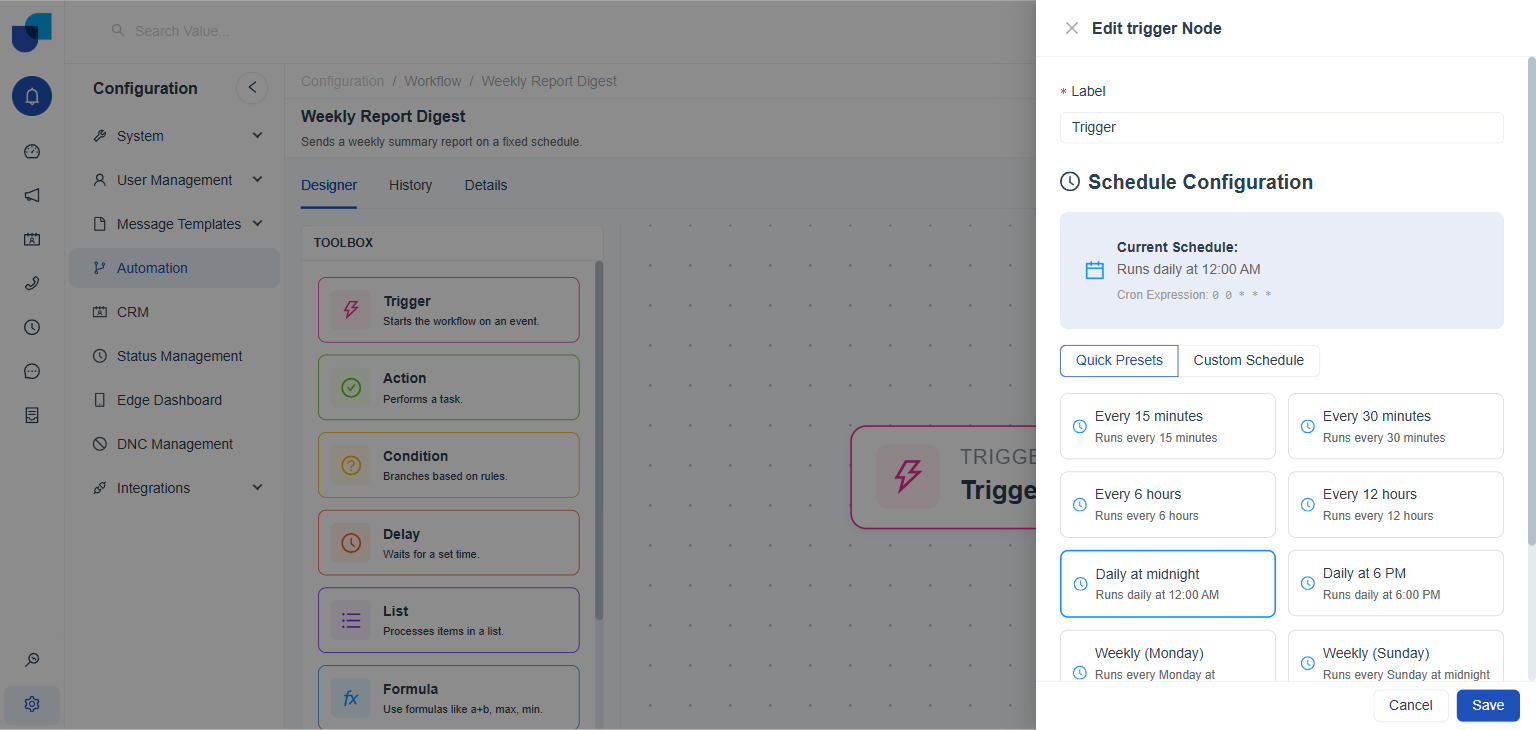 Figure 3. Schedule Configuration, open on Quick Presets. Daily at midnight is selected, shown by its blue outline, matching the Current Schedule summary above.
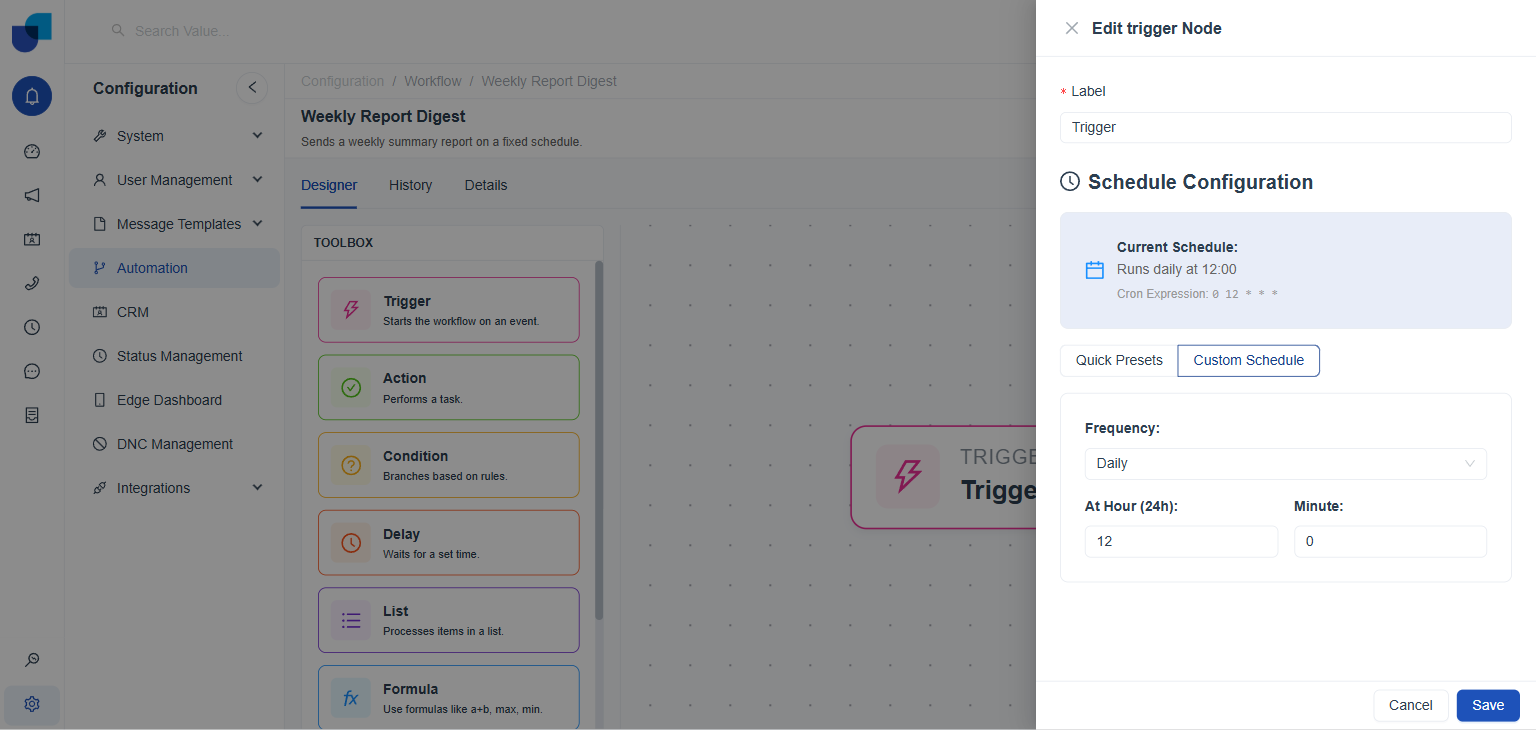 Figure 4. Custom Schedule, set to Daily, asking for the Hour and Minute the workflow should run at.
| PRESET | FIRES |
|---|---|
Every 15 minutes | Every 15 minutes, around the clock. |
Every 30 minutes | Every 30 minutes, around the clock. |
Every 6 hours | Every 6 hours, around the clock. |
Every 12 hours | Every 12 hours, around the clock. |
Daily at midnight | Once a day, at 12:00 AM. |
Daily at 6 PM | Once a day, at 6:00 PM. |
Weekly (Monday) | Every Monday, at midnight. |
Weekly (Sunday) | Every Sunday, at midnight. |
Monthly (1st) | On the first day of every month. |
Yearly (Jan 1st) | On January 1st, every year. |
Whichever method is used, the result is always expressed the same way underneath: as a Cron Expression, shown in the Current Schedule summary, confirming exactly when the workflow will run next.
Filter the Automations list by Trigger Type: Scheduled. It quickly surfaces every recurring workflow in the system.
Date Range still interacts with a schedule once enabled. Runs outside the Start and End Date are simply skipped.
Campaign-Related Triggers
Configuration → Automation → a workflow → Designer → Trigger node
Campaign-Related Triggers start a workflow from something happening inside the Campaign module, rather than from a CRM record or a schedule. Campaign is one of the system level categories available in the Trigger node's Module filter, alongside Telephony and AI Configuration, sitting separately from the per-CRM-module triggers covered above.
Finding a Campaign Trigger
-
Open the workflow's Trigger node and click its edit icon.
Opens the Edit trigger Node panel. -
Open the Module filter chips.
The first handful of modules show as chips directly; a "..." chip opens a search popup covering the full list, including Campaign. -
Select Campaign.
Narrows the Triggers list below to the triggers that belong to the Campaign module only. -
Pick a trigger from the filtered list.
Each row shows the trigger's name, its module, and a short description of what fires it. -
Click Save.
The Confirmed Campaign Triggers
| TRIGGER | FIRES WHEN |
|---|---|
On Campaign Created | A new campaign is created. |
On Campaign Updated | An existing campaign's details are changed. |
On Campaign Deleted | A campaign is deleted. |
On Campaign Paused | A running campaign is paused. |
On Campaign Resumed | A paused campaign is resumed. |
Campaign itself offers four channels, Voice Call, SMS, WhatsApp, and Email, each configured through its own seven step creation wizard. The five triggers above correspond directly to the campaign lifecycle actions available elsewhere in the platform, Pause Campaign and Resume Campaign in particular matching the Campaign-Related Actions of the same name.
WhatsApp Triggers
Configuration → Automation → a workflow → Designer → Trigger node
WhatsApp Triggers start a workflow from activity on the WhatsApp channel, such as a message arriving. WhatsApp is a confirmed, active channel elsewhere in the system, present as one of the four Campaign channels and as its own Message Templates category, as well as its own plugin under Configuration → System → Plugins.
Finding the WhatsApp Trigger
-
Open the workflow's Trigger node and click its edit icon.
Opens the Edit trigger Node panel. -
Filter by Messaging, not WhatsApp.
There is no separate WhatsApp entry in the Module filter. WhatsApp triggers are grouped under the same Messaging module filter that also holds SMS and generic conversation triggers, mirroring how Messaging groups the equivalent Action categories. -
Pick On WhatsApp Message Received from the filtered list.
The confirmed trigger name for this channel. -
Click Save.
On WhatsApp Message Received fires when a new inbound WhatsApp message arrives. There is no separate WhatsApp filter chip; filter by Messaging to find it, the same module filter used for the Messaging Action categories.
Email Triggers
Configuration → Automation → a workflow → Designer → Trigger node
Email Triggers start a workflow from activity on the Email channel. Email is a confirmed, active channel elsewhere in the system, present as one of the four Campaign channels, as its own Message Templates category, and through three dedicated plugins, AWS SES Email, Mailgun Email, and SMTP Email, under Configuration → System → Plugins.
Finding the Email Trigger
-
Open the workflow's Trigger node and click its edit icon.
Opens the Edit trigger Node panel. -
Filter by Email, or search by name.
Email has its own entry in the Module filter, separate from Messaging. -
Pick On Email Received from the filtered list.
The confirmed trigger name for this channel. -
Click Save.
On Email Received fires when a new inbound email arrives through a configured Email plugin.
Event-Based Webhooks
Configuration → Automation → a workflow → Designer → Trigger node
An Event-Based Webhook is intended to start a workflow from an inbound call made by an external system, rather than from a CRM record, a channel, or a schedule. This is distinct from, but closely related to, the Webhook feature confirmed under Configuration → Integrations → Webhook, which is where an inbound URL for receiving that external call is actually created.
Creating the Inbound Webhook
-
Go to Configuration → Integrations → Webhook.
Lists every webhook already configured, with a Create option available. -
Click Create Webhook.
Opens a dialog that generates an inbound URL immediately, in the formhttps://dev.uniconnect.ai/webhook/webhook-name-[uuid]. -
Enter a Name and Description.
Identifies the webhook in its list and on the workflow side once it is referenced. -
Paste a sample payload into the JSON Input box.
The platform reads the sample and automatically generates a schema from it, the same pattern used for Response Mapping in a Script node and for the Res Schema on a CRM External Module. -
Save the webhook.
The inbound URL is now live and ready to receive calls from the external system.
Connecting it to a Trigger
With the webhook created, the expectation, consistent with every other trigger category, is that an Event-Based workflow's Trigger node would list it by name under a Webhook module in its catalog, firing the moment the external system calls the generated URL.
Webhook creation itself is confirmed live and working. Whether it then appears in the Trigger catalog remains to be confirmed separately in your own environment.
What is Confirmed Today
| PIECE | STATUS |
|---|---|
| Webhook creation, inbound URL generation, and schema mapping | Confirmed live, in Configuration → Integrations → Webhook. |
| A created webhook appearing inside the Trigger node's catalog | Not yet confirmed; verify directly in your own environment. |