How to Configure Automation Use Cases in UNICONNECT AI
This is the technical companion to the Automations Use Case Scenario, which narrates why AUS Bank built these two workflows. This page documents exactly what was configured live in UNICONNECT AI to build the complete designs, including every branch, delay, list, and formula step.
Adding the Case Status Field
The Service Cases module, as built earlier in the CRM use case, had no field recording whether a case was still open. Both automations depend on that state, so a new field was added first.
- Open Configuration → CRM → Service Cases → Fields, and click New Field.
- Pick Enumeration, name it Case Status, and add three values. Open, In Progress, Resolved.
- Set the Default Value to Open, and click Save. Every case logged from this point on starts in the Open state without the agent having to set it by hand.
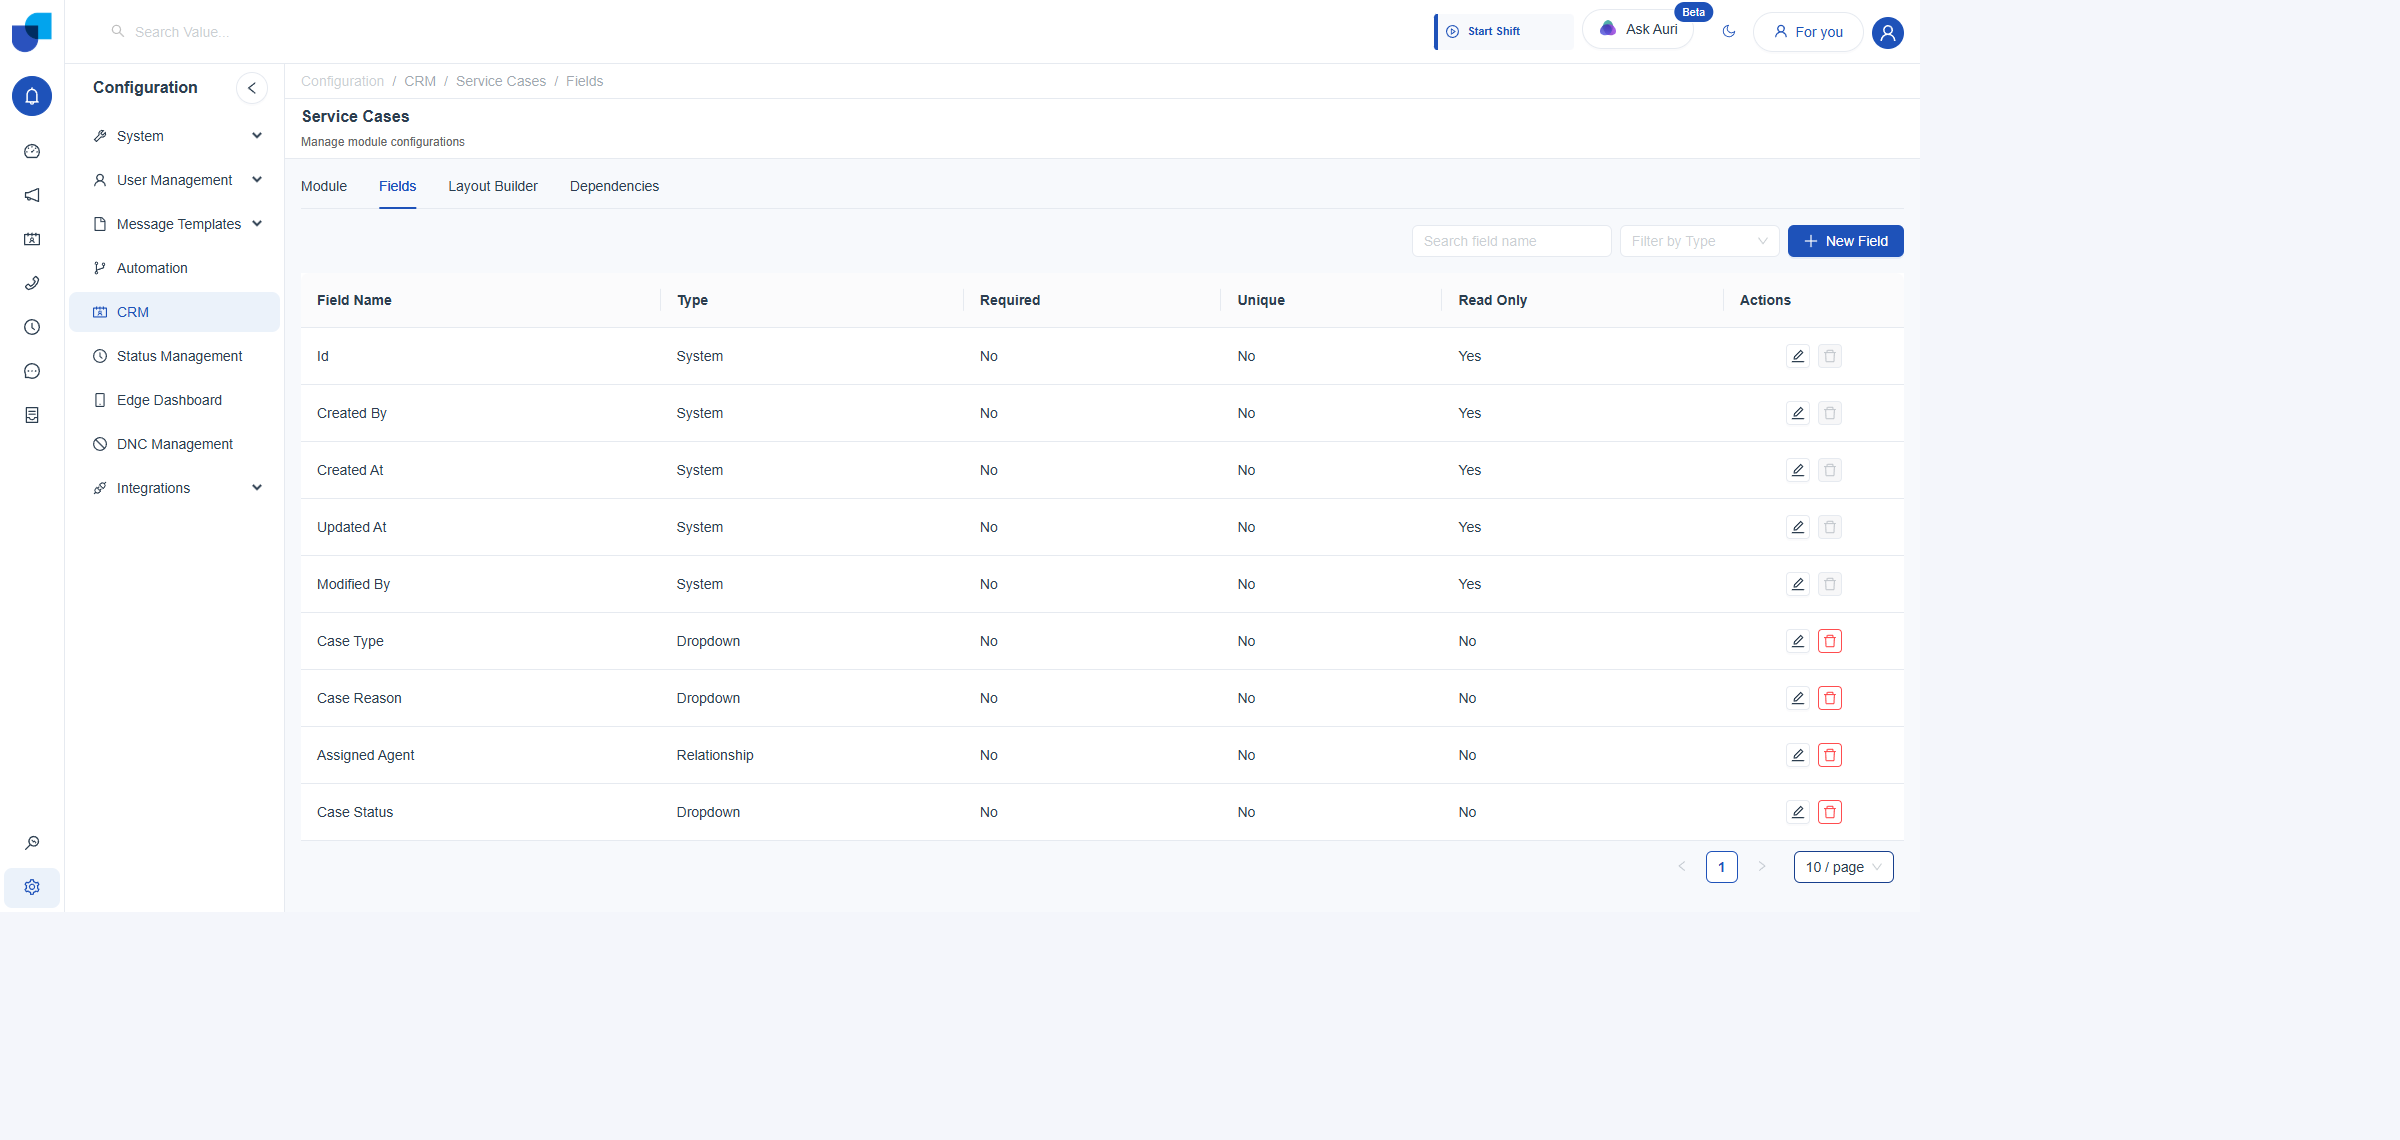
Figure 1. Case Status, added as a Dropdown field alongside the three fields from the CRM use case.
Building New Case Alert & Escalation
Created from Configuration → Automation → Create, with Trigger Type set to Event-based, title New Case Alert & Escalation, and the description carried over from the scenario. The finished workflow is nine nodes: a Trigger, an immediate notification, a branch on case type, a delay, a re-fetch of the case, a branch on whether it's still unresolved, a Script node that resolves the right supervisor, and two escalation actions, one email and one SMS.
- Add a Trigger node, and set it to On Service Cases Created. Selected from the CRM-Related trigger catalog, filtered to the Service Cases module. This fires once, the instant a case record is saved.
- Drag an Action node onto the canvas, connect it to the Trigger, and set it to Send Email Notification.
to:
agent@example.com· subject: New Service Case Assigned to You. Typed as plain values rather than dynamic mentions, since there's nothing to look up yet at this point in the chain. - Drag a Condition node onto the canvas, connect it after the Action, and label it Is Case Type Fraud Alert?
Rule:
Case Type(selected via the "@" dynamic mention, resolving back through the chain to the Trigger's record)equalsFraud Alert. - Drag a Delay node onto the canvas, connect it to the Condition's true branch, label it Wait SLA Window, and set Hours to 2. Days, Minutes, and Seconds left blank. Two hours stands in for the fraud-alert SLA window described in the scenario.
- Drag a second Action node onto the canvas, connect it after the Delay, and label it Get Record Service Cases By ID.
Record ID set via the "@" dynamic mention to
Id (Current), the Trigger's own record ID, so the case is re-fetched fresh after the wait, picking up any status change made in the meantime. - Drag a second Condition node onto the canvas, connect it after that Action, and label it Is Case Still Unresolved?
Rule:
Case Status(selected from the re-fetch Action's output, not the original Trigger's)does not equalResolved. - Drag a Script node onto the canvas, connect it to the second Condition's true branch, and label it Resolve Supervisor. The script reads the case's Case Type, looks it up against a map of service line leads, and returns the matching name, email, and phone, falling back to the Contact Center Director if a Case Type has no specific lead yet. Covered in full below.
- Drag two more Action nodes onto the canvas, both connected from the Script node, and set them to Send Email Notification and Send SMS. Label them Escalate to Supervisor (Email) and Escalate to Supervisor (SMS).
- Click Save Workflow. Confirmed by reloading the page: every node, every edge, and every field value persisted exactly as configured.
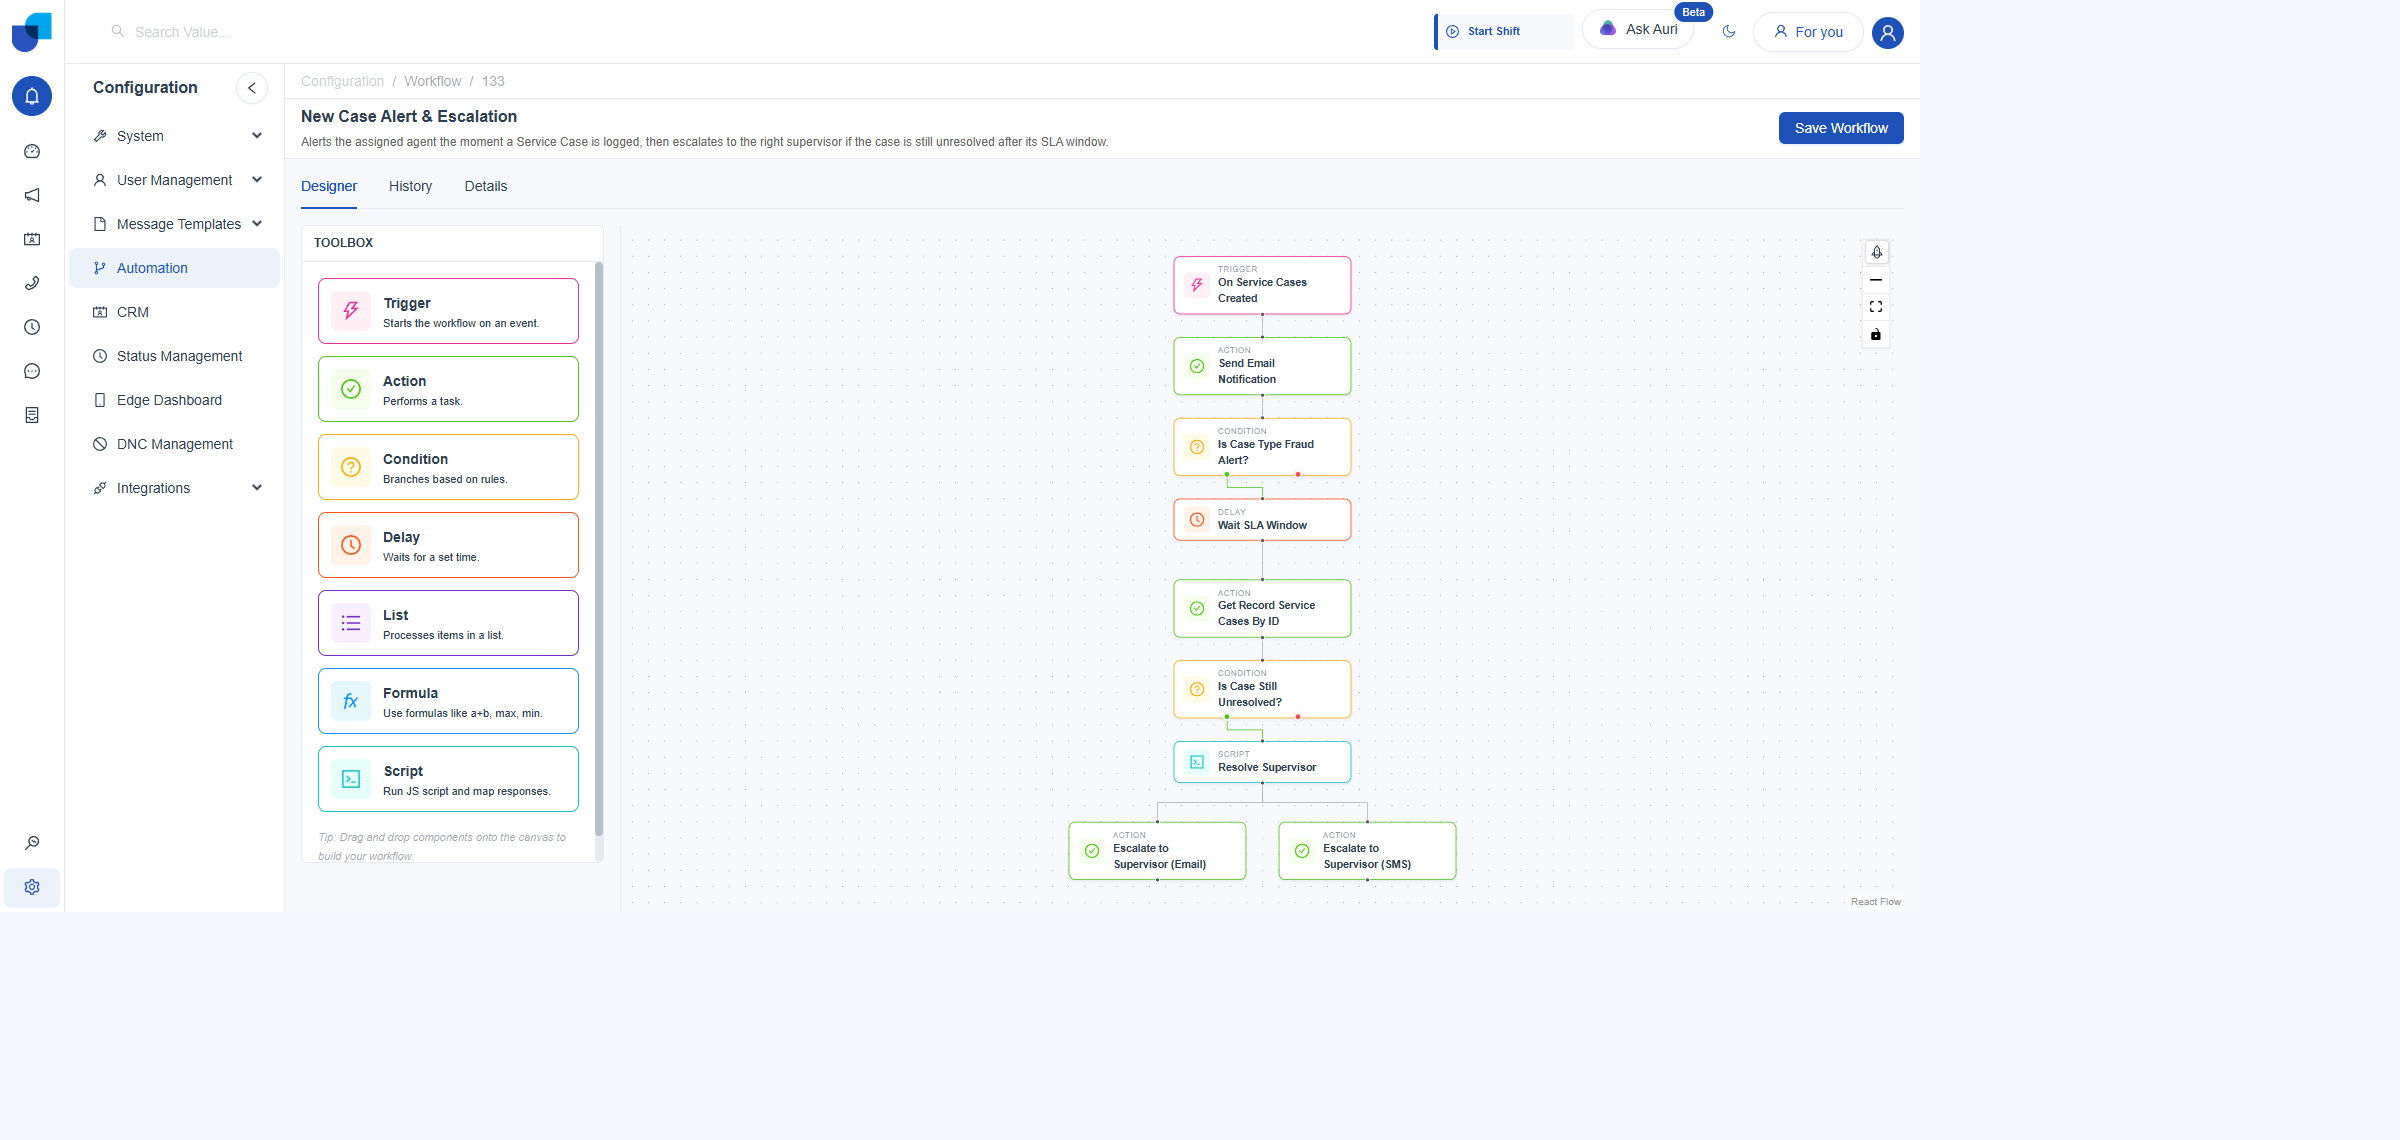
Figure 2. The complete nine-node chain, reloaded fresh from the backend to confirm every node and edge saved.
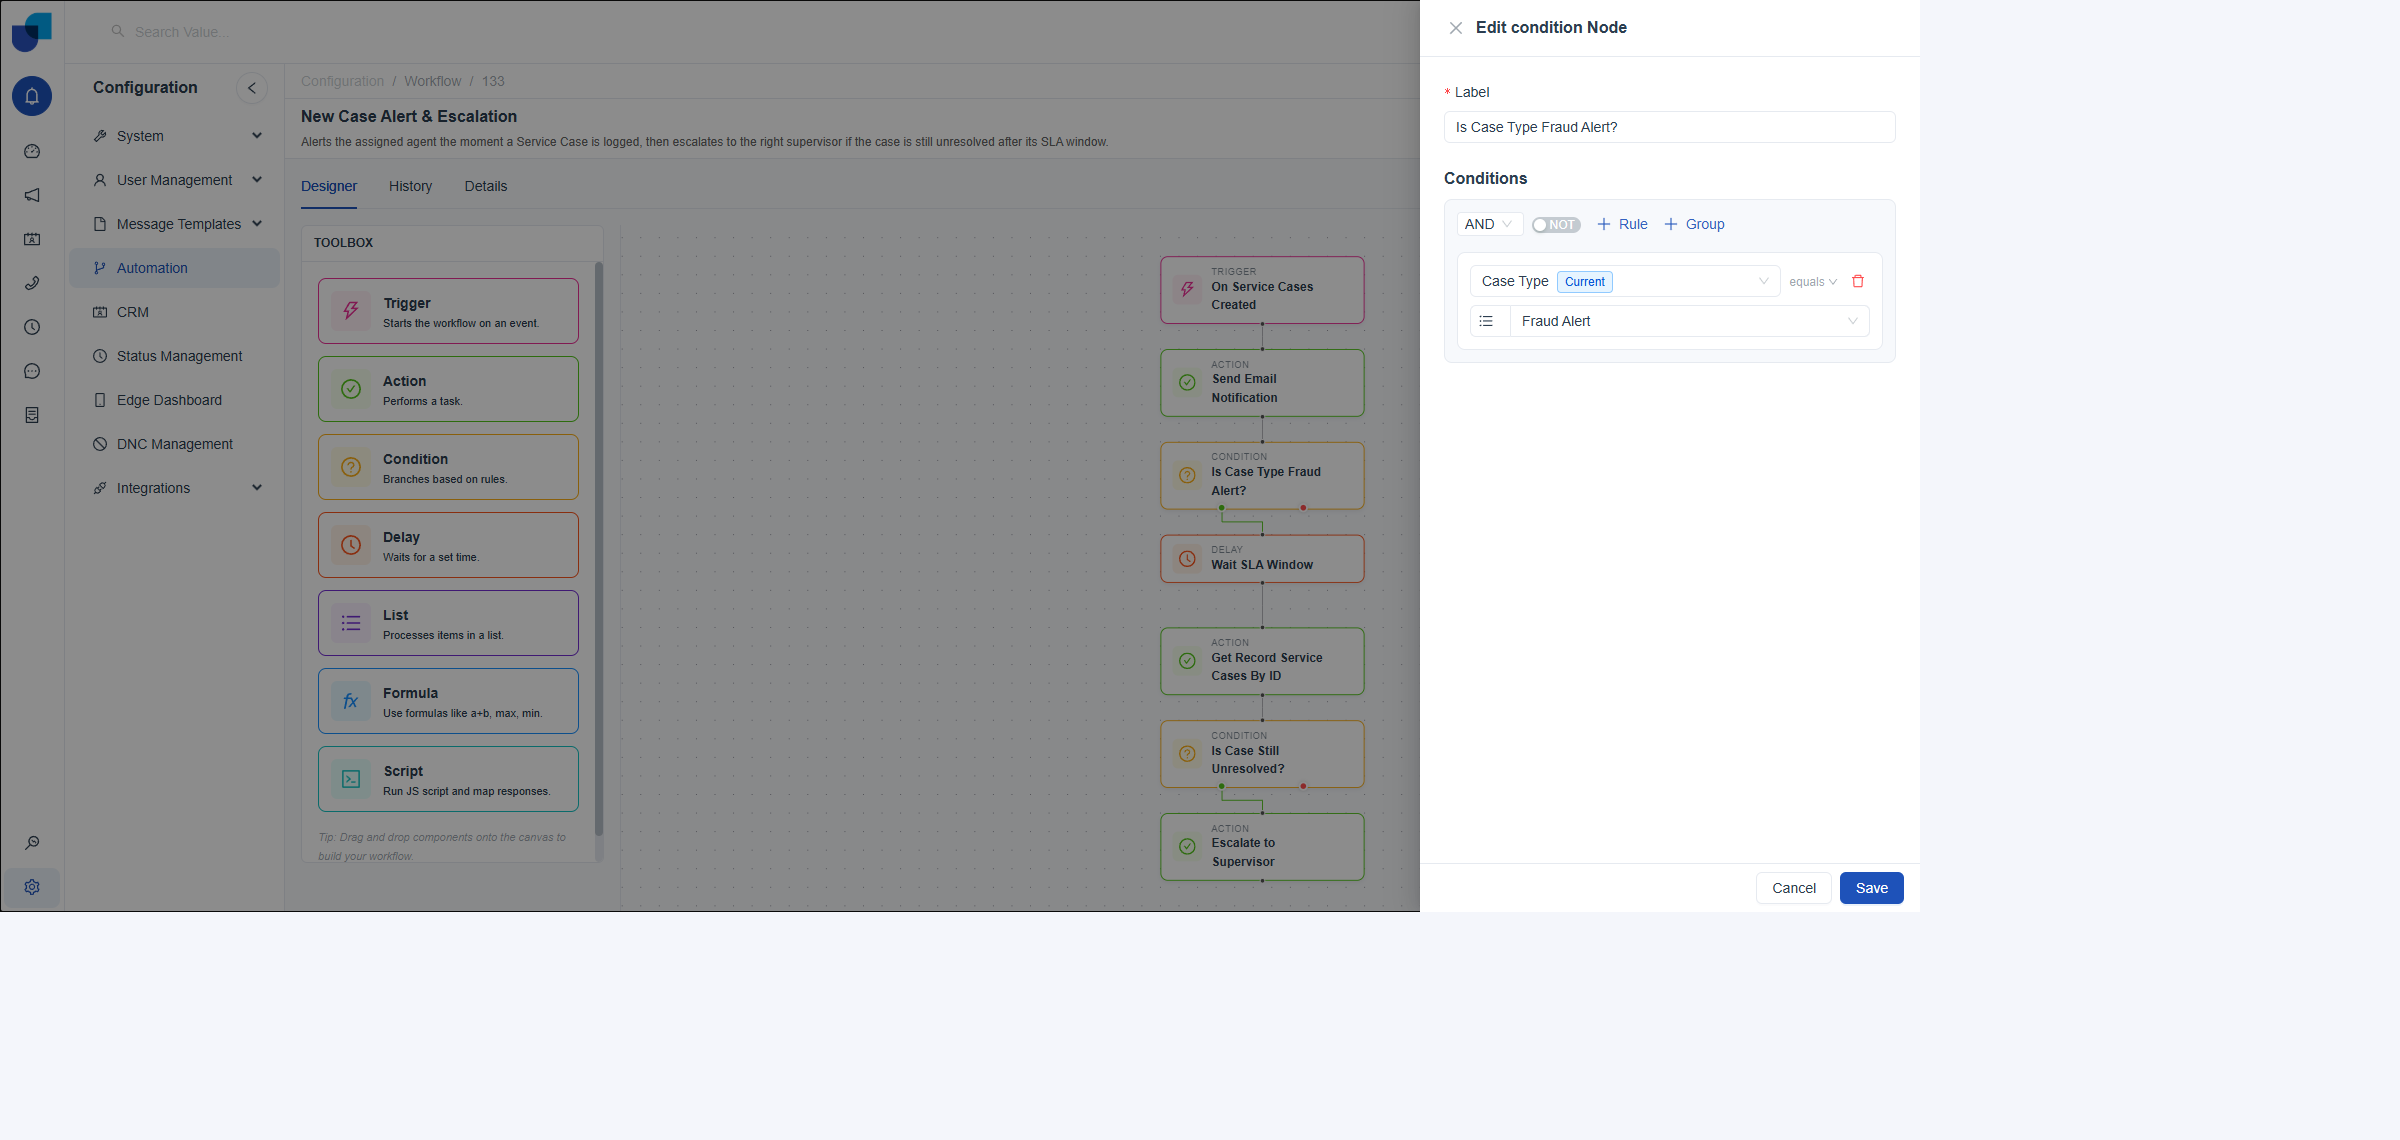
Figure 3. The Case Type branch, with its field populated live from the Trigger's record via the "@" dynamic mention.
| Node | Configuration |
|---|---|
| Trigger | On Service Cases Created |
| Action: Send Email Notification | to: agent@example.com · subject: New Service Case Assigned to You · text: A new Service Case has just been logged and assigned to you. Please review it as soon as possible. |
| Condition: Is Case Type Fraud Alert? | Case Type (Current) equals Fraud Alert |
| Delay: Wait SLA Window | Hours: 2 |
| Action: Get Record Service Cases By ID | Record ID: Id (Current, from the Trigger) |
| Condition: Is Case Still Unresolved? | Case Status (from the re-fetch Action) does not equal Resolved |
| Script: Resolve Supervisor | Looks up (action_3.caseType) against a lookup table, returns supervisorName, supervisorEmail, supervisorPhone |
| Action: Escalate to Supervisor (Email) | to: supervisor@example.com (literal, see note below) · subject: Service Case Overdue - Immediate Attention Needed |
| Action: Escalate to Supervisor (SMS) | Recipient Phone Number: +1 555 0100 (literal, see note below) |
Building the Nightly SLA Sweep
Created the same way, with Trigger Type set to Schedule-based, title Nightly SLA Sweep, and the matching description. The finished workflow is eight nodes: a Trigger, a bulk fetch of open cases, a List node to iterate them, a Formula node to compute each case's age, a Condition to flag the aged ones, the same Script-based supervisor lookup used in the first workflow, and the same two escalation actions.
- Open the Trigger node, and confirm the schedule.
The dialog defaults to Daily at midnight (cron
0 0 * * *) under Quick Presets, which matches a nightly sweep exactly, so it was kept as-is and saved. - Drag an Action node onto the canvas, connect it to the Trigger, and set it to Get All Records Service Cases By Filter. Found by searching the action picker for the module name. It is listed under the Service Cases module group.
- Set the Filter field to a saved filter. The Filter field only offers two input modes: a saved-filter reference, or an "@" dynamic mention, and there's no upstream node here to mention from. A saved filter was created on the Service Cases list screen first (filter icon → Case Status In Open → Save Filter, named Open Cases), then selected here.
- Drag a List node onto the canvas, connect it after the Action, and label it List.
Select List Data Field set via the "@" dynamic mention to
Get All Records Service Cases By Filter :data, the array the Action produced. Processing Item Pattern: All. - Drag a Formula node onto the canvas, connect it after the List, and label it Case Age.
Function:
DATE_DIFF. Start Date:Created At, selected from the List's current-item fields. End Date: nested functionNOW, via the field's own fx picker. Unit: direct valuehours. - Drag a Condition node onto the canvas, connect it after the Formula, and label it Has Case Aged (SLA Check)?
Rule:
Case Age Value(the Formula node's own output, expanded one level from the top-level "Case Age" tree entry)is not empty. See the warning below on why this checks presence rather than a numeric threshold. - Drag a Script node onto the canvas, connect it to the Condition's true branch, and label it Resolve Supervisor.
Identical lookup logic to the first workflow, reading
(bulk_1.caseType)from the List node's current item instead of a re-fetched record. - Drag two more Action nodes onto the canvas, both connected from the Script node, and set them to Send Email Notification and Send SMS. Label them Escalate Aged Case (Email) and Escalate Aged Case (SMS).
- Click Save Workflow. Confirmed by reloading the page: all eight nodes and seven edges persisted.
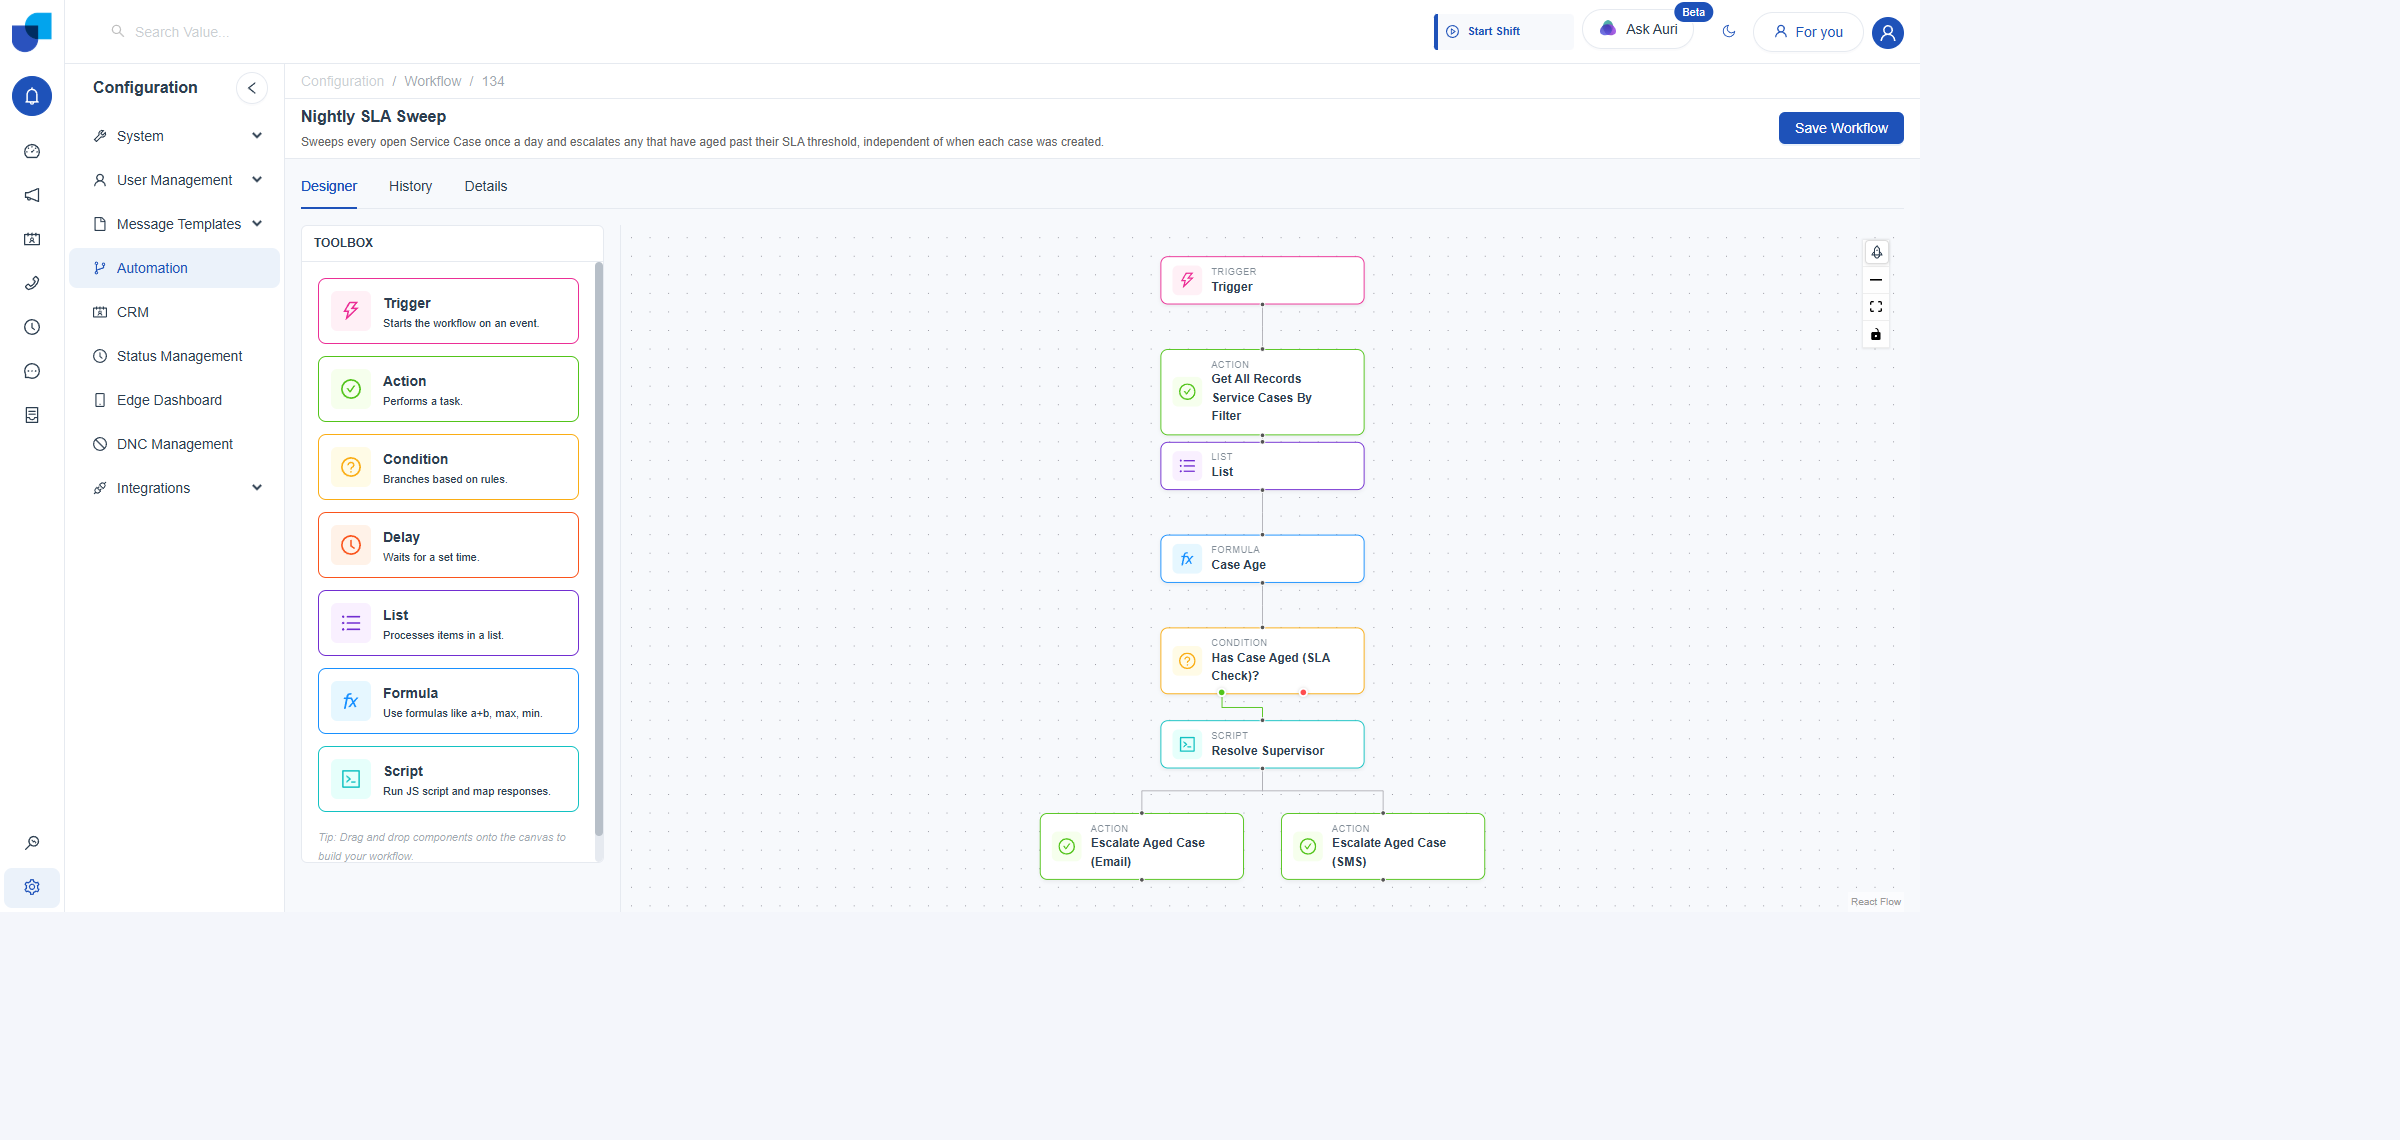
Figure 4. The complete eight-node chain, reloaded fresh from the backend to confirm every node and edge saved.
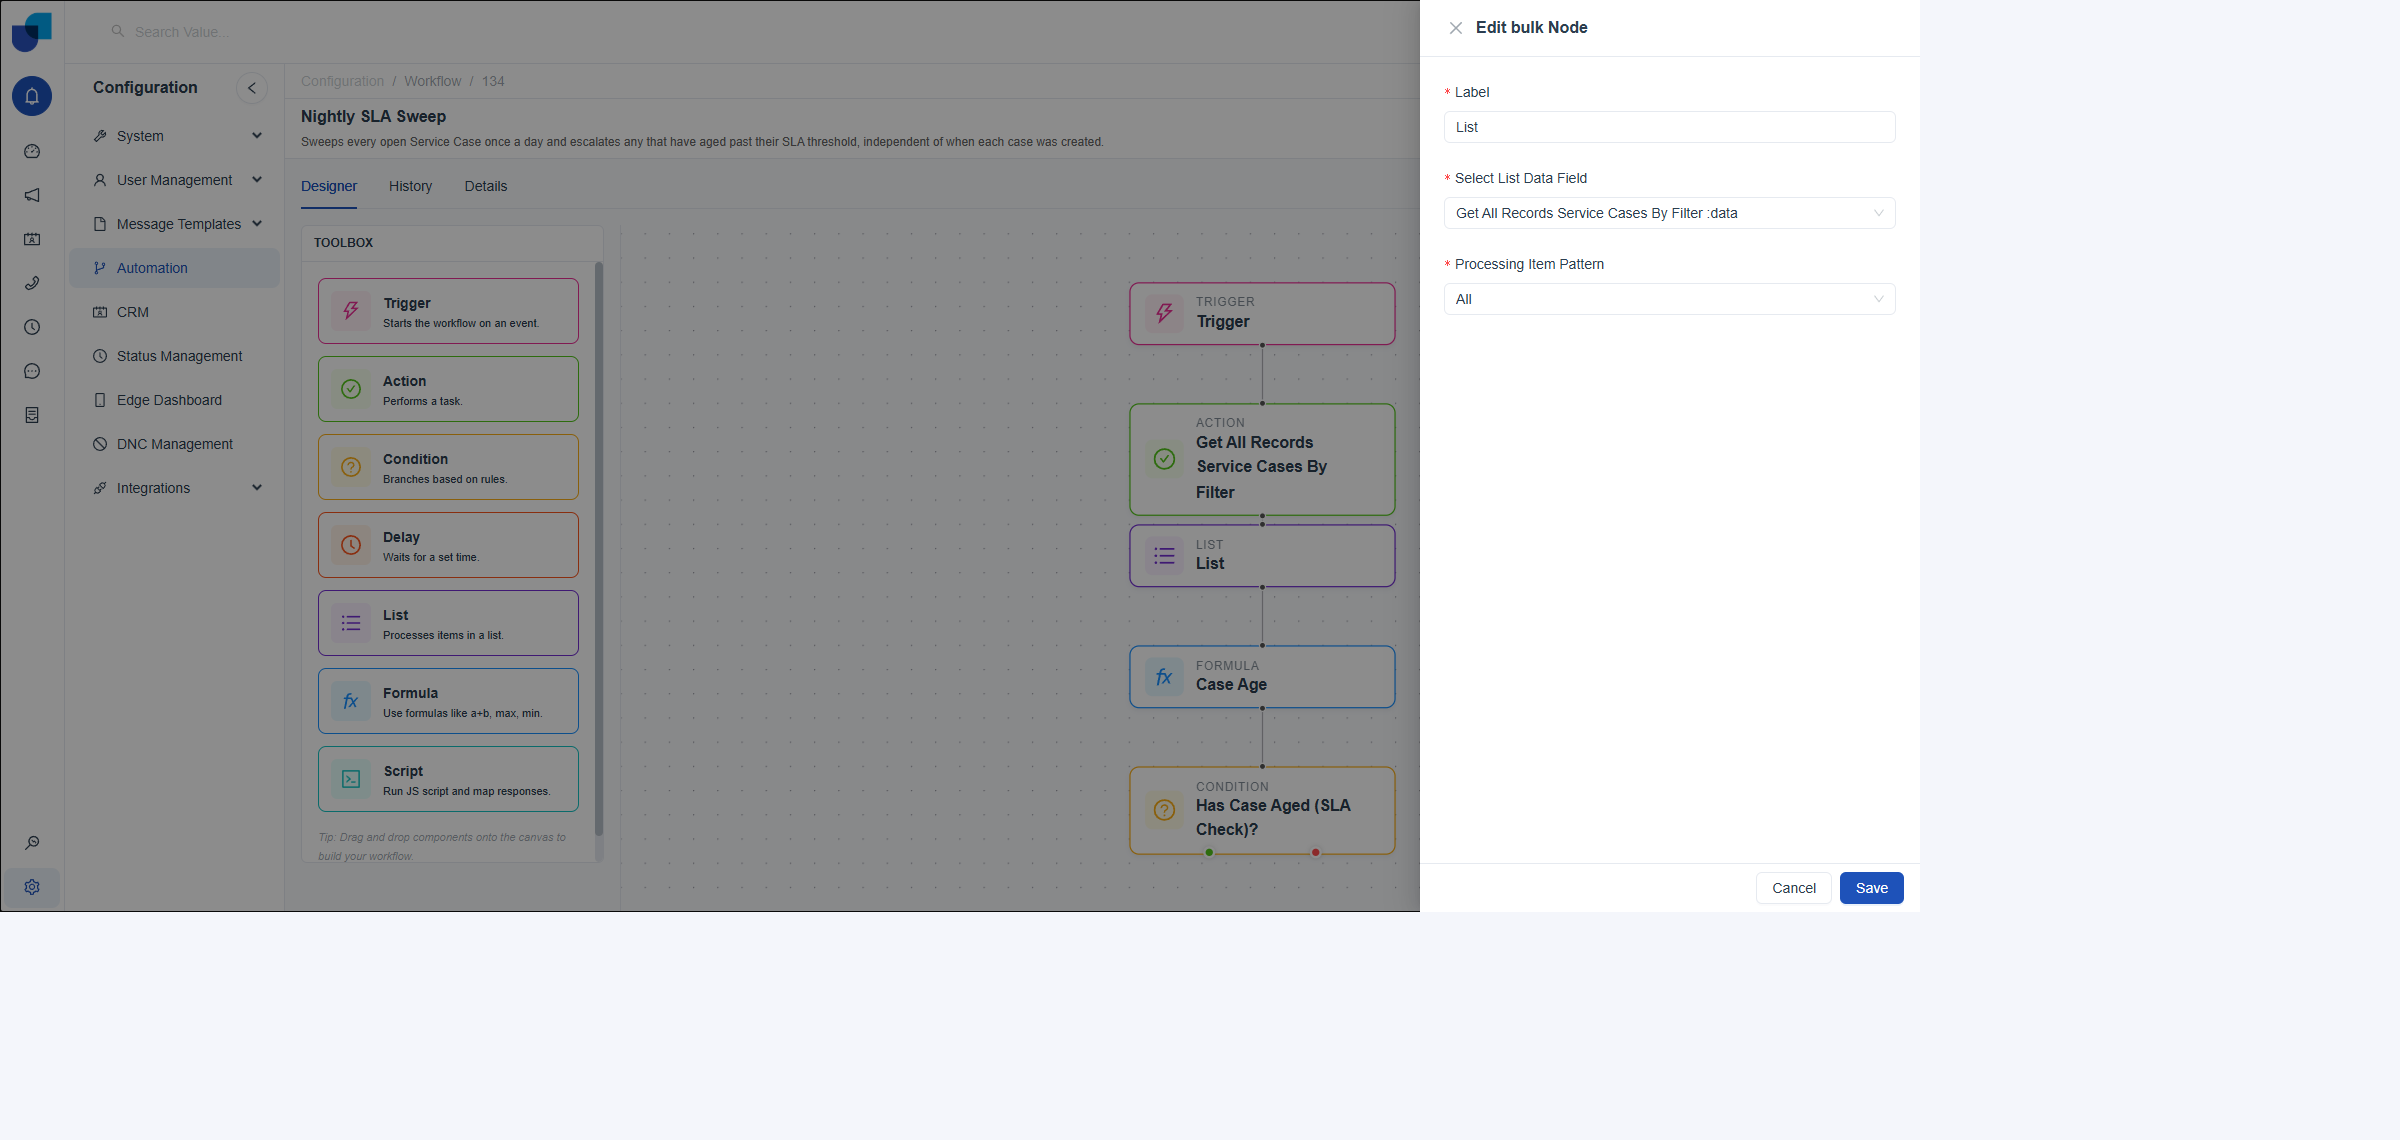
Figure 5. The List node's data field, populated live with the upstream Action's array output.
| Node | Configuration |
|---|---|
| Trigger | Schedule-based, Quick Preset: Daily at midnight (0 0 * * *) |
| Action: Get All Records Service Cases By Filter | Filter: saved filter "Open Cases" (Case Status In Open) |
| List | Select List Data Field: Get All Records Service Cases By Filter :data · Processing Item Pattern: All |
| Formula: Case Age | DATE_DIFF(Start Date: Created At, End Date: NOW(), Unit: hours) |
| Condition: Has Case Aged (SLA Check)? | Case Age Value is not empty |
| Script: Resolve Supervisor | Looks up (bulk_1.caseType) against the same lookup table, returns supervisorName, supervisorEmail, supervisorPhone |
| Action: Escalate Aged Case (Email) | to: supervisor@example.com (literal, see note below) |
| Action: Escalate Aged Case (SMS) | Recipient Phone Number: +1 555 0100 (literal, see note below) |
This rule builder offers only string operators, no greater-than, for Formula fields. The condition above checks only that Case Age Value is present, not that it has actually crossed a numeric SLA threshold. A case one hour old and a case one month old both evaluate the same way here. Treat this as presence checking for "has an age been computed at all," not real SLA enforcement, until the platform exposes a numeric comparison operator.
Routing the Escalation with a Script Node
Both workflows reach the same problem once a case is confirmed overdue: Contact Center Supervisor is a role held by four people, not one, and the right person depends on the case's Case Type. A Script node resolves this with a small lookup table instead of a Condition node with one branch per Case Type.
- Click the Script node's edit icon, and set its Label.
- Click into Script Code, and type enough of a field's name to fuzzy-match it, for example
casetype. Ctrl+Space with nothing typed only ever surfaced generic JavaScript globals, matching what was documented before. Typing distinguishing characters first, then pressing Ctrl+Space (or just typing, since the suggestion list appears automatically), surfaces real workflow fields, each shown as "Node Label - Field Name". - Select the matching suggestion.
Inserts the exact reference syntax the platform uses to read another node's output inside a script:
(nodeId.fieldName), for example(action_3.caseType)in the first workflow and(bulk_1.caseType)in the second, where the field name is the human label converted to camelCase. - Write the lookup and return the resolved contact.
A plain object keyed by Case Type, with a fallback entry for any type not yet mapped, returning
supervisorName,supervisorEmail, andsupervisorPhone. - Click Save.
Response Mapping's JSON Input and Schema Editor populated automatically from the script's own return statement, with no sample JSON pasted by hand.
supervisorEmailandsupervisorPhonewere even auto-typed as Email and PhoneNumber Field Types, inferred from their names.
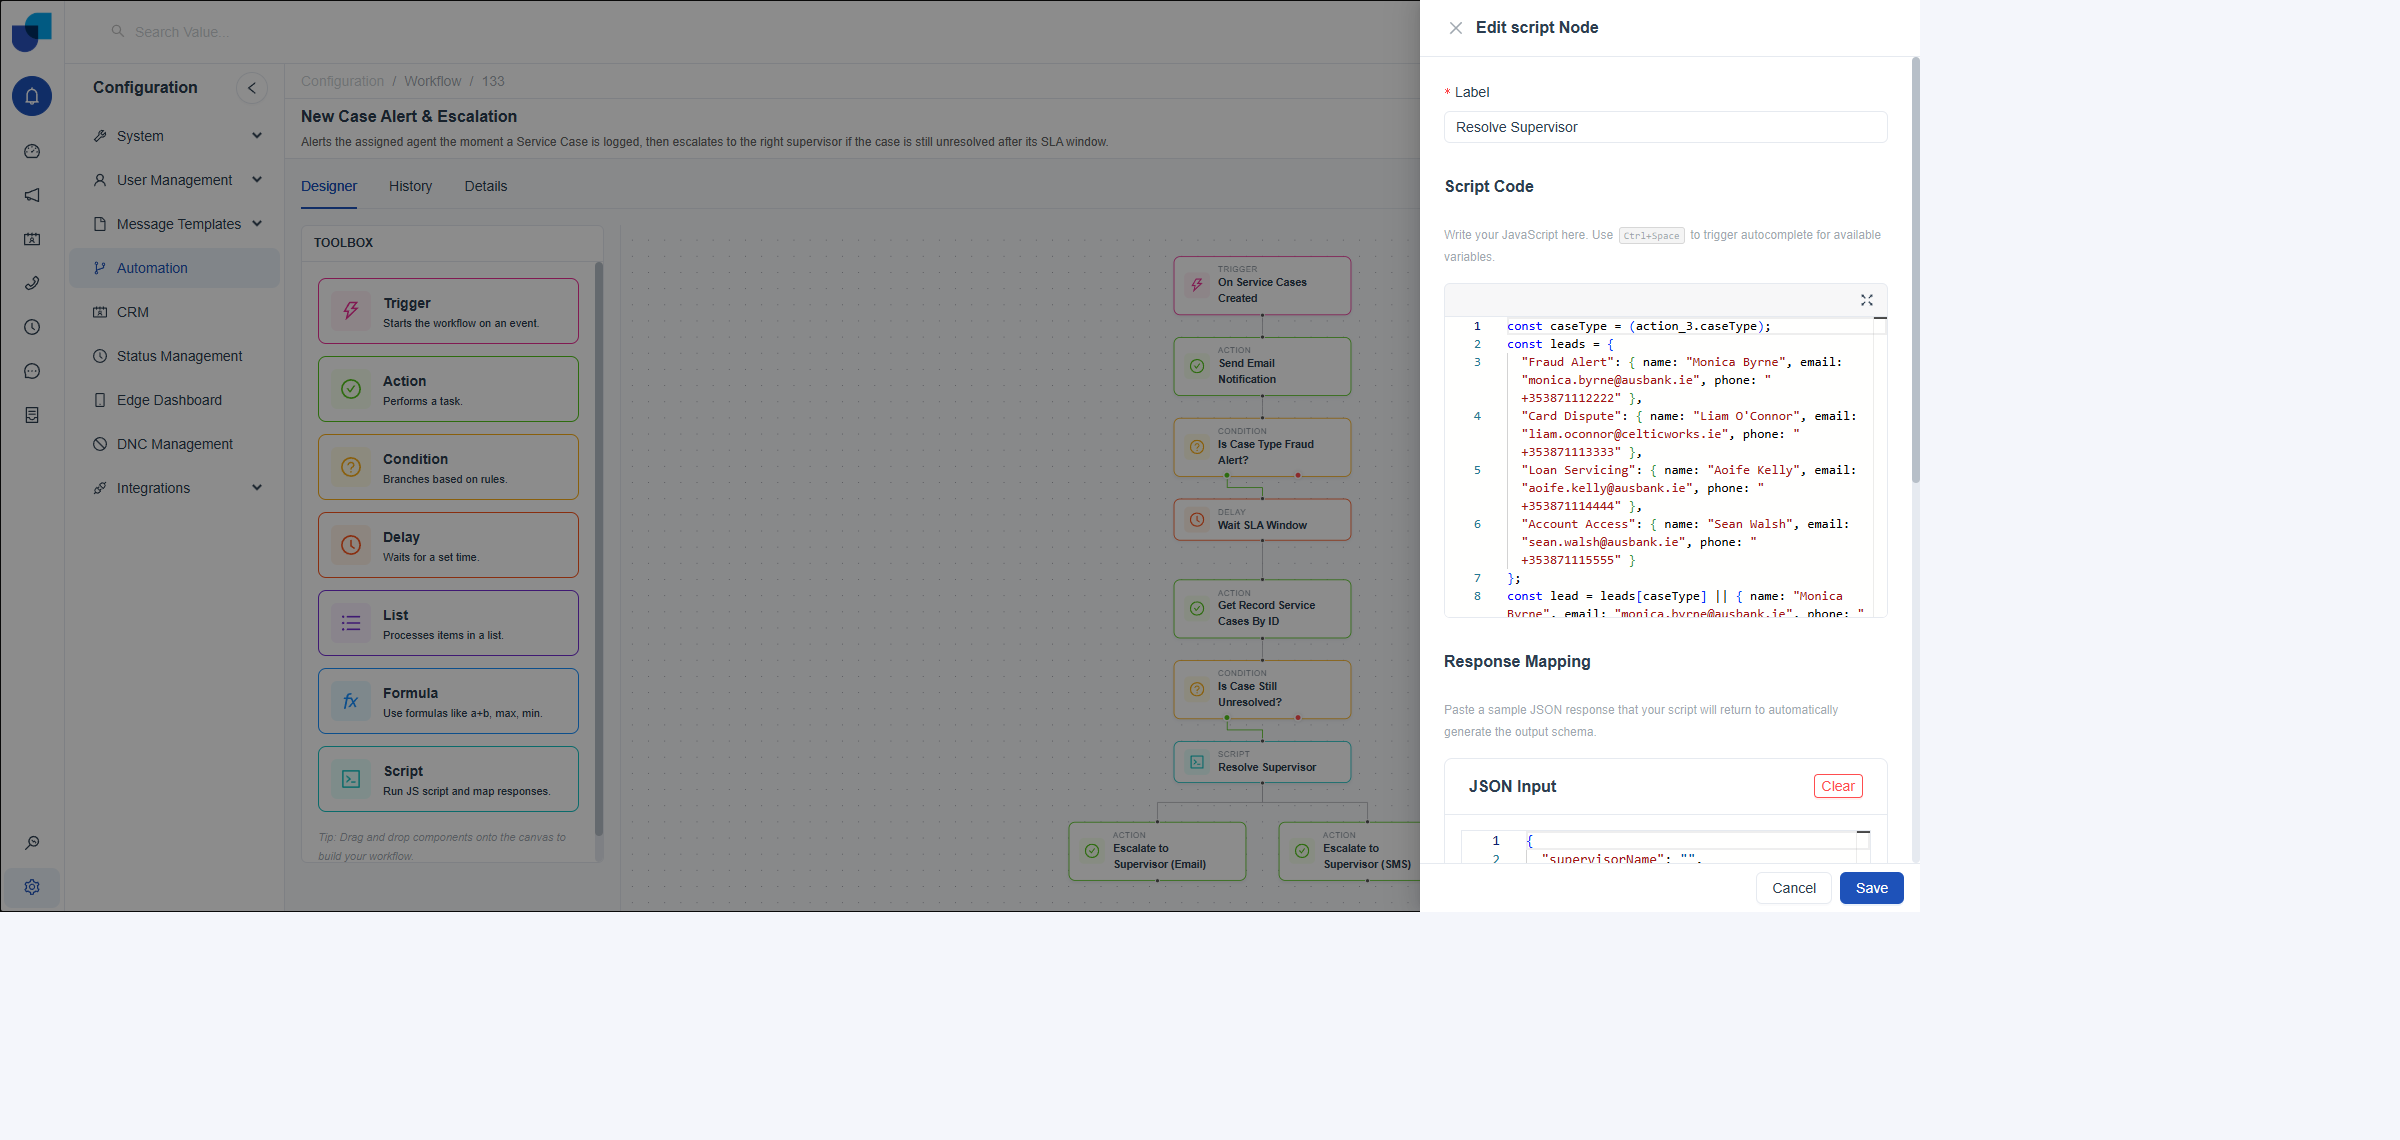
Figure 6. The Resolve Supervisor Script node, fully configured and reloaded fresh from the backend to confirm it saved.
Script autocomplete does list real workflow fields, not just JS globals. Type a few matching letters first, instead of an empty Ctrl+Space.
The Email and SMS actions can't consume the Script's output directly. A script reference typed into "to" failed email validation, so both use a literal value instead.
Wiring Nodes Together
Every "@" dynamic-mention field in both workflows above (Case Type, Case Status, Record ID, the List node's data field, Case Age Value) depends on a genuine connector line existing between the node being configured and the upstream node producing that data. This is worth calling out explicitly, because it's easy to get wrong.
A dropped node doesn't auto-connect to the one above it. Without a drawn connector, its "@" fields show "No data."
A real connector shows as a solid line with a dot at each end. No line means no amount of retyping will fix it.