Campaign Builder
The complete flow for configuring a campaign, from the first click on New Campaign to the final Save. It follows a Voice Call campaign called Autumn Member Appreciation through every step of the Create Campaign wizard.
The wizard shows its steps in a list on the right, with a tick beside every completed step. Next moves forward and Previous moves back, and nothing is created until Save is clicked on the last step. A Voice Call campaign has seven steps. SMS, WhatsApp, and Email campaigns have six, because the Disposition step is Voice only. Where a step differs by channel, see Campaign Channels.
Step 1. Channel
The wizard opens by asking how the campaign should reach its audience.
- Go to Campaign and click New Campaign. Opens the Create Campaign wizard on the Channel step.
- Click a channel card. Voice Call, SMS, WhatsApp, or Email. The selected card is highlighted.
- Click Next.
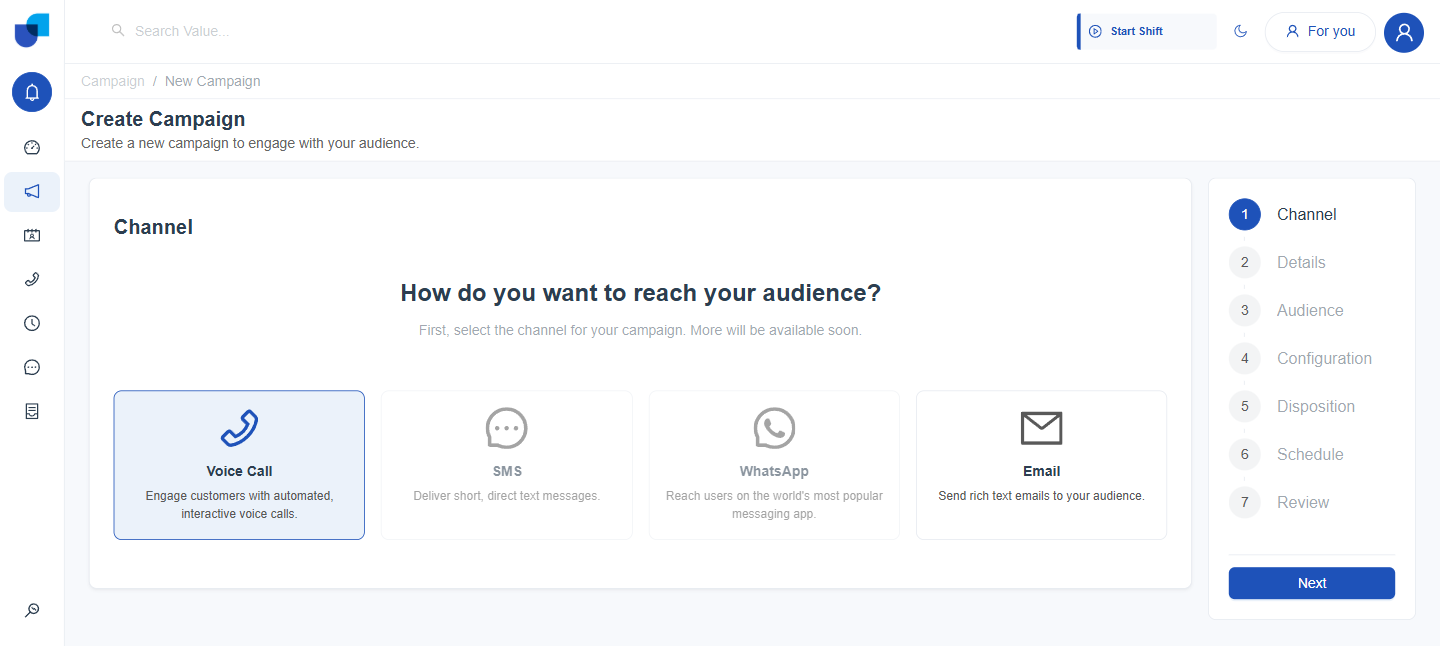
Figure 1. The Channel step with Voice Call selected. Each card carries a short description of the channel.
The channel cannot be changed after the campaign is saved.
Step 2. Details
The second step names the campaign and marks the purpose behind it.
- Enter a Campaign Title. Required, and it must be unique across every campaign. Reusing an existing title blocks the wizard from moving on until it is changed.
- Choose a Campaign Type. A plain pair of radio buttons. Neither choice reveals any further field.
| Type | Meaning |
|---|---|
| Transactional | A campaign tied to an existing relationship or process, for example a renewal reminder. Selected by default. |
| Promotional | A campaign offering something new, for example a marketing outreach. |
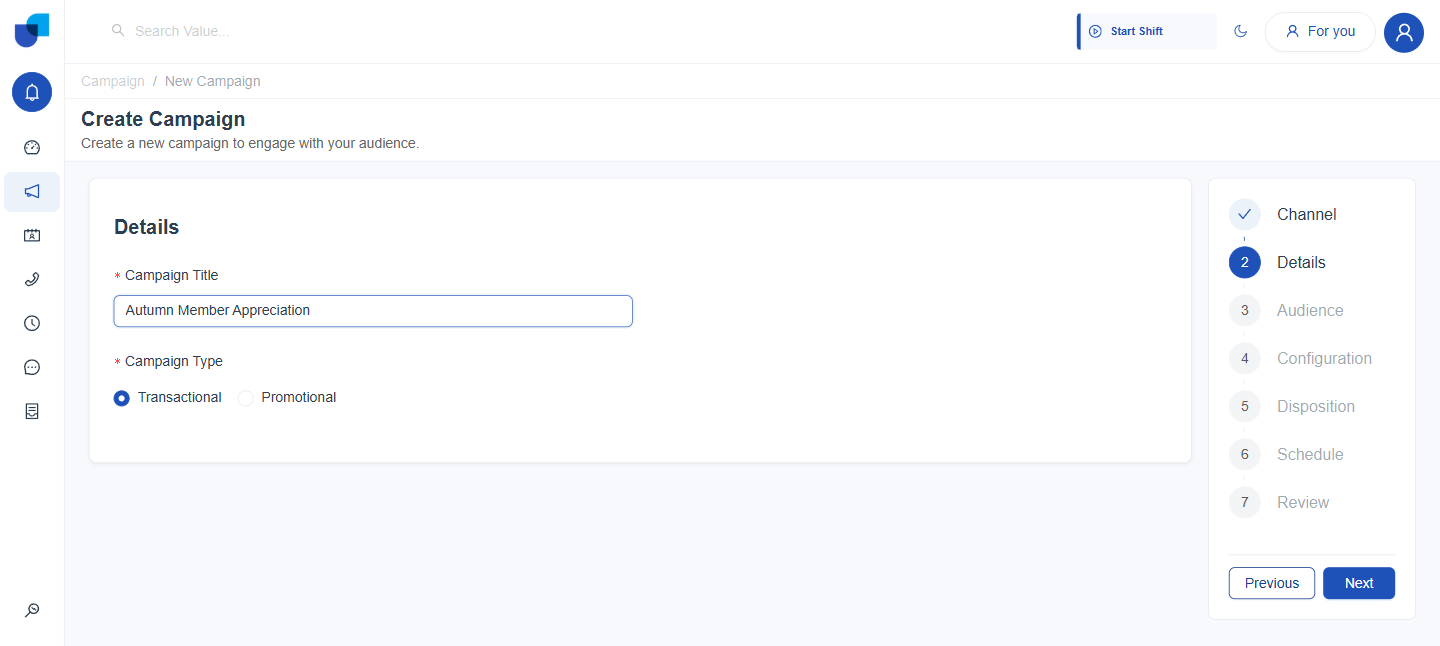
Figure 2. The Details step with a title entered and the default Transactional type selected.
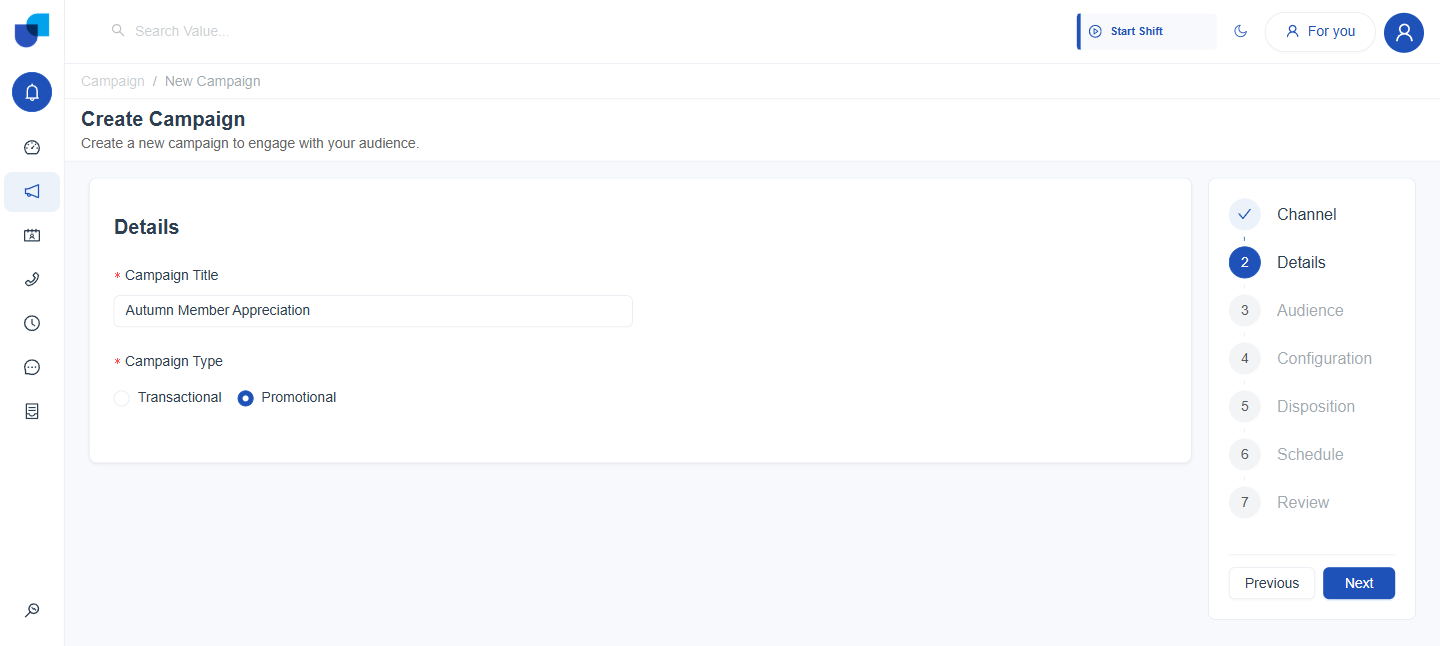
Figure 3. The same step with Promotional selected. Both types are plain options with no sub choice beneath them.
Campaign Type cannot be changed after the campaign is saved.
Step 3. Audience
The third step decides which contacts the campaign works through. Select Audience offers two methods.
Upload CSV
Imports contacts from a file into the built in Campaign Uploads module, a plain CRM module provisioned for this purpose. Each column of the file is mapped to a field of that module, for example a column named PhoneNumber mapped to the module's Mobile Number field. When a matching record already exists, Ignore skips importing it so no duplicate is created, and Overwrite all replaces the existing record with the new data. Select Layout stays disabled and reads No layouts available for this method. Beneath the drop zone, Dialing Fields is required and Dialing Order is optional, and they work like Dialing Fields and Dialing Priority do for a module.
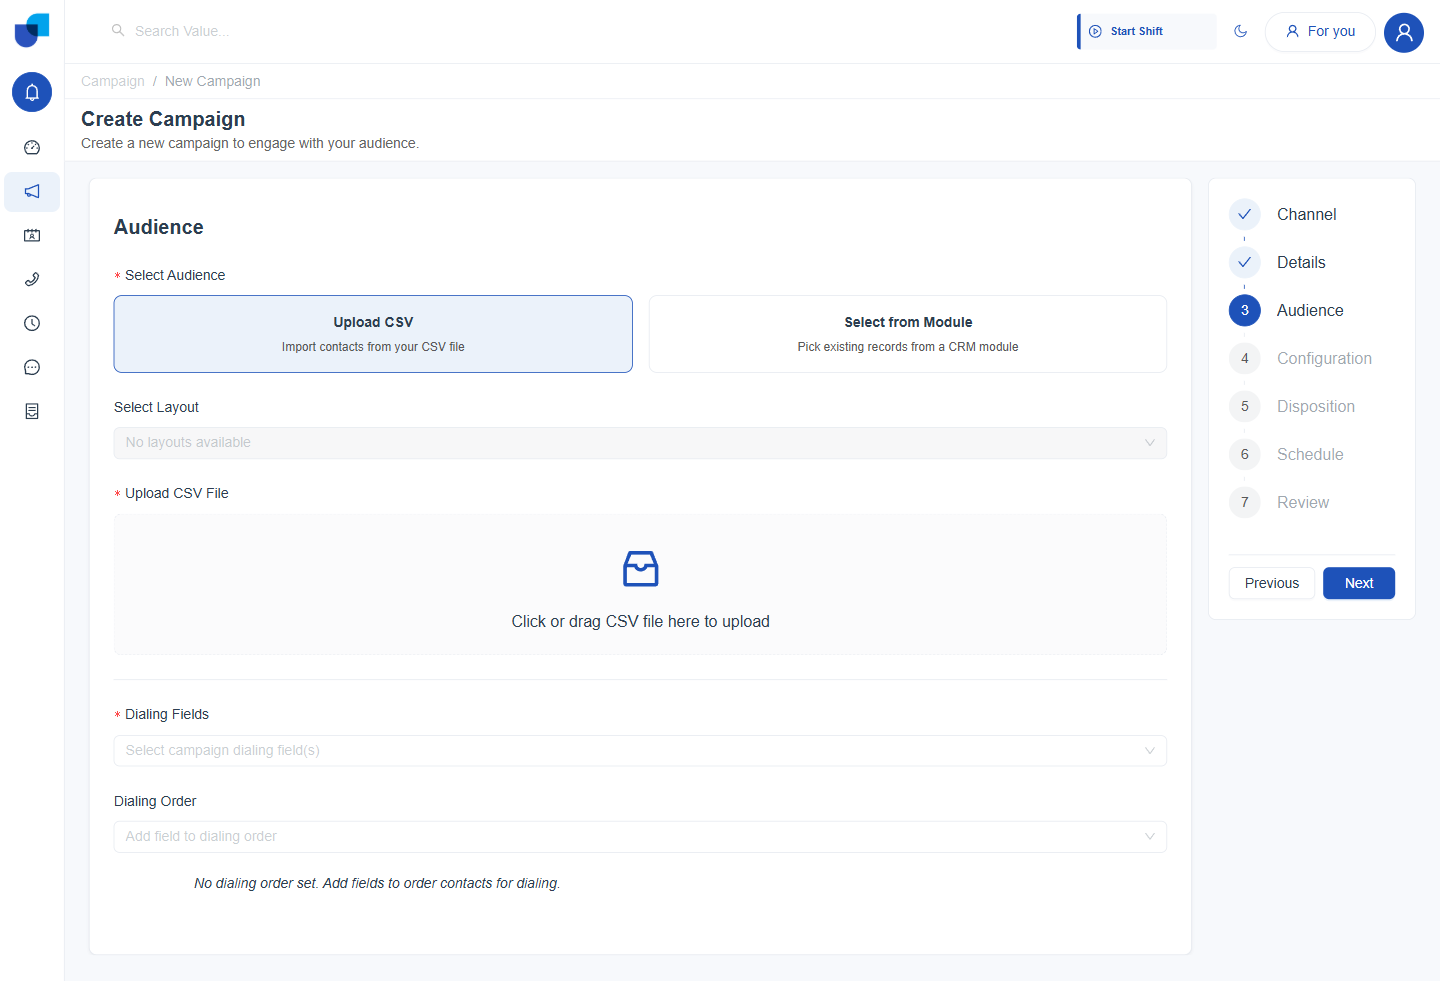
Figure 4. The Audience step with Upload CSV selected, showing the file drop zone.
Select from Module
Points the campaign at an existing CRM module instead of a file.
- Choose a Module. Required. Lists the CRM modules available to campaigns, for example Accounts, Contacts, Tickets, and Leads.
- Optionally choose a Select Layout. Chooses which of the module's own CRM layouts a contact is shown with, for example Leads Detail Layout. It is the same layout used elsewhere for that module's records, not a campaign specific one.
- Optionally choose a Filter. A saved filter built on the module's own list, narrowing which records are included. See Campaign Filters.
- Set the Dialing Fields. Required. The phone type field or fields the campaign is allowed to dial, for example Phone Number.
- Optionally add fields to Dialing Priority. Each field added appears as its own row, which can be reordered, so that contacts are ordered for dialing.
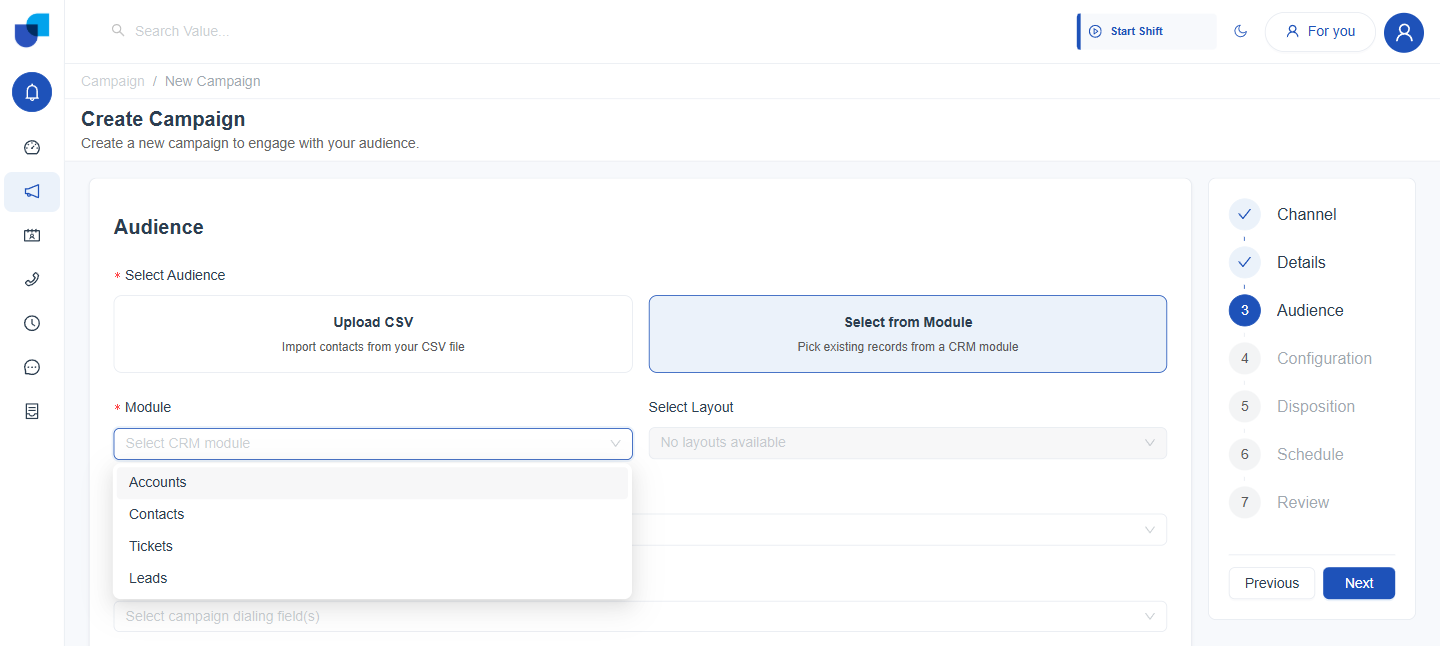
Figure 5. The Module dropdown, listing the CRM modules a campaign can draw its audience from.
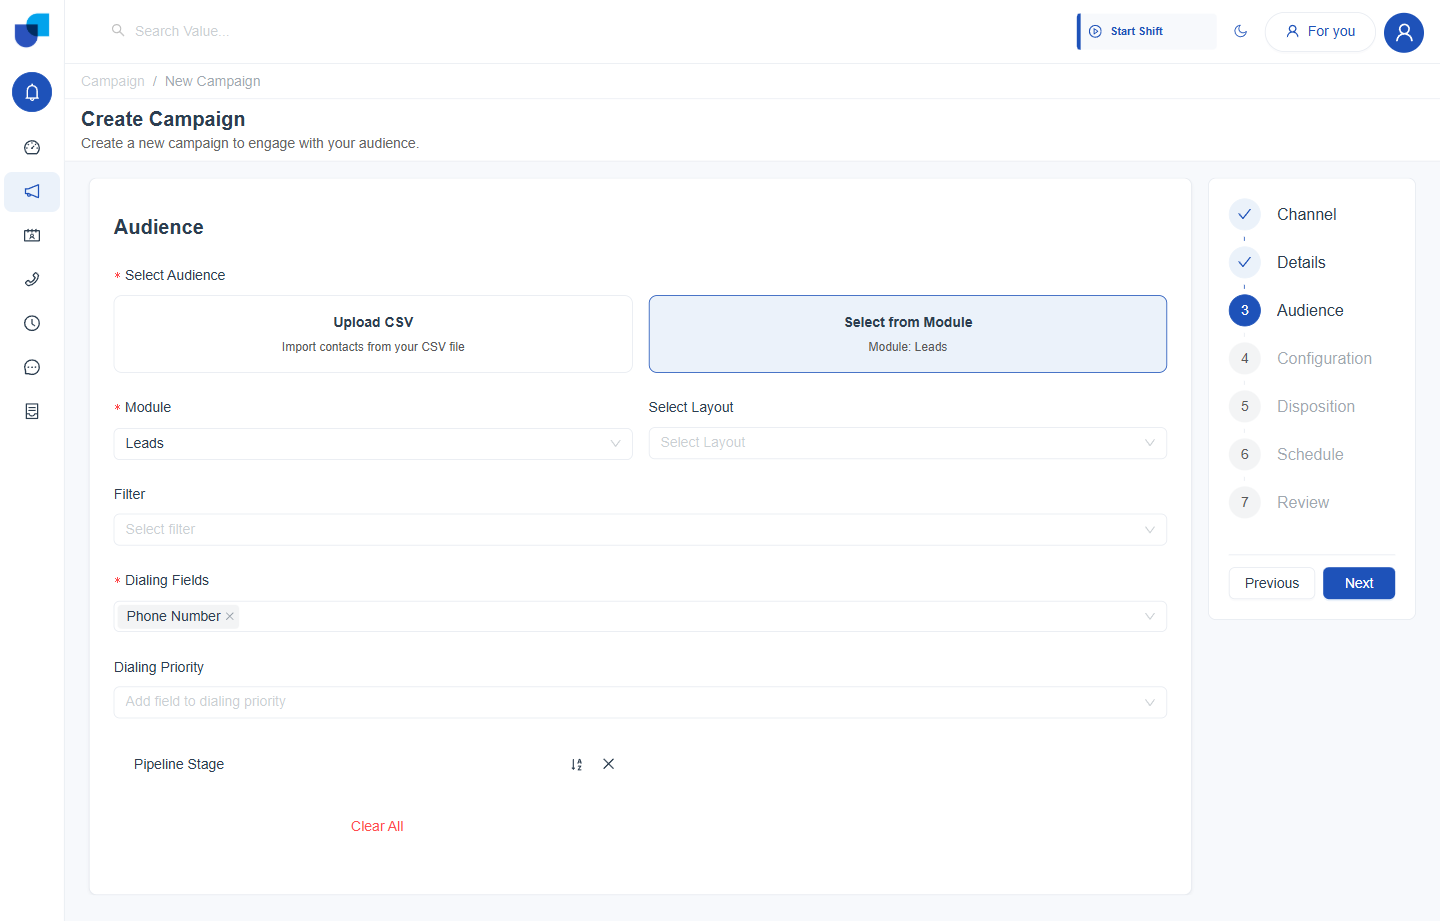
Figure 6. The Audience step complete for the Leads module, with Phone Number as the Dialing Field and Pipeline Stage added to Dialing Priority.
Because Select Layout reuses the module's own CRM layout, a change made to that module in Layout Builder carries through to every campaign built against it. Layout Builder is covered in the CRM documentation.
Step 4. Configuration
The fourth step decides who, or what, works the campaign's contacts and how they are connected. For a Voice Call it opens with the question How will this call be handled, and each answer reveals its own fields.
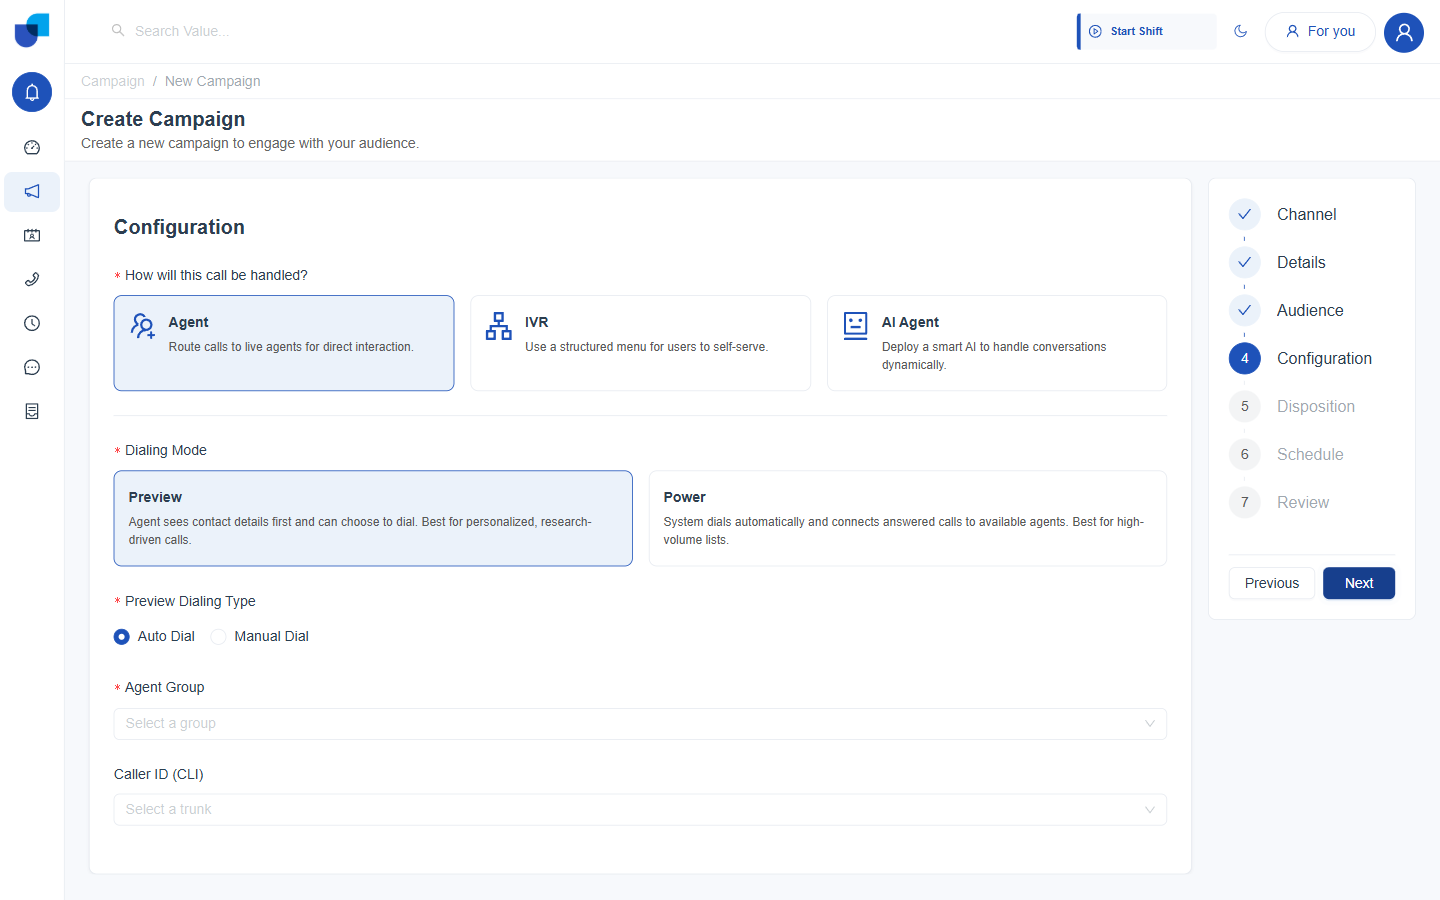
Figure 7. The Configuration step in its default state: Agent handling, Preview dialing, and Auto Dial.
Agent Handling
Routes calls to live agents for direct interaction. It needs a Dialing Mode and an Agent Group. Switching between the two dialing modes clears the handling fields already filled in below them.
| Dialing Mode | Behavior |
|---|---|
| Preview | The agent sees the contact's details first and can choose to dial. Best for personalized, research driven calls. Selected by default. |
| Power | The system dials automatically and connects an answered call to an available agent. Best for high volume lists. |
Preview Dialing
Choosing Preview reveals a required Preview Dialing Type, alongside the Agent Group.
| Preview Dialing Type | Behavior |
|---|---|
| Auto Dial | The contact is dialed automatically once the agent sees its details. Selected by default. |
| Manual Dial | The agent must choose to dial the contact themselves. |
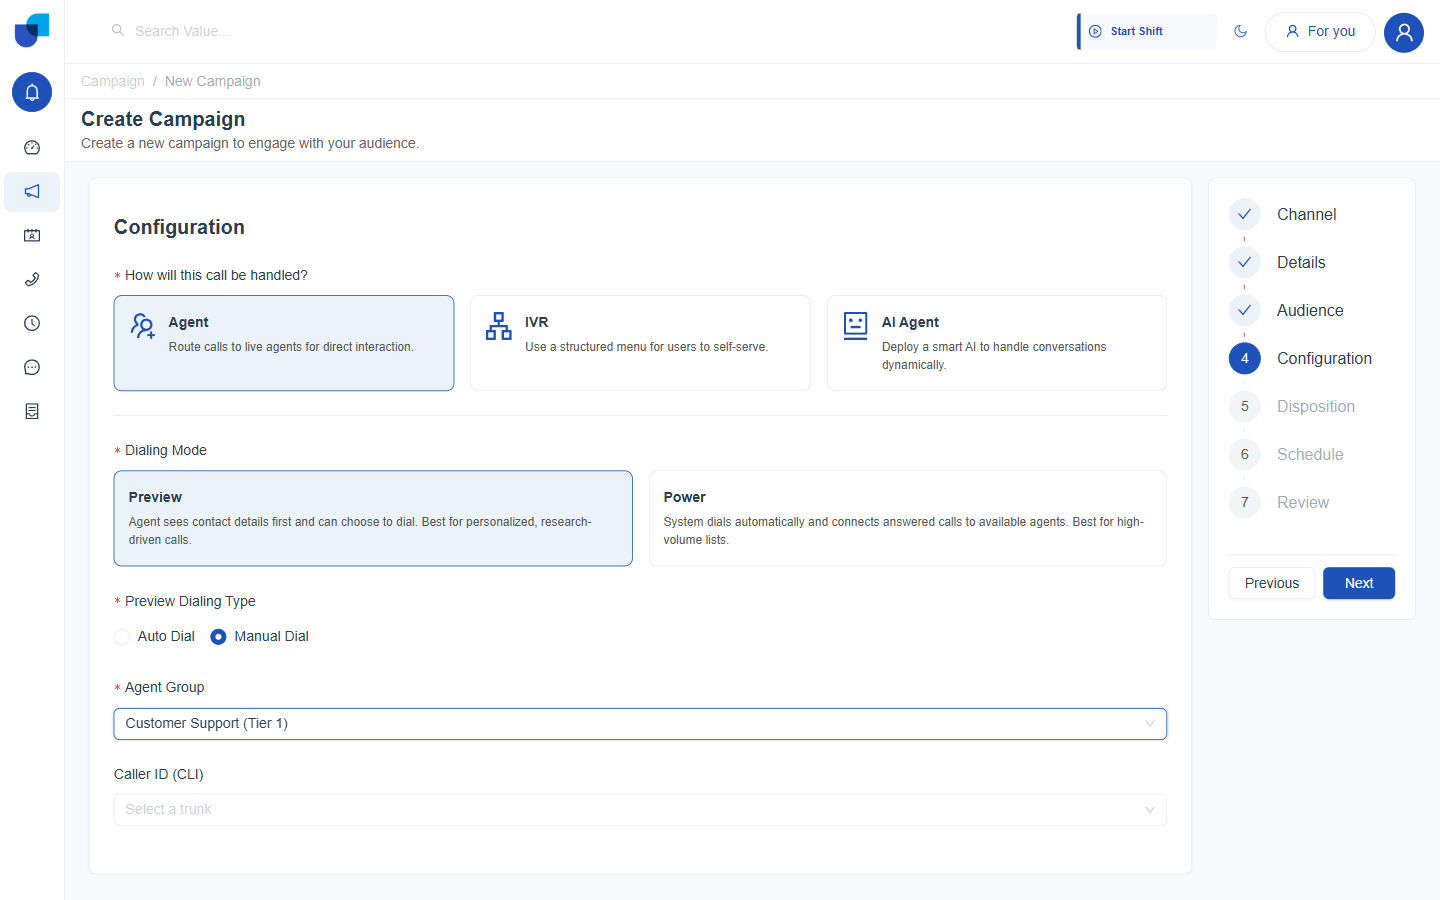
Figure 8. Preview dialing with Manual Dial selected and an Agent Group chosen.
Power Dialing
Choosing Power replaces Preview Dialing Type with two required numeric fields.
| Field | What it does |
|---|---|
| Number of Concurrent Calls | Required. How many calls the campaign places at the same time. |
| Max Waiting Calls in Queue | Required. How many answered calls can wait for an available agent before the campaign stops dialing further ahead. |
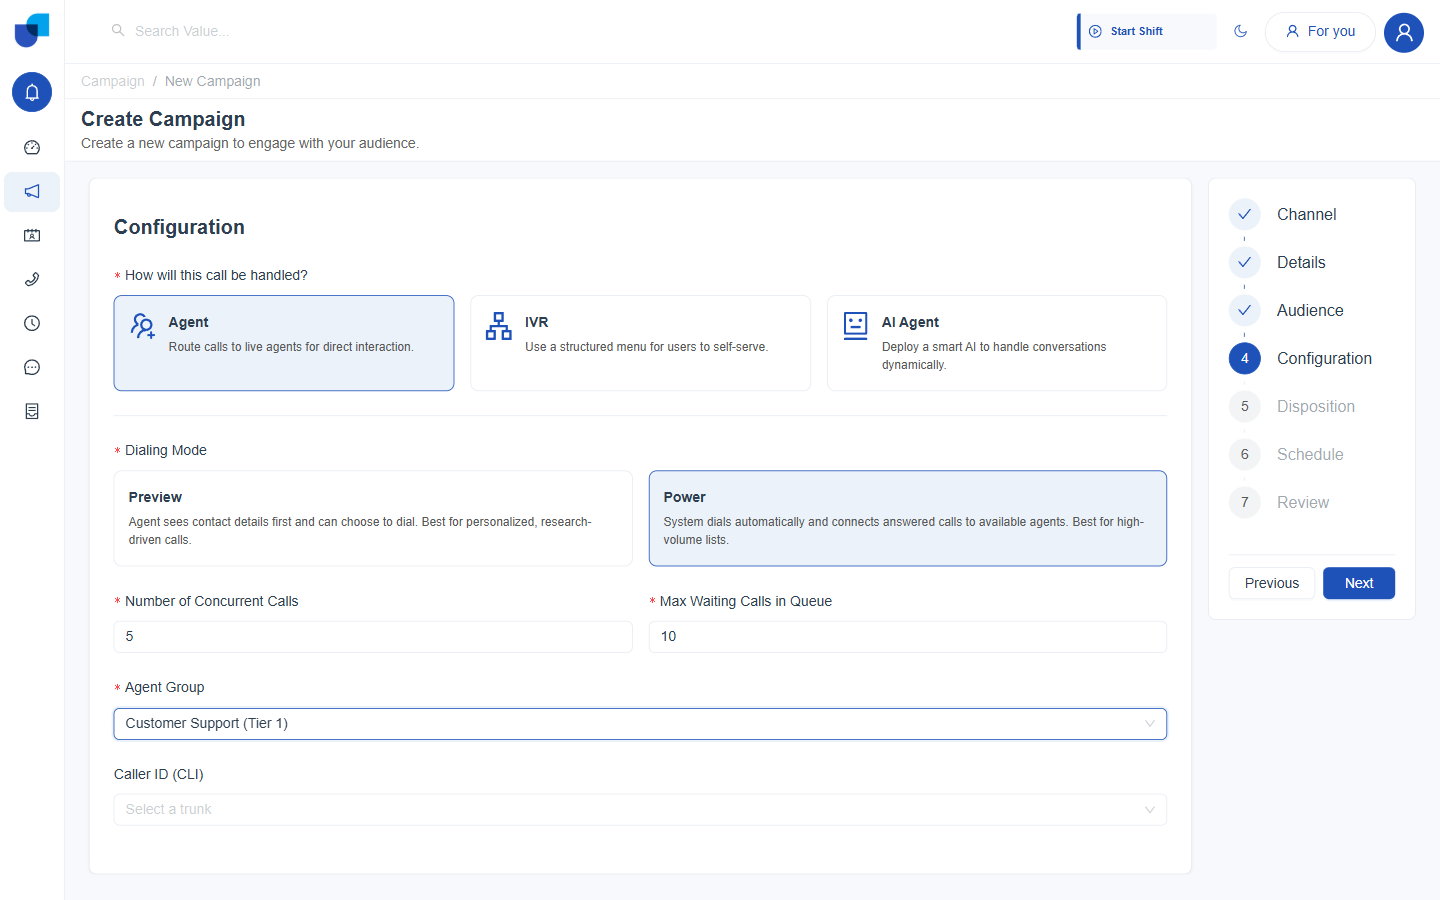
Figure 9. Power dialing, with Number of Concurrent Calls and Max Waiting Calls in Queue filled in above the Agent Group.
IVR Handling
Uses a structured menu for contacts to self serve, with no live agent, no Dialing Mode, and no Agent Group.
| Field | What it does |
|---|---|
| IVR Template | Required. The structured menu flow the call follows. |
| Number of Concurrent Calls | Required. How many calls the campaign places at the same time. |
| Caller ID (CLI) | Optional. |
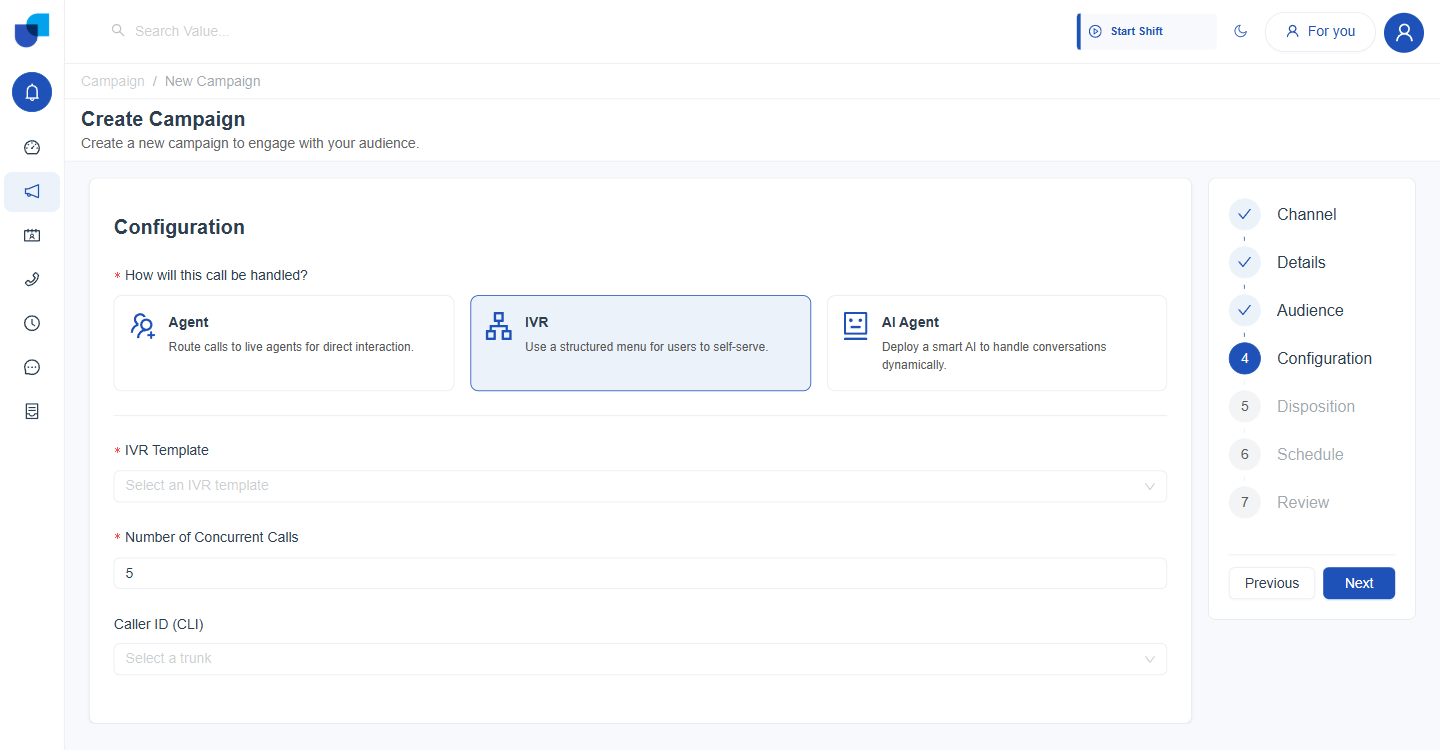
Figure 10. IVR handling. Dialing Mode and Agent Group are replaced by an IVR Template and Number of Concurrent Calls.
AI Agent Handling
Deploys an AI to handle the conversation dynamically. The fields mirror IVR, with an AI Agent chosen in place of an IVR Template.
| Field | What it does |
|---|---|
| AI Agent | Required. Which configured AI agent handles the call. |
| Number of Concurrent Calls | Required. |
| Caller ID (CLI) | Optional. |
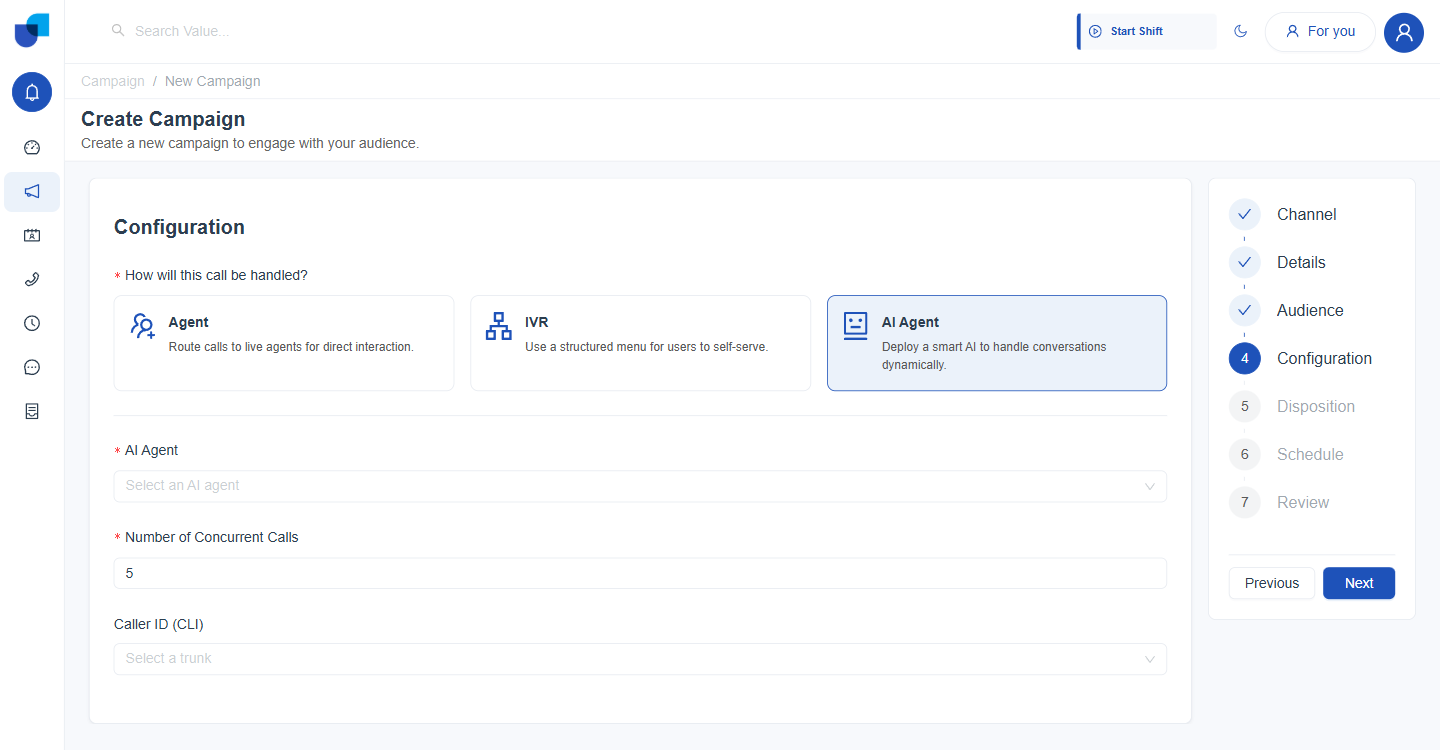
Figure 11. AI Agent handling, with the same layout as IVR and an AI Agent in place of an IVR Template.
Caller ID (CLI)
Caller ID is the outbound number or line a call appears to come from. It appears on every handling type, Agent, IVR, and AI Agent alike, and is optional on all three.
- Open the Caller ID (CLI) dropdown. It lists the outbound trunks configured for the organization's connected PBX.
- Select a trunk.
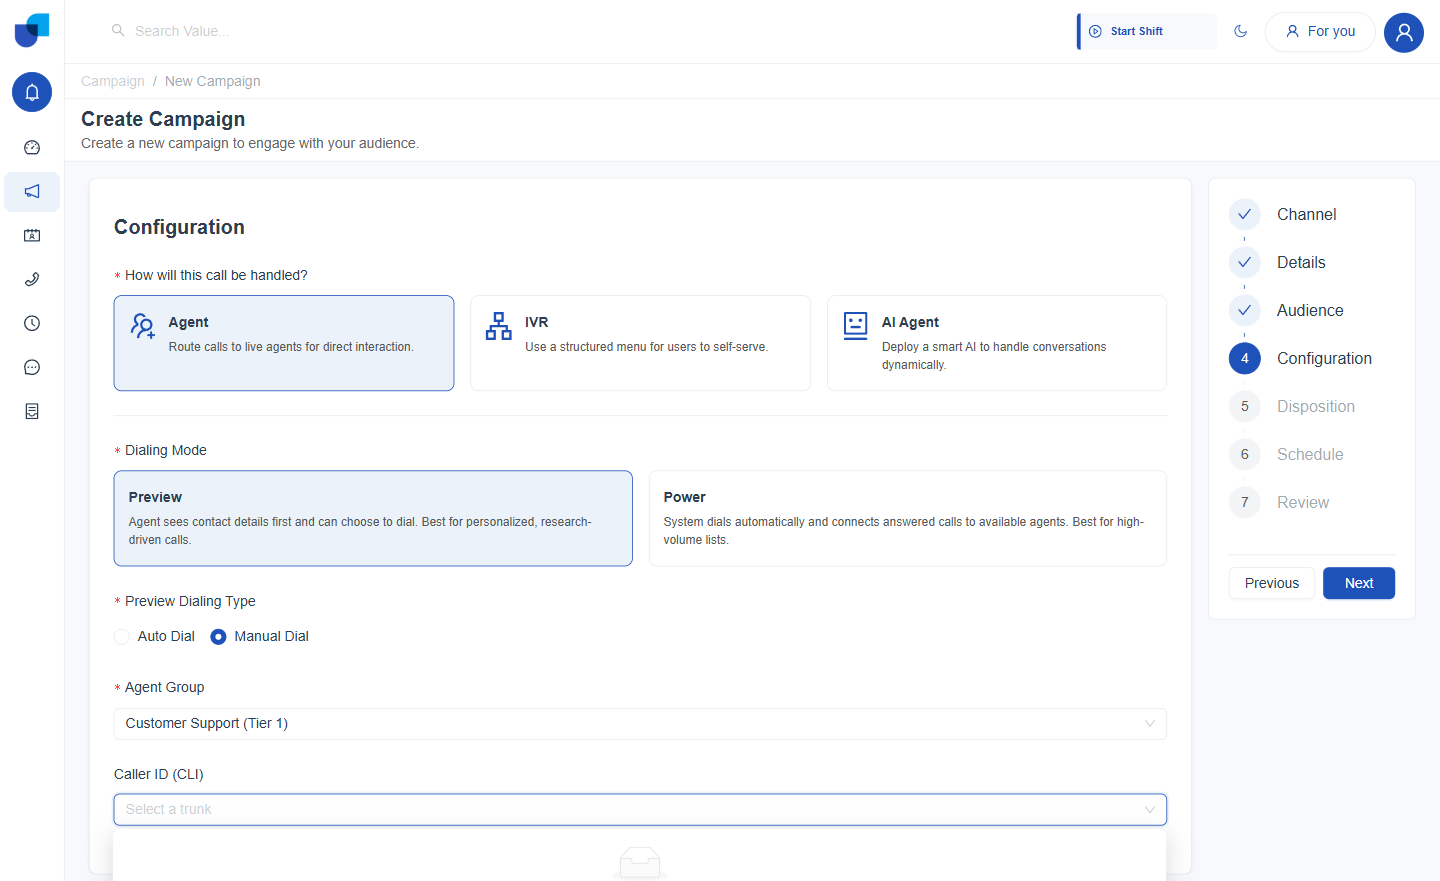
Figure 12. The Caller ID dropdown open. It reads No data when no outbound trunk has been configured.
Leaving Caller ID unset is allowed on every handling type. Set it deliberately whenever the organization needs calls to show a specific outbound number.
Step 5. Disposition
Voice Call only, and entirely optional. Enable Dispositions lets the campaign prefill a Call Type, Disposition, and Message for each call, so agents do not start from a blank form. Every field and option is described in Dispositions.
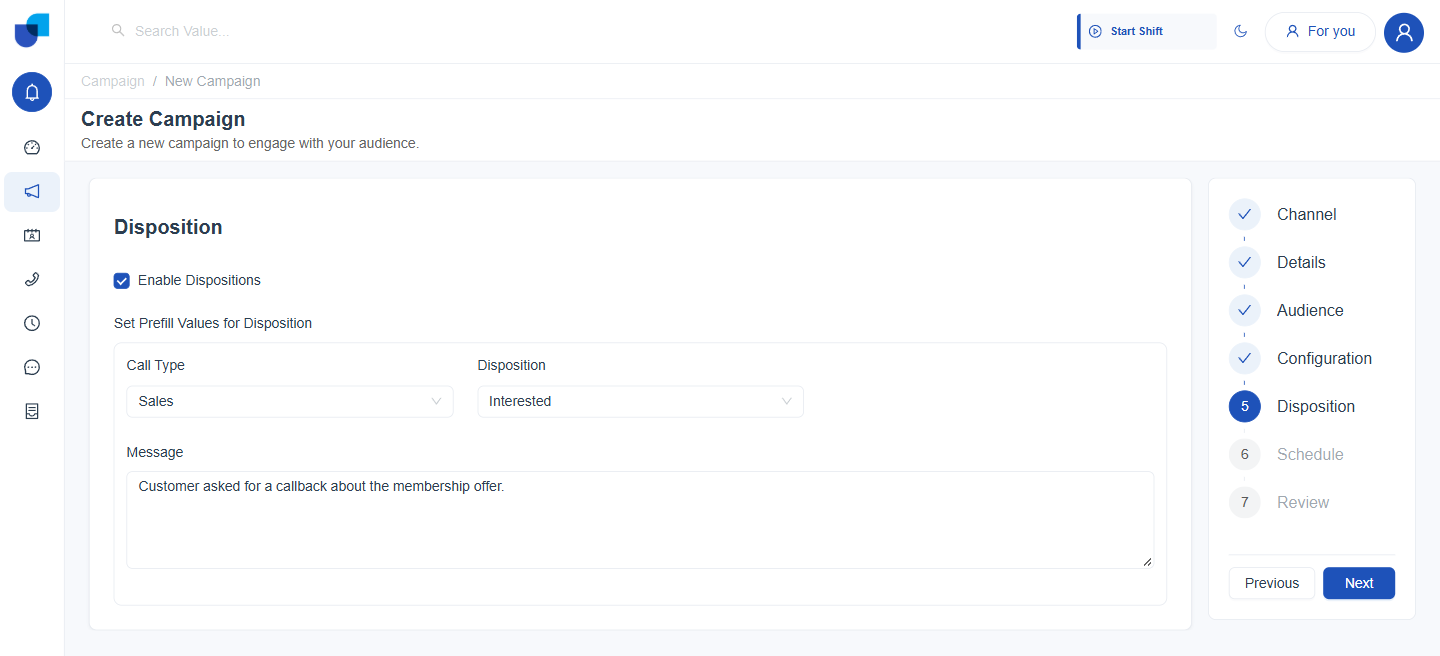
Figure 13. The Disposition step filled in with a Call Type, a Disposition, and a prefilled Message.
Step 6. Schedule
Sets when the campaign begins, optionally when it ends or repeats, and whether failed attempts are retried. Schedule Start Time is required and defaults to the current date and time. Every option is described in Scheduling and Retries.
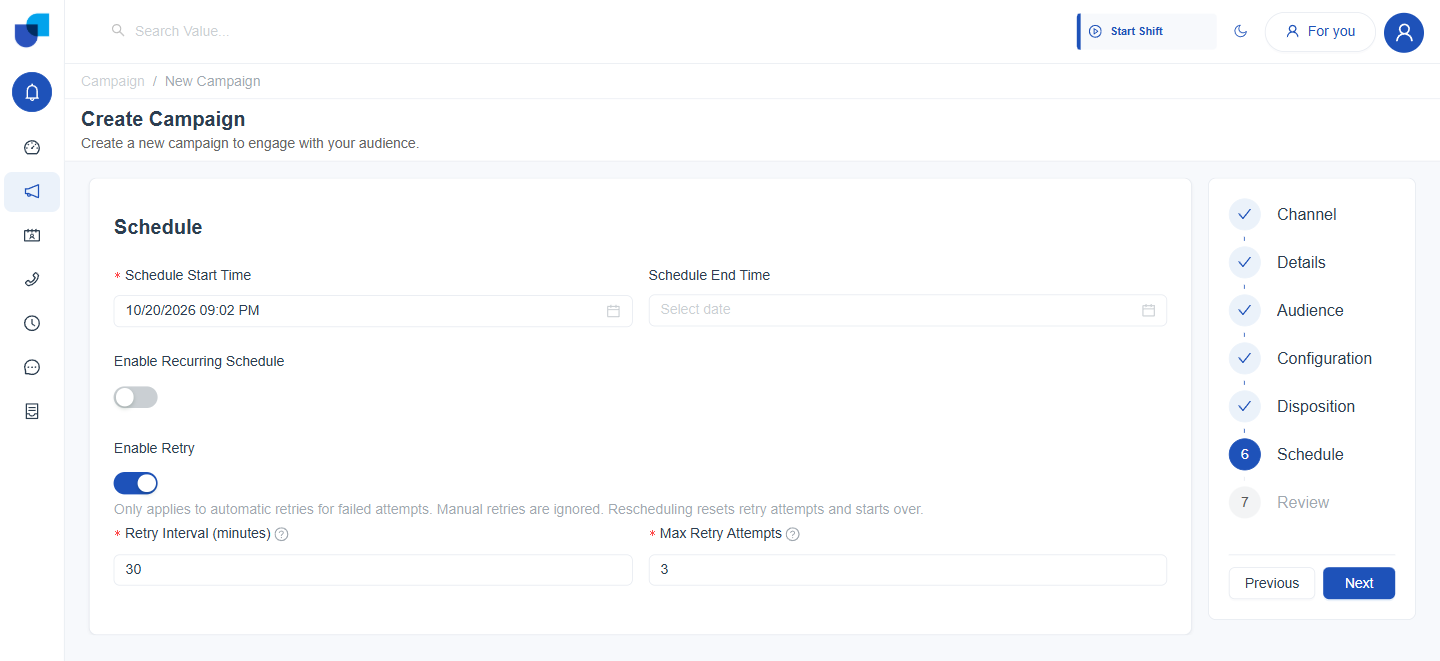
Figure 14. The Schedule step with Enable Retry turned on, a Retry Interval of 30 minutes, and 3 Max Retry Attempts.
Step 7. Review
The final step summarizes every choice made in the previous steps.
- Check the summary table. It lists Schedule Start, Schedule End, Dialing Mode, Group, Retry Attempts, Audience Module, Handler Type, and Dialing Fields. Campaign Created reads N/A until the campaign is saved.
- Click Previous to change anything that is wrong.
- Click Save. Creates the campaign. Its status changes from Draft to Pending.
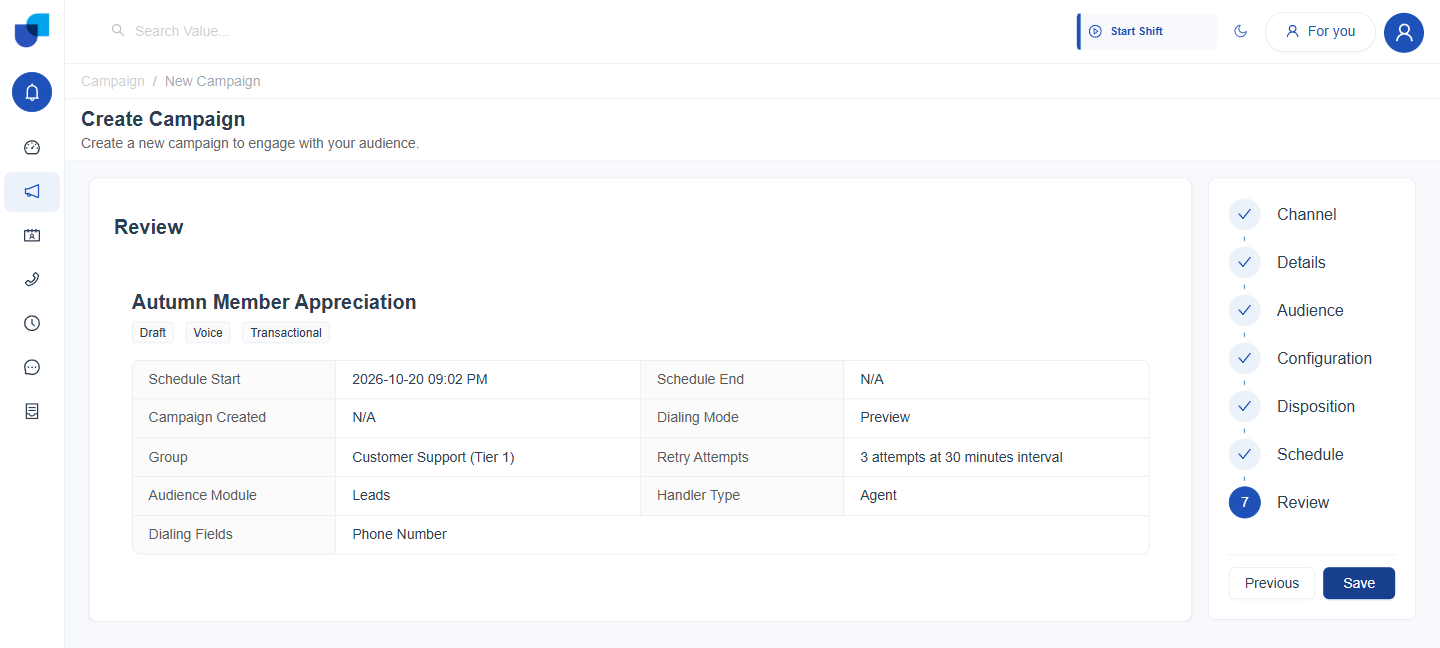
Figure 15. The Review step. The Draft badge marks the campaign as not yet saved, and the Retry Attempts row reads 3 attempts at 30 minutes interval.
After Save the campaign appears in the Campaigns list as Pending. Starting it, pausing it, and adjusting it are covered in Managing Live Campaigns.