How to Configure the Campaign Use Case in UNICONNECT AI
This page is the technical companion to Campaign Use Case Scenario, which extends the AUS Bank story from CRM Use Case Scenario. It assumes the Service Cases register from that scenario already exists. The steps run in the order a person follows them, from preparing the customer list to reading the reports, and each part names the requirement from the scenario that it meets.
Part 1: Prepare the Customer List
Requirement: a call list that stays current
The campaign calls the customers whose loans are overdue. They live in the CRM, and a saved filter selects them each time the campaign is built.
- Make sure each customer record has a name, an email and a mobile number. The scenario's customers are Contacts records. The Mobile Number is what the dialer calls, so every customer needs one.
- Open the Contacts list and click the filter icon. Enter the condition that describes an overdue customer. Here the Job Title contains Loan Customer.
- Enter a filter name and click Save. The saved filter is named Overdue Loan Customers. It now appears in the campaign's Audience step. Saved filters are covered in Campaign Filters.
Part 2: Create the Campaign
The Create Campaign wizard has seven steps: Channel, Details, Audience, Configuration, Disposition, Schedule and Review. Open it from Campaign → New Campaign.
Step 1: Channel
Requirement: phone calls to overdue customers
- Select Voice Call and click Next. The channel decides which options appear later. Voice Call is the channel that offers Dialing Mode and Caller ID.
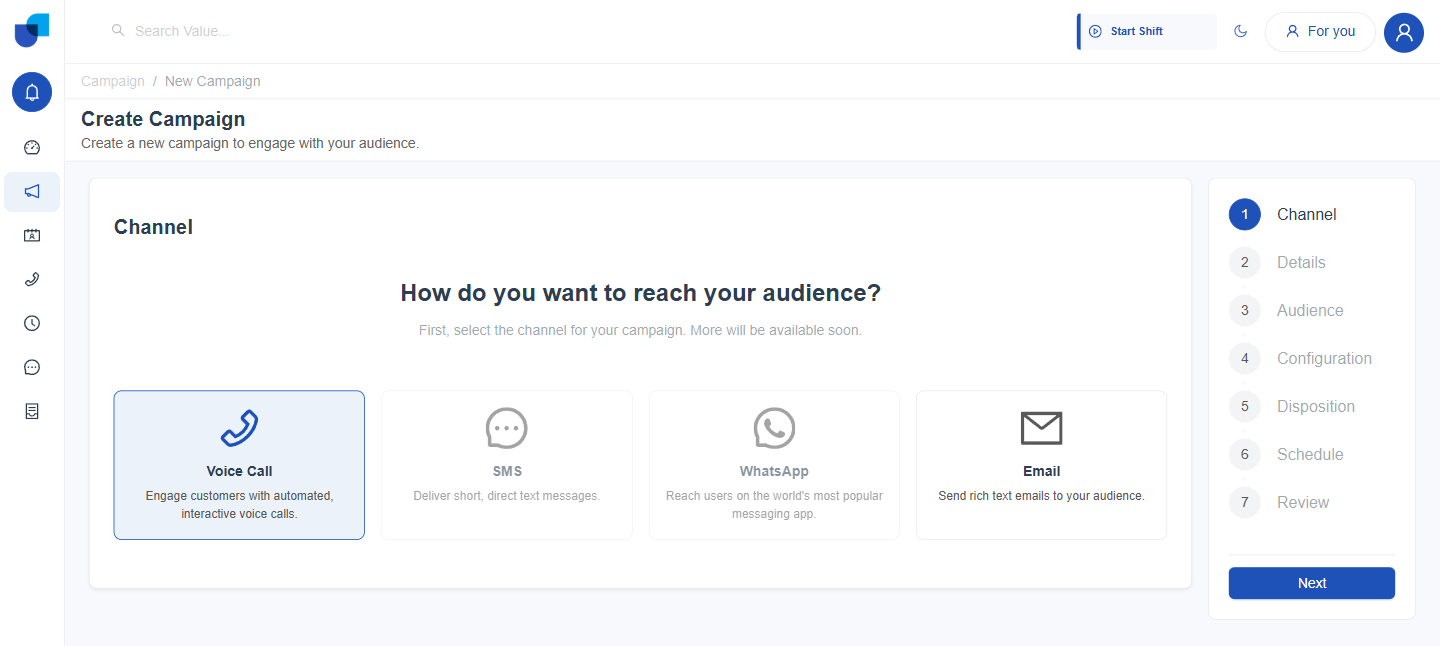
Figure 1. The Channel step with Voice Call selected.
Step 2: Details
Requirement: a servicing call, not a marketing offer
- Enter the Campaign Title. Overdue Payment Outreach.
- Choose Transactional as the Campaign Type, then click Next. The call concerns an existing account. The type also decides which do not call entries apply to the campaign.
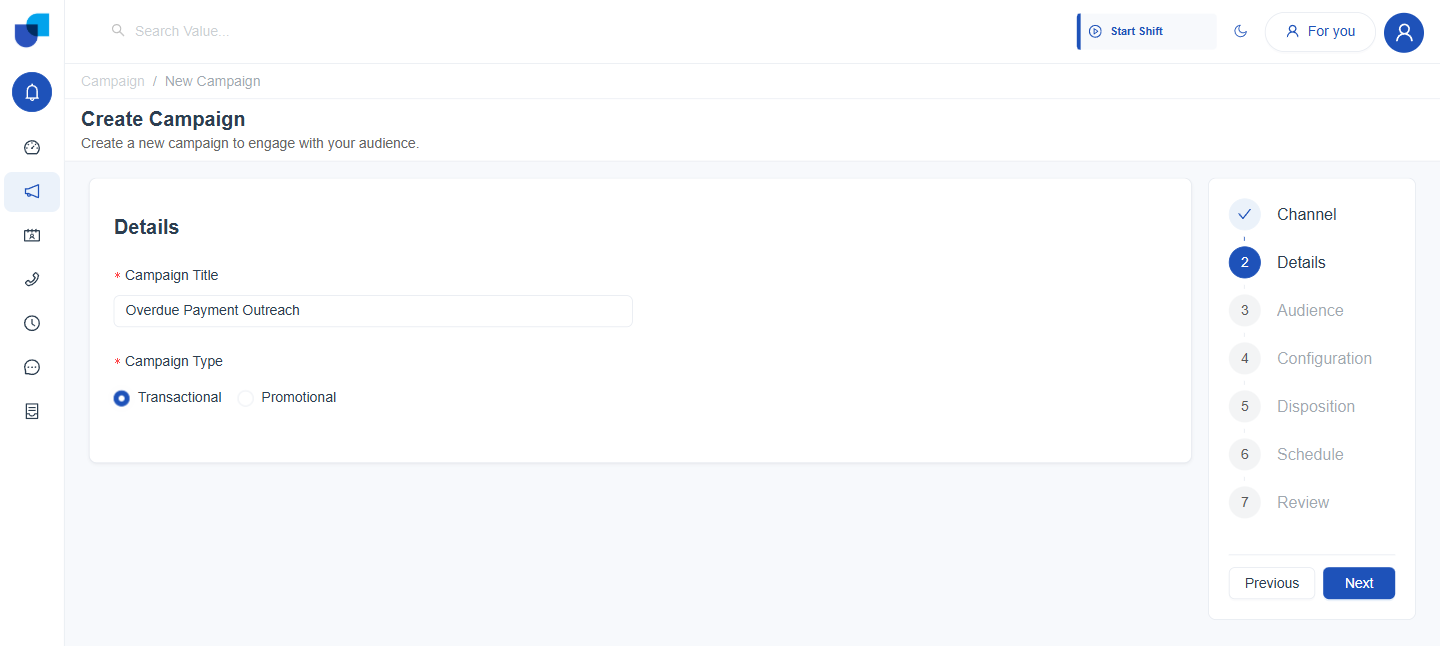
Figure 2. The Details step with the title entered and the Transactional type selected.
Step 3: Audience
Requirement: a call list that stays current
- Choose Select from Module. A module based audience stays tied to the CRM records. Upload CSV would give a one time snapshot instead.
- Choose the Module. Contacts, where the customers live.
- Open the Filter dropdown and choose Overdue Loan Customers. The dropdown lists only the filters saved against the chosen module.
- Set Dialing Fields to Mobile Number, then click Next. Dialing Fields is required. It is the field the dialer reads to place each call.
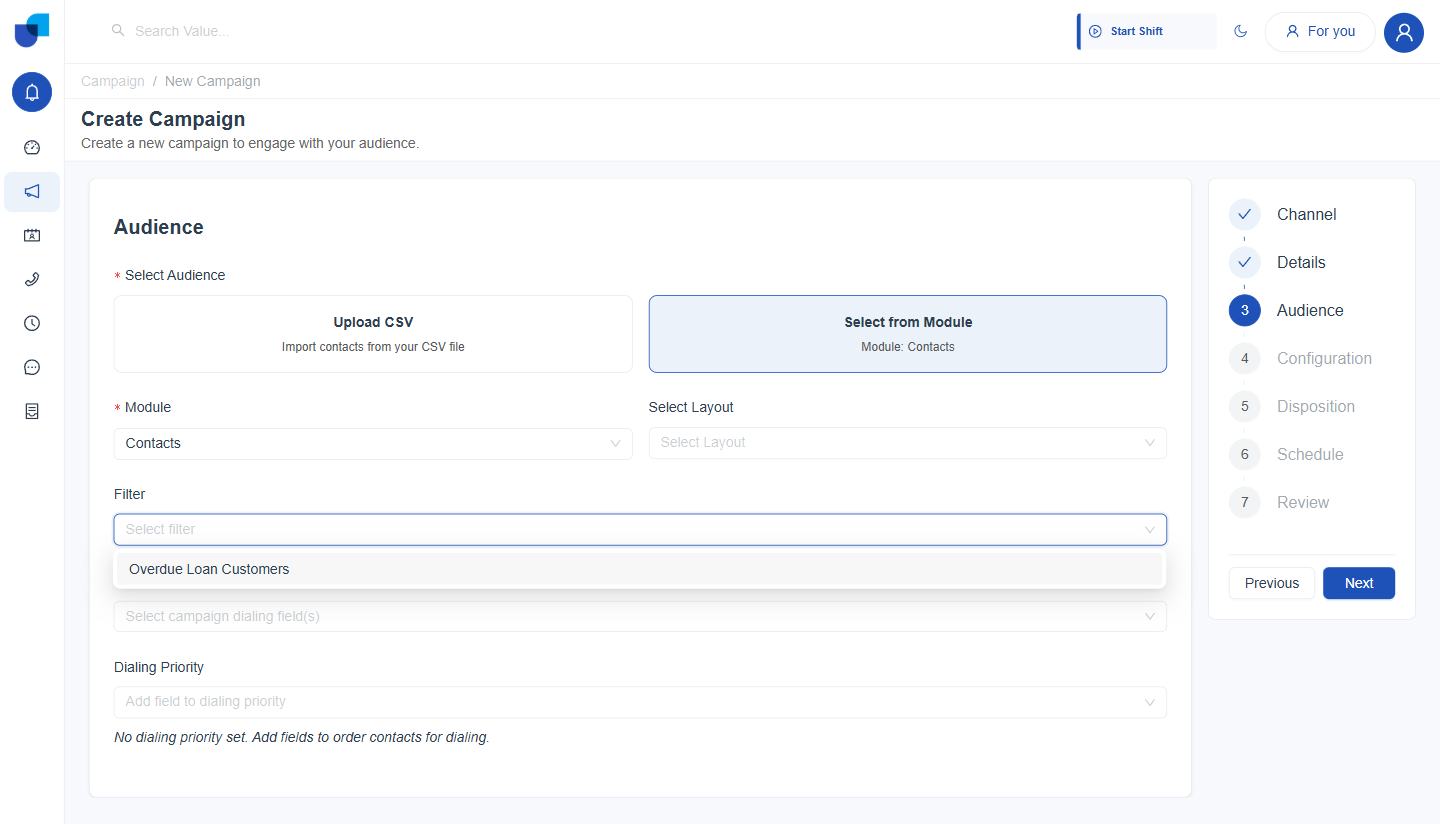
Figure 3. The Filter dropdown on the Audience step, listing the saved filter for the chosen module.
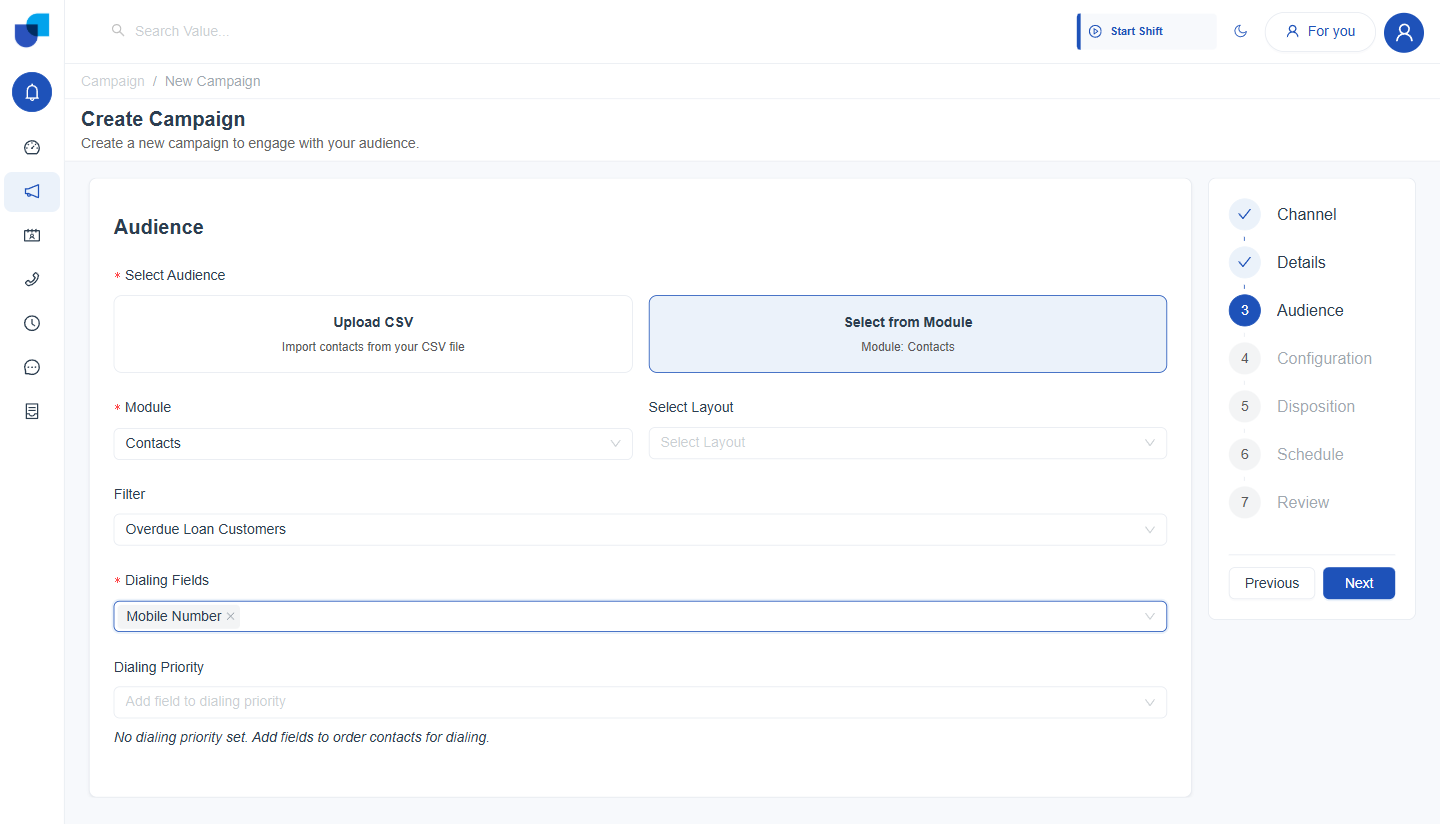
Figure 4. The completed Audience step, with the module, the saved filter and the dialing field chosen.
Step 4: Configuration
Requirement: agents prepared before each call
- Keep Agent as the handling type. The call goes to a live collections agent. IVR and AI Agent are the other two options.
- Choose Preview as the Dialing Mode and leave Auto Dial selected. An agent sees the customer's details before the call is placed. Power would dial automatically and connect answered calls to available agents.
- Choose the Agent Group. Required. It is the group of collections agents who receive the calls.
- Optionally choose a Caller ID (CLI), then click Next. It sets the outbound line the call appears to come from. Every field on this step is described in Campaign Builder.
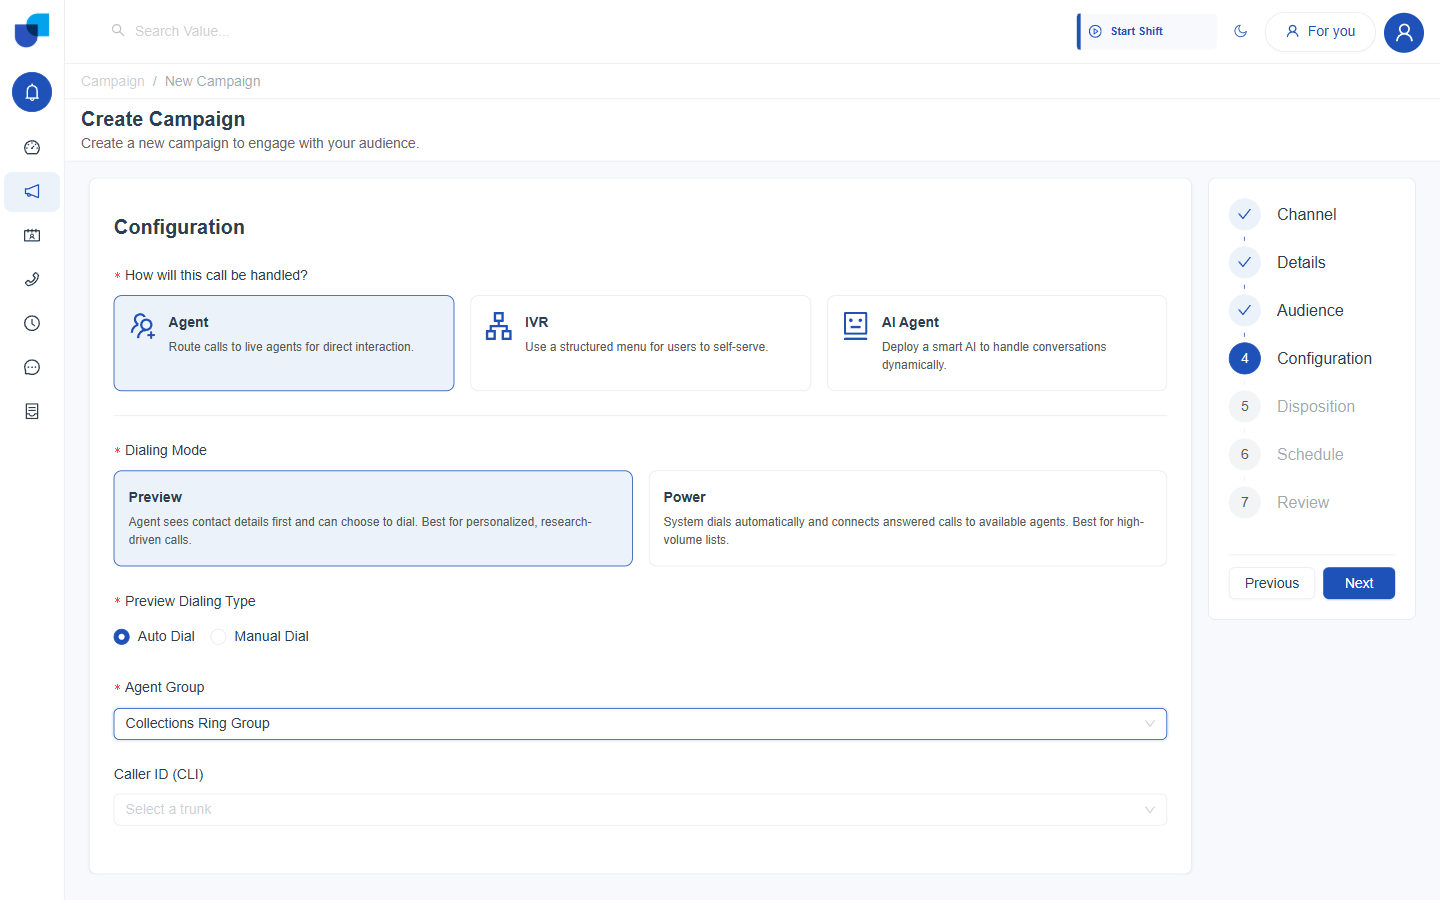
Figure 5. The Configuration step with Agent handling, Preview dialing and the collections agent group chosen.
Step 5: Disposition
Requirement: a record of what the customer said
- Tick Enable Dispositions. This reveals the Set Prefill Values for Disposition panel.
- Set Call Type to Campaign. The call type scopes the Disposition list to the four collections outcomes.
- Leave Disposition and Message empty, then click Next. The agent picks the real outcome on each call, so no single value is prefilled. The full mapping is in Campaign Dispositions.
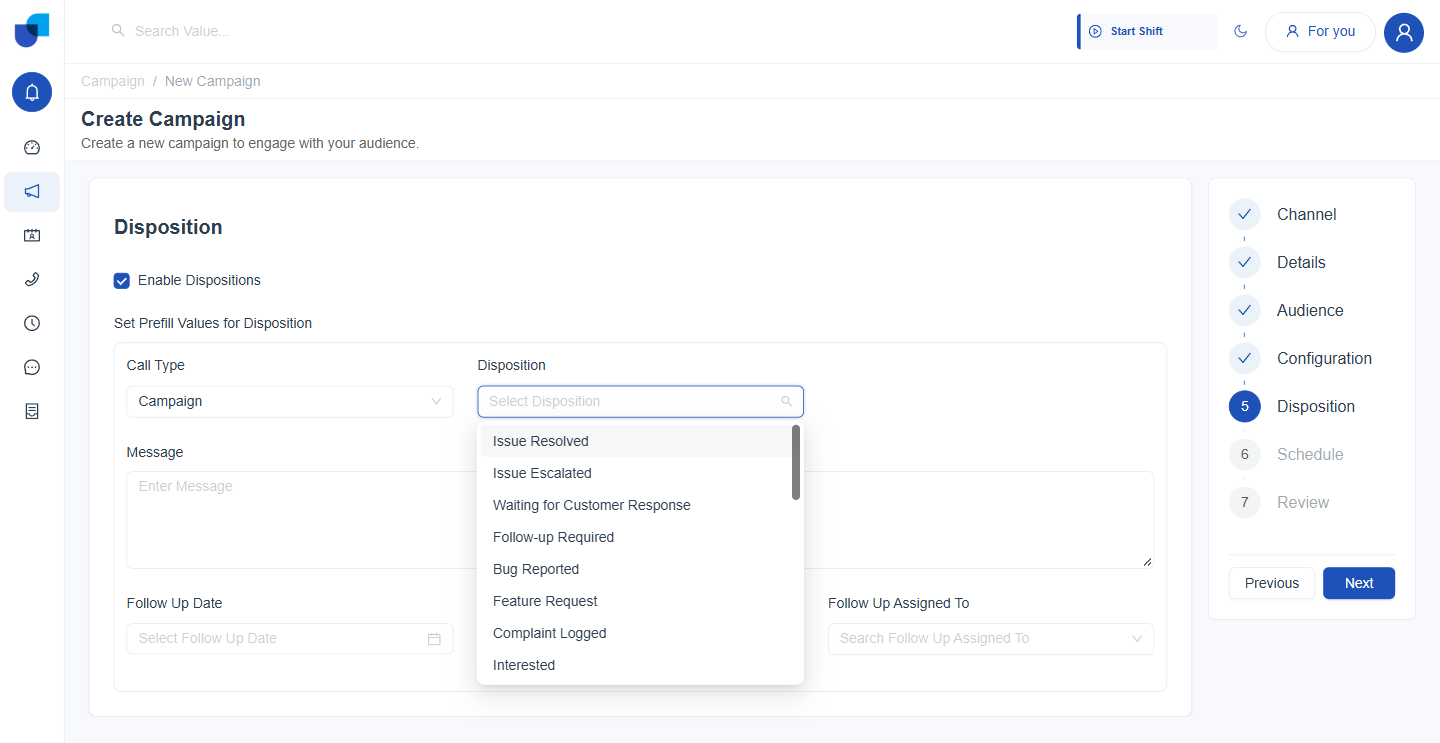
Figure 6. The Disposition step with Call Type set to Campaign. The dropdown lists the four collections outcomes.
Step 6: Schedule
Requirement: the program starts on its own
- Set the Schedule Start Time and click Next. Required. The campaign starts when this time arrives. Schedule End Time, Enable Recurring Schedule and Enable Retry keep their defaults here, and are covered in Scheduling and Retries.
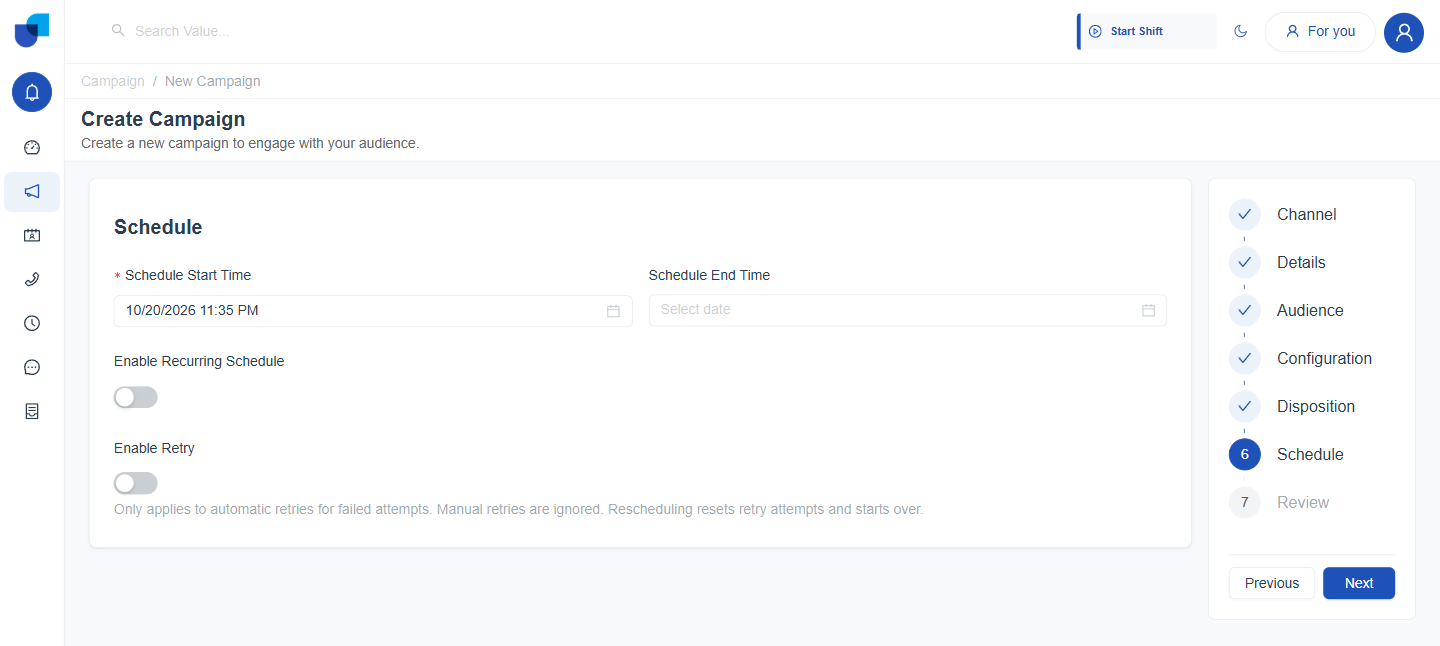
Figure 7. The Schedule step with only the required start time entered.
Step 7: Review and Save
- Check the summary, then click Save. The Review step lists the title, the Voice and Transactional badges, the schedule, the dialing mode, the group, the audience module and the dialing fields.
- Read the import result. Saving imports the audience. The result panel reports how many leads were imported, here 8, and the campaign status changes from Draft to Pending.
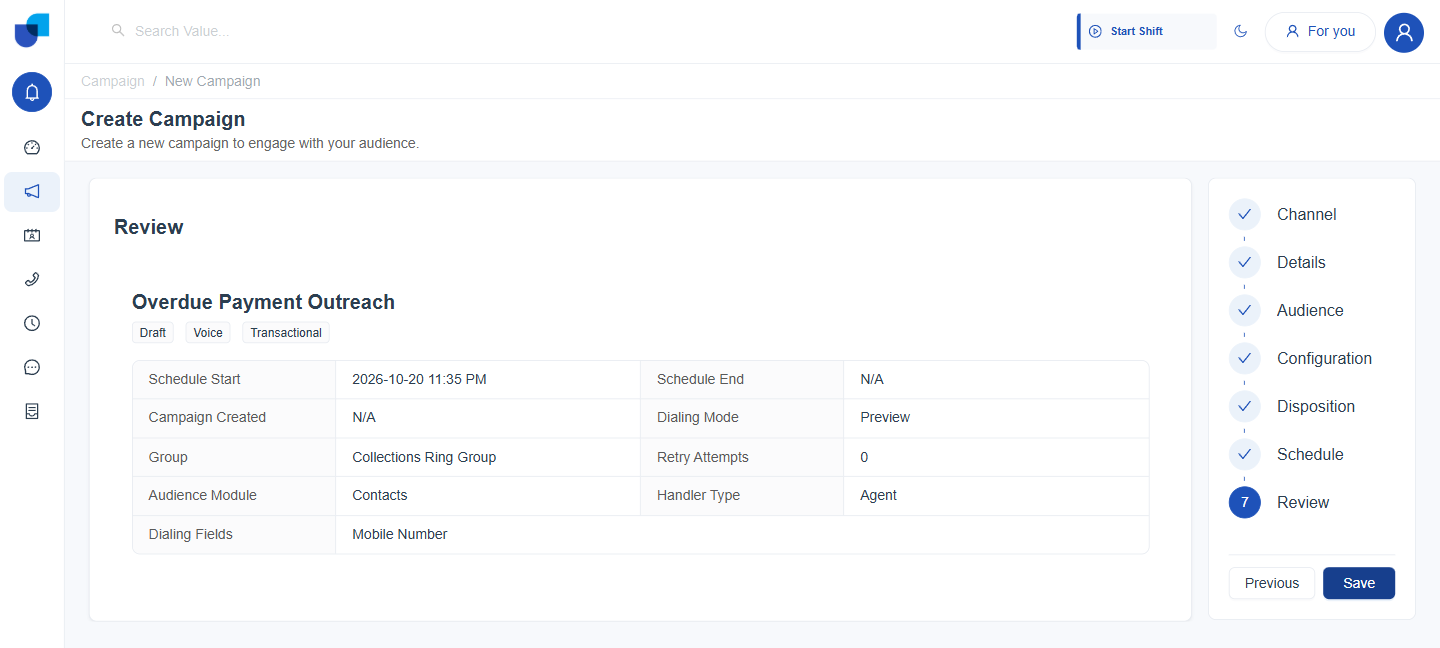
Figure 8. The Review step. Every earlier choice appears on one screen before Save is clicked.
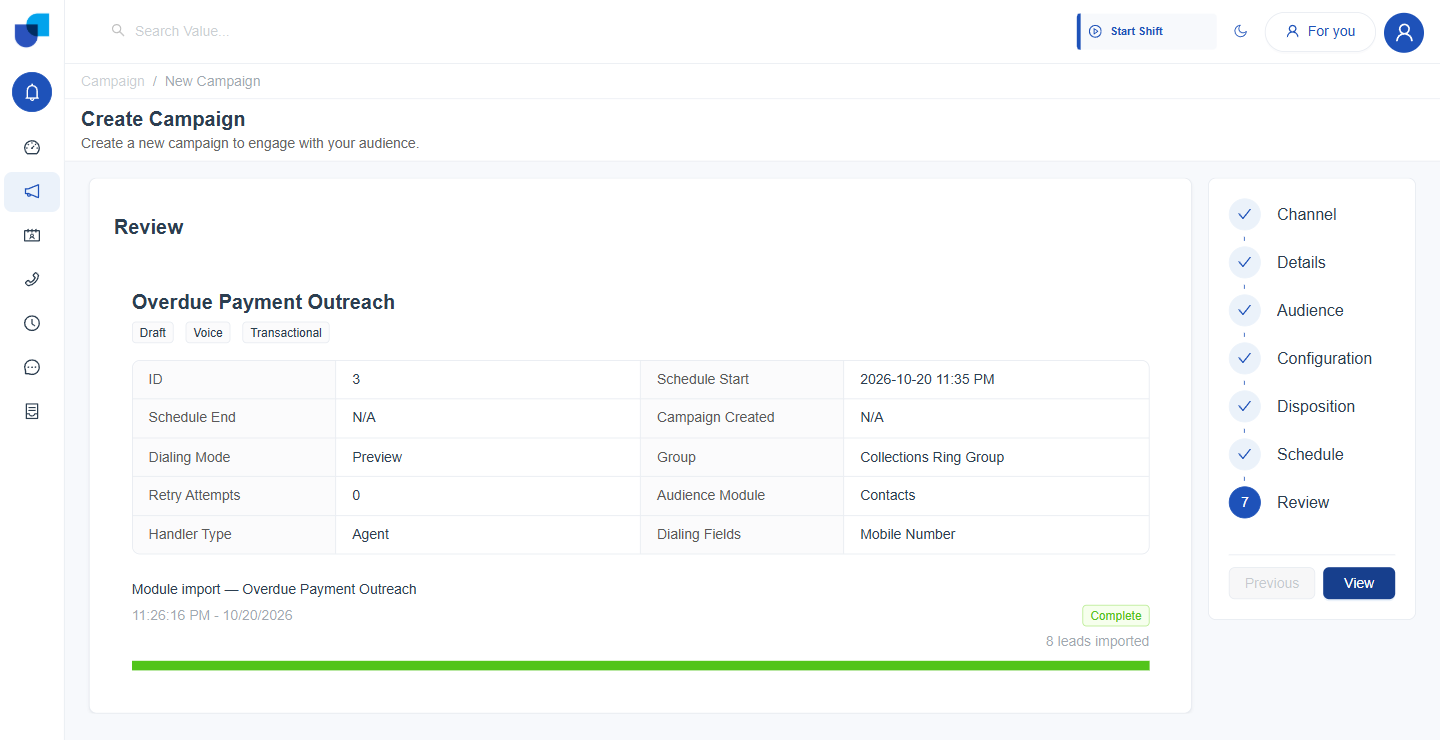
Figure 9. The Review step after Save, with the campaign ID and the import result of 8 leads.
Part 3: Opt Outs and Access Limits
Respect for people who opt out
Requirement: never call someone who has opted out
Open Configuration → DNC Management and click Create. Choose the Voice channel, enter the customer's phone number, set Type to Transactional, and click Create. Transactional matches the type of this campaign, so the entry applies to it. The Create dialog and CSV import are shown in DNC Management.
Who changes what
Requirement: agents work calls but do not change the program
Open Configuration → User Management → Roles, choose the Collections Agent role, and expand Campaign. The role receives the values below, described in Campaign Permissions.
| Permission | Value set |
|---|---|
| View Campaigns | Own |
| Manage Campaigns | No access |
| Execute Campaigns | Own |
| Manage Leads | No access |
| View Leads | Own |
| Manage DNC List | No |
Part 4: Start the Campaign
Requirement: the program starts on its own
- Open Campaign → Campaigns and select the campaign. A Pending campaign shows its schedule, group, audience module and a Lead Status Breakdown with every lead still Pending.
- Let the Schedule Start Time arrive, or click the Run icon. The status changes to Started. On a started campaign, Reschedule, Topup, Edit and Delete are greyed out, while View Leads, Fullscreen and Pause stay active.
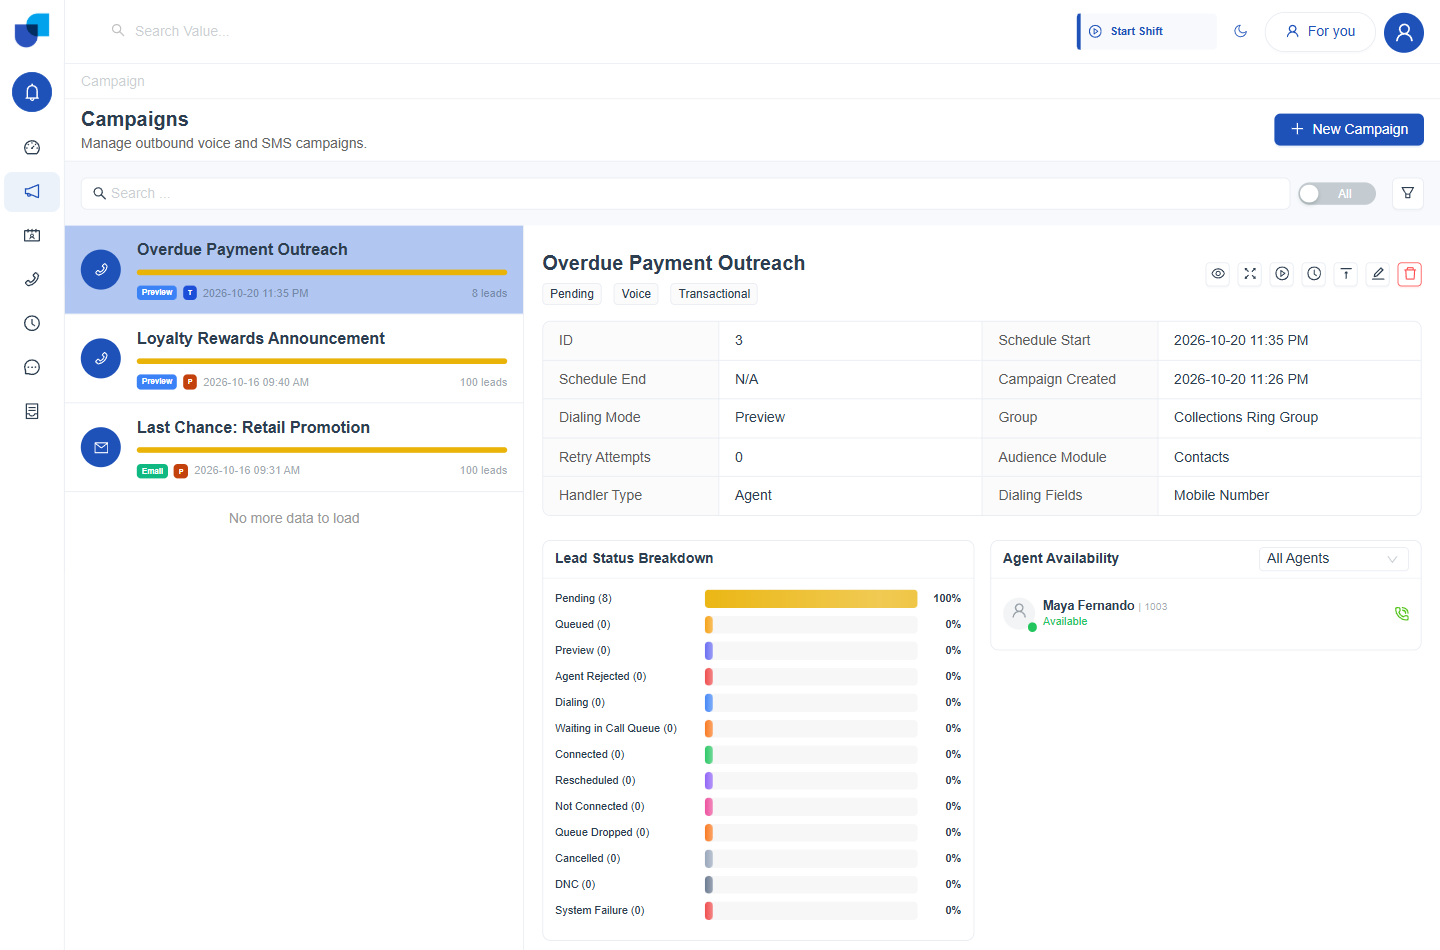
Figure 10. The detail panel of a Pending campaign, with every lead still Pending.
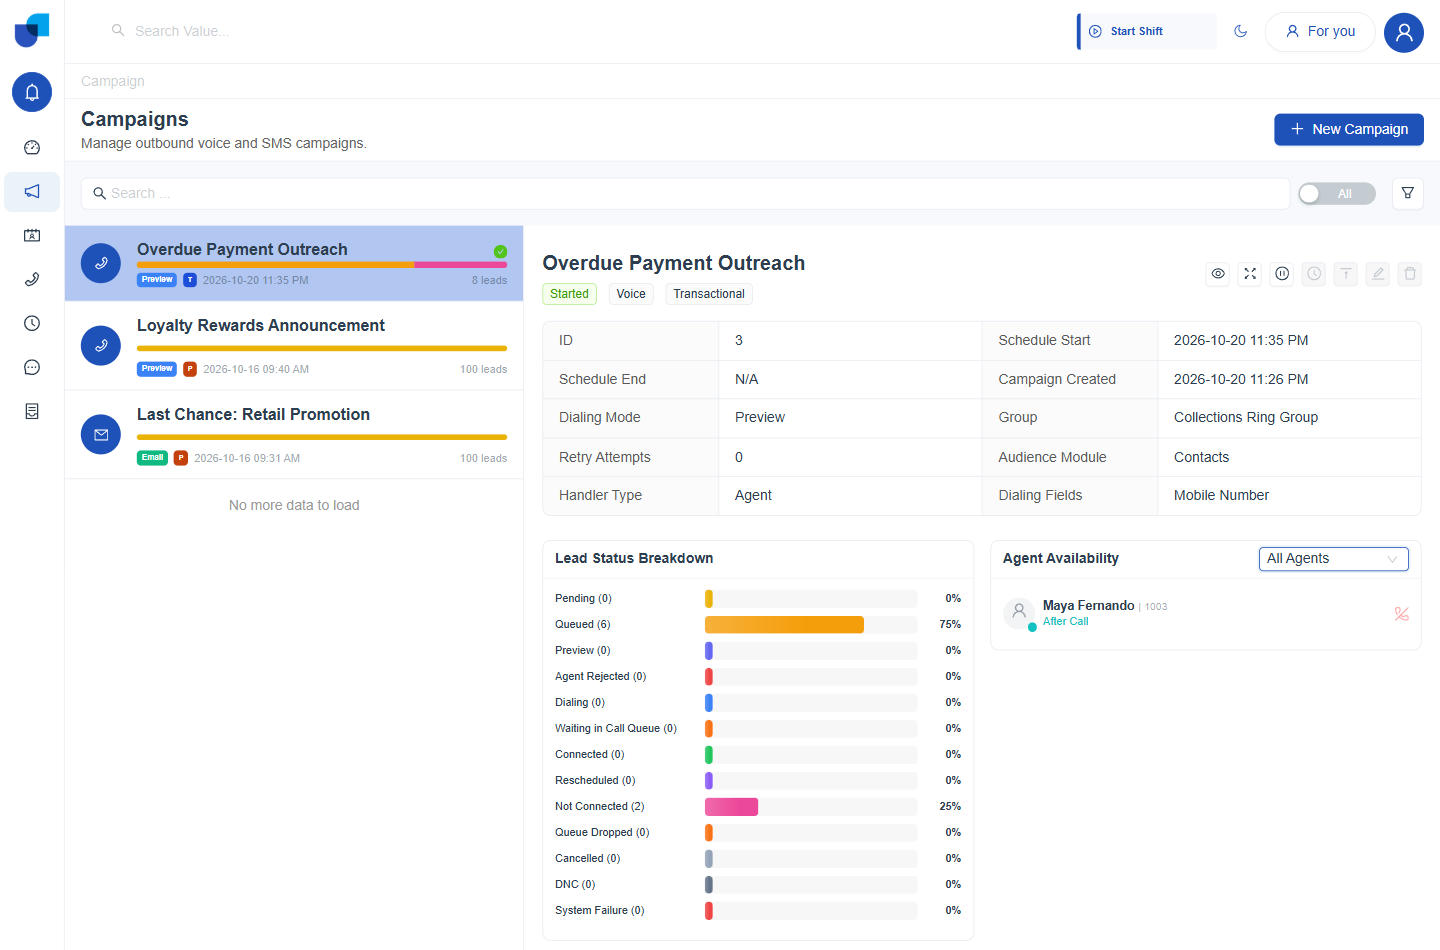
Figure 11. The detail panel of a Started campaign. Leads move through the lifecycle and the editing actions are greyed out.
Pause, Topup and Reschedule are described in Managing Live Campaigns.
Part 5: Watch the Campaign Run
Requirement: see what happened without chasing
- Open Monitoring → Campaign Execution. The list shows one row per campaign with its last action, last status and the counts of successful, canceled, skipped and failed executions.
- Expand the row. The log lists each action, its status, who triggered it and why. SYSTEM_RETRY entries are the system's own retry attempts.
- Open the campaign's leads from the detail panel. The Campaign Leads list shows each lead's status, attempt count and timestamps.
- Open one lead. The lead detail shows its status, its data, the calls made to it, its latest disposition and its history.
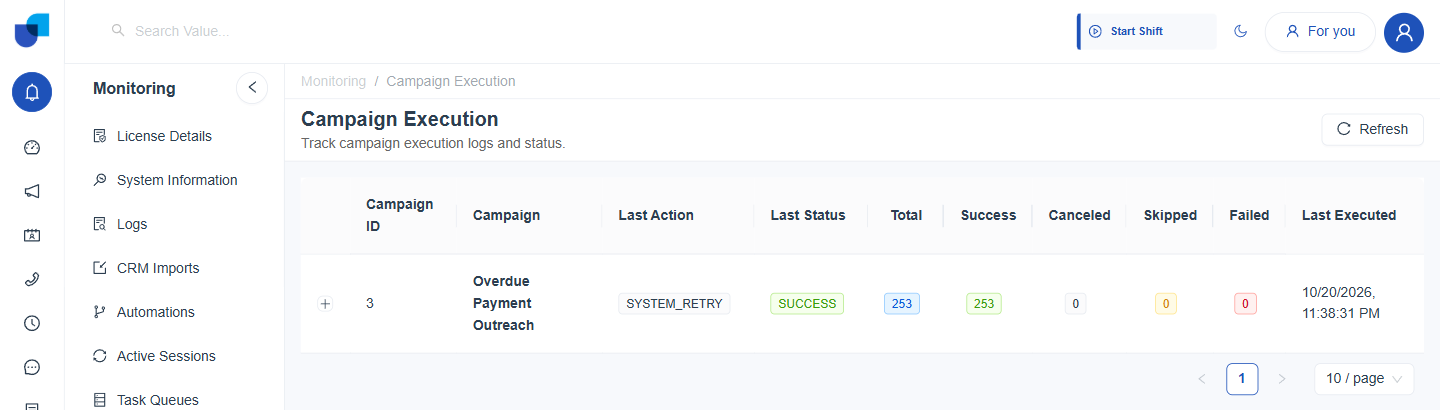
Figure 12. The Campaign Execution list with one row for the campaign and its execution counts.
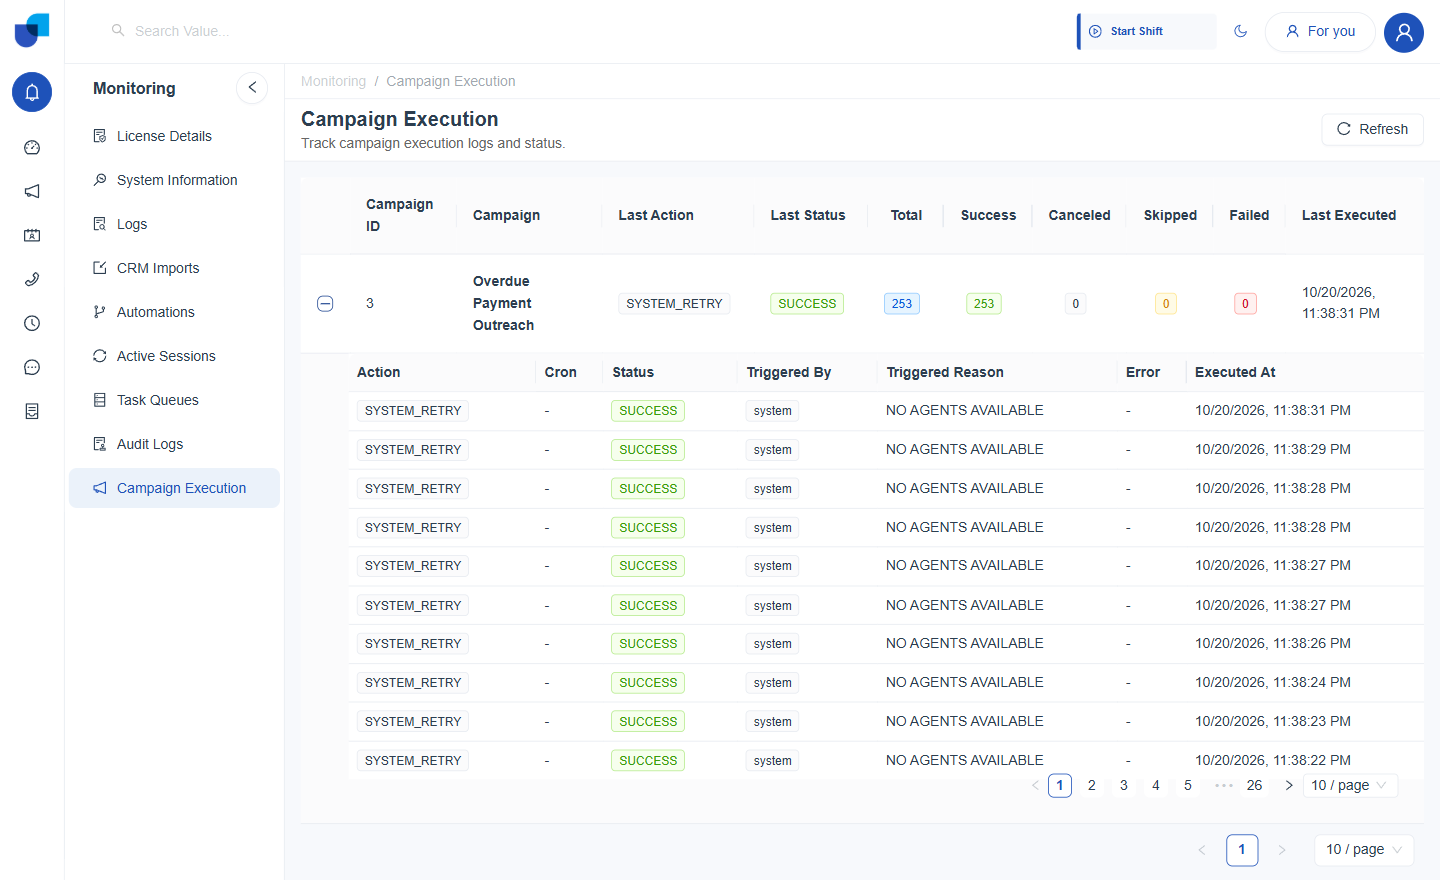
Figure 13. The expanded execution log, listing each retry action with its status, trigger and reason.
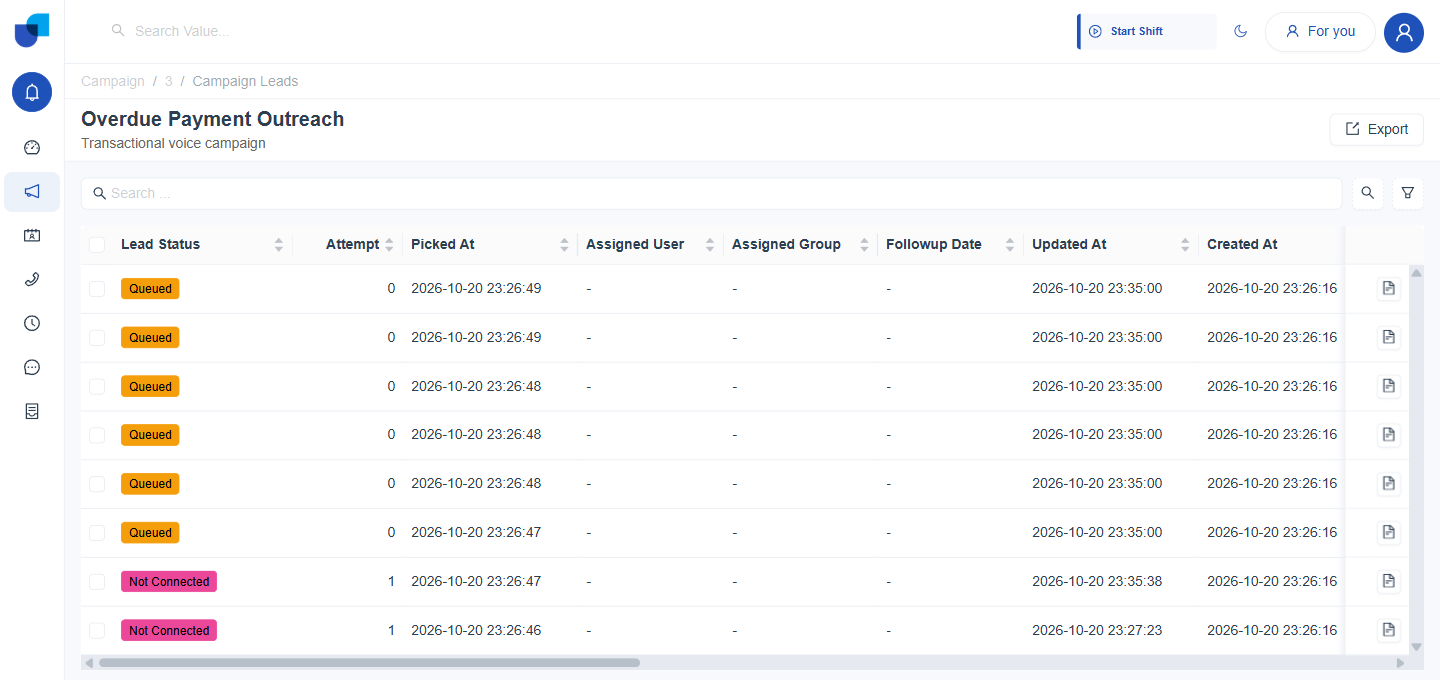
Figure 14. The Campaign Leads list, with each lead's status, attempt count and timestamps.
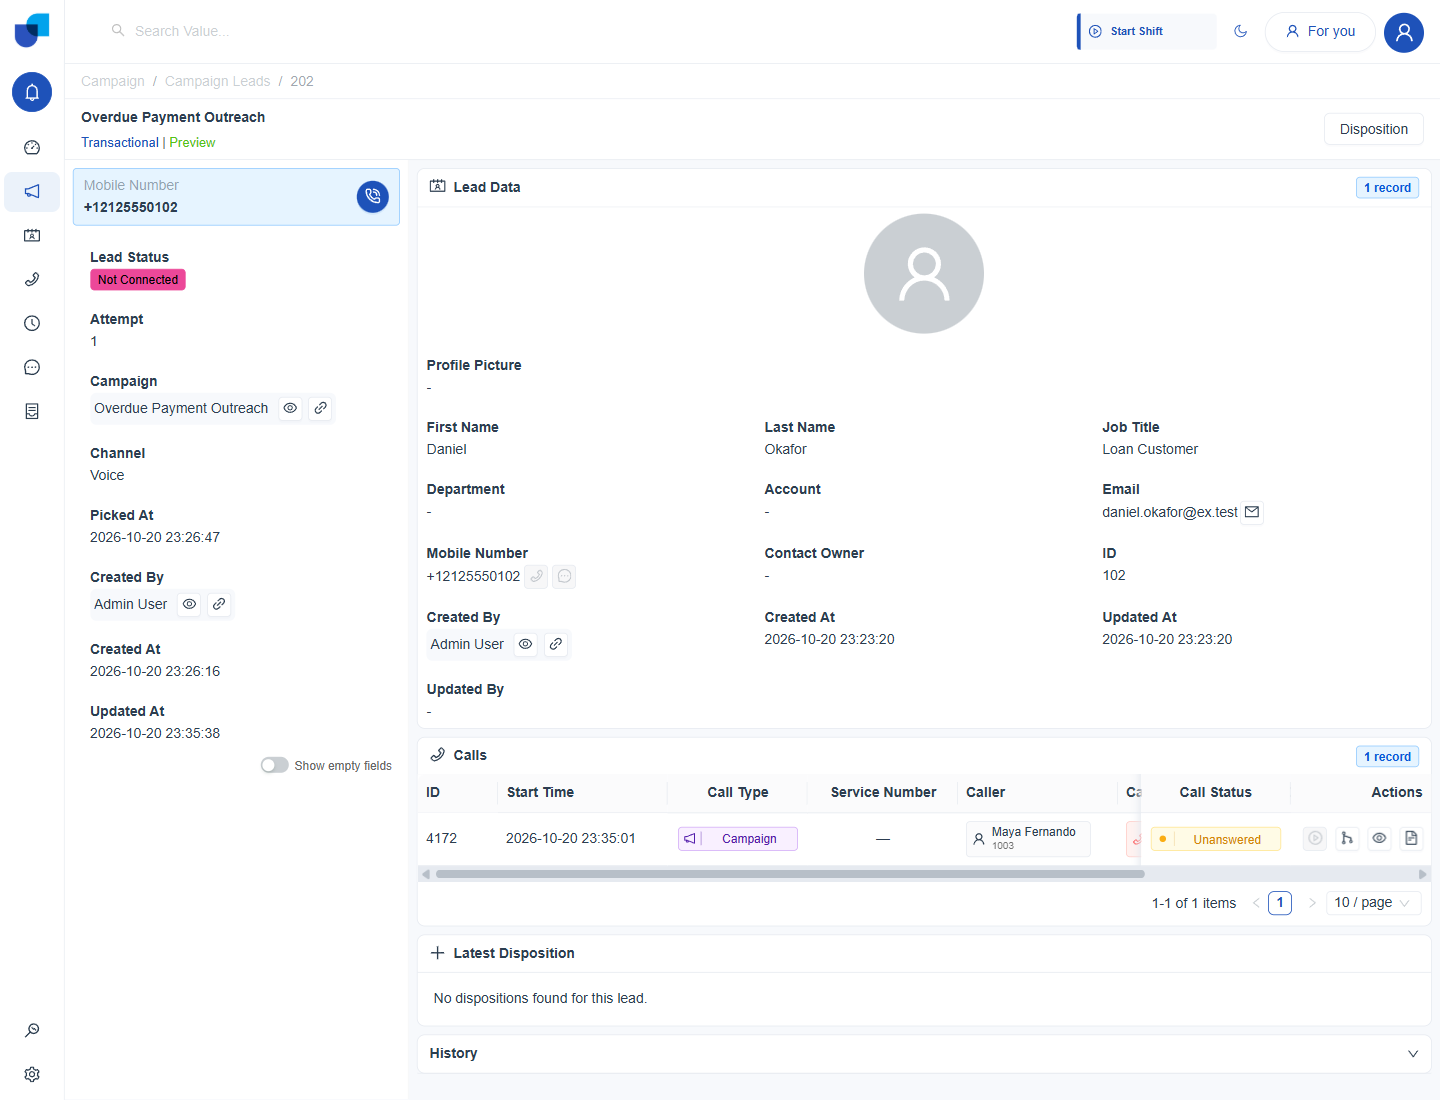
Figure 15. The detail page of one lead, with its status, data and call history.
These screens are explained in Campaign Monitoring.
Part 6: Send Hard Cases to the Register
Requirement: Unable to Pay becomes a Loan Servicing case on its own
The automation is created from Configuration → Automation → Create, with the trigger type set to Event-based and the title Collections Disposition Routing.
- Add a Trigger node and open its edit dialog.
Search the trigger picker for Disposition Submitted. It returns one match,
On Disposition Submitted, under the Telephony category, described as "Triggered when disposition is submitted for a call." - Select it and click Save. The Trigger node now reads On Disposition Submitted on the canvas.
- Drag a Condition node onto the canvas and connect it to the Trigger. Open it, name it Check Disposition, and choose Disposition ID under On Disposition Submitted as the field. The trigger passes the call's disposition to the condition as an ID, so the rule tests that field.
- Drag an Action node onto the canvas and connect it to the Condition's green (true) output. Search the action picker for Service Cases and choose Create Record Service Cases. Under Fields to Add, click Add Field, choose Case Type, and set it to Loan Servicing. Case Reason and Assigned Agent are added the same way.
- Drag a second Action node and connect it to the Condition's red (false) output. Choose Send Email Notification, then fill in the recipient, a subject such as Payment promise received, and a short confirmation message.
- Click Auto Format, then Save Workflow. Auto Format lines the nodes up so the branches are easy to read.
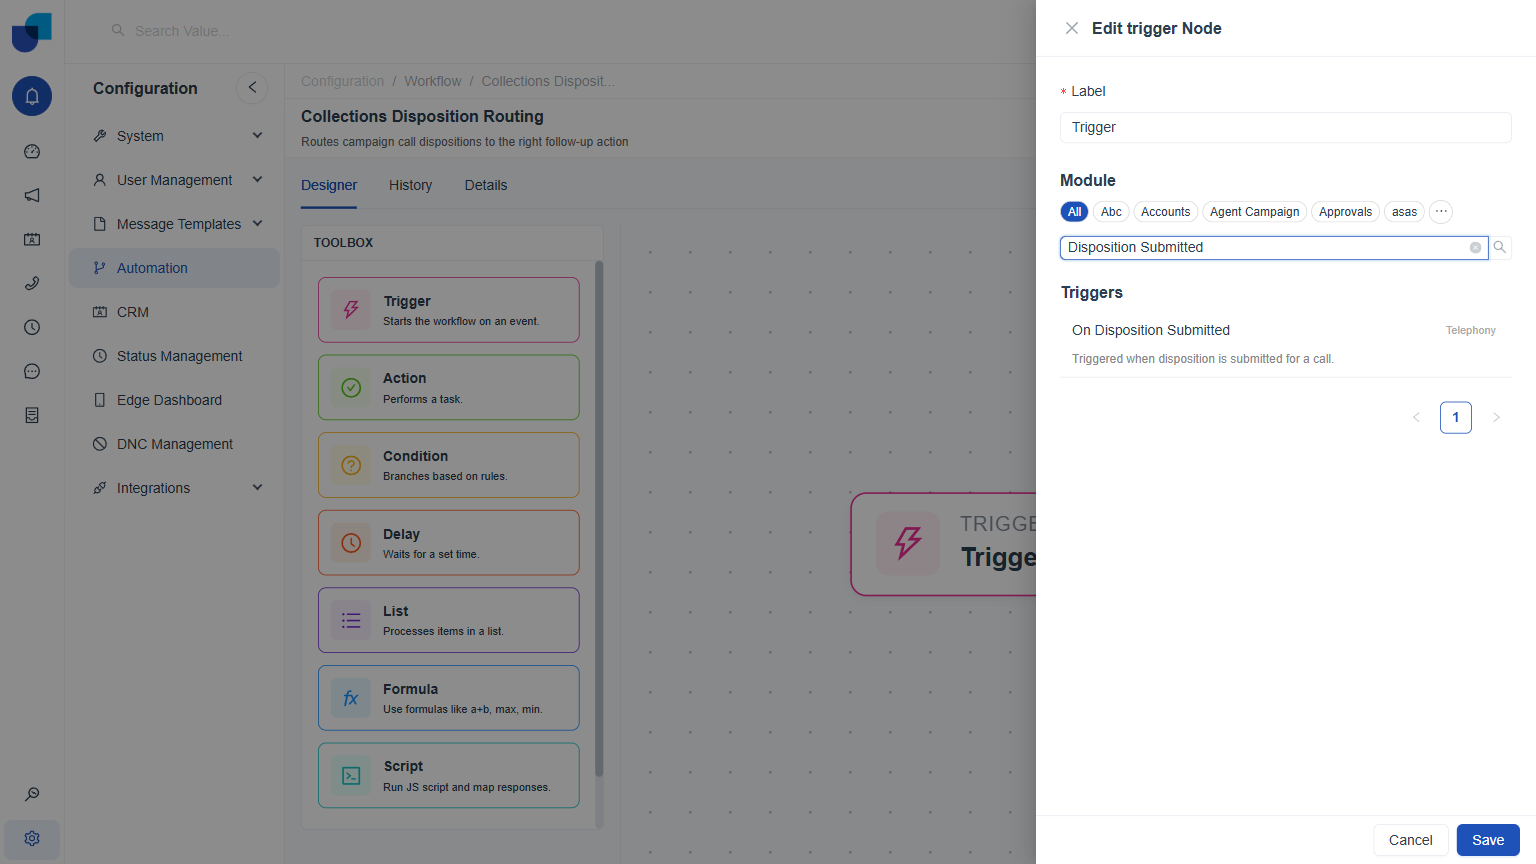
Figure 16. The trigger picker searched down to its one match, On Disposition Submitted, under Telephony.
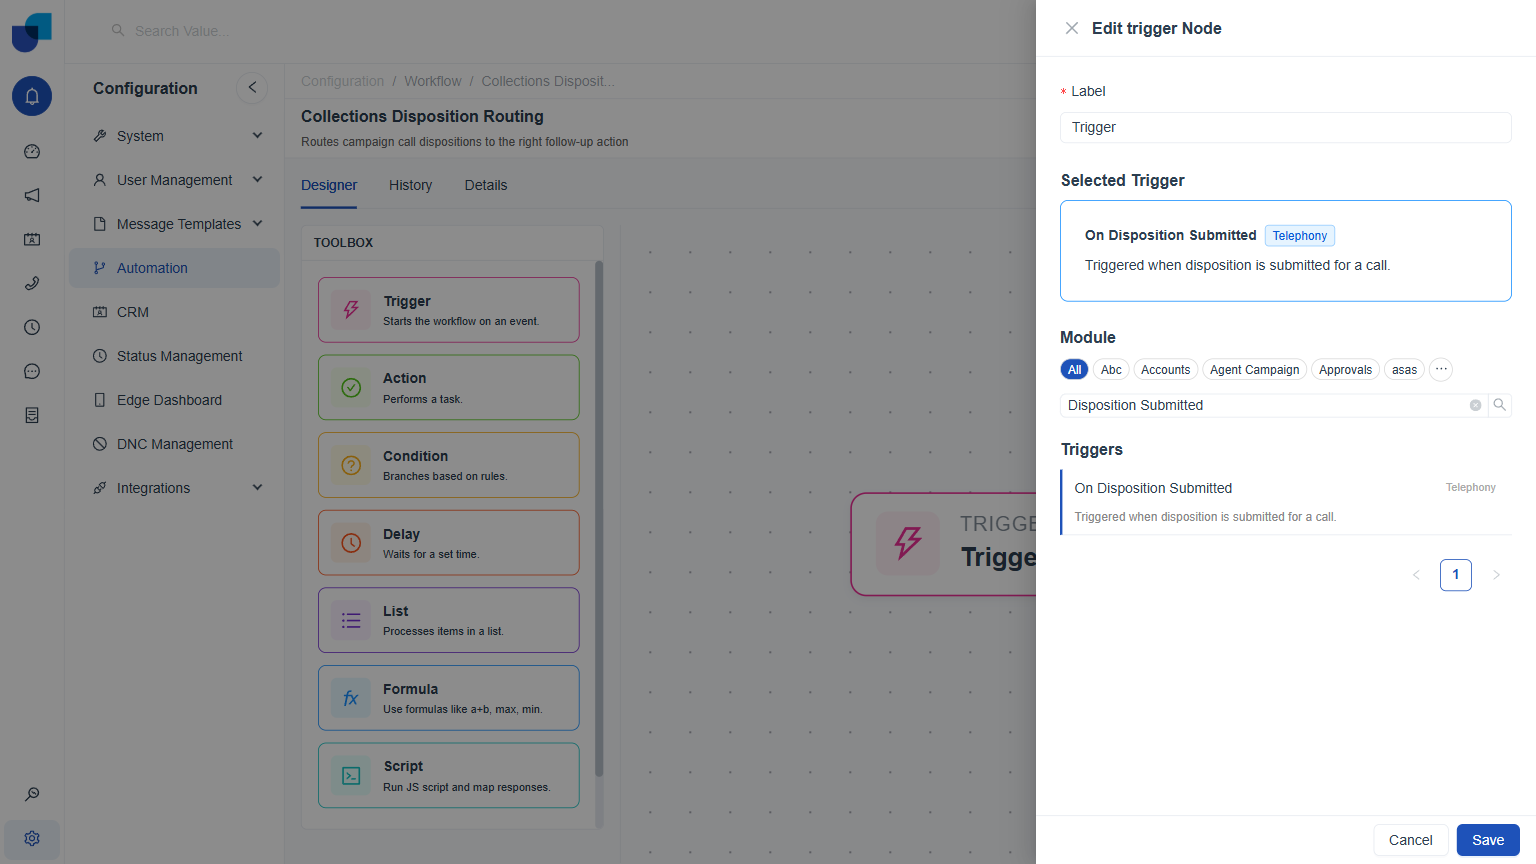
Figure 17. The Selected Trigger panel, shown before the dialog is saved.
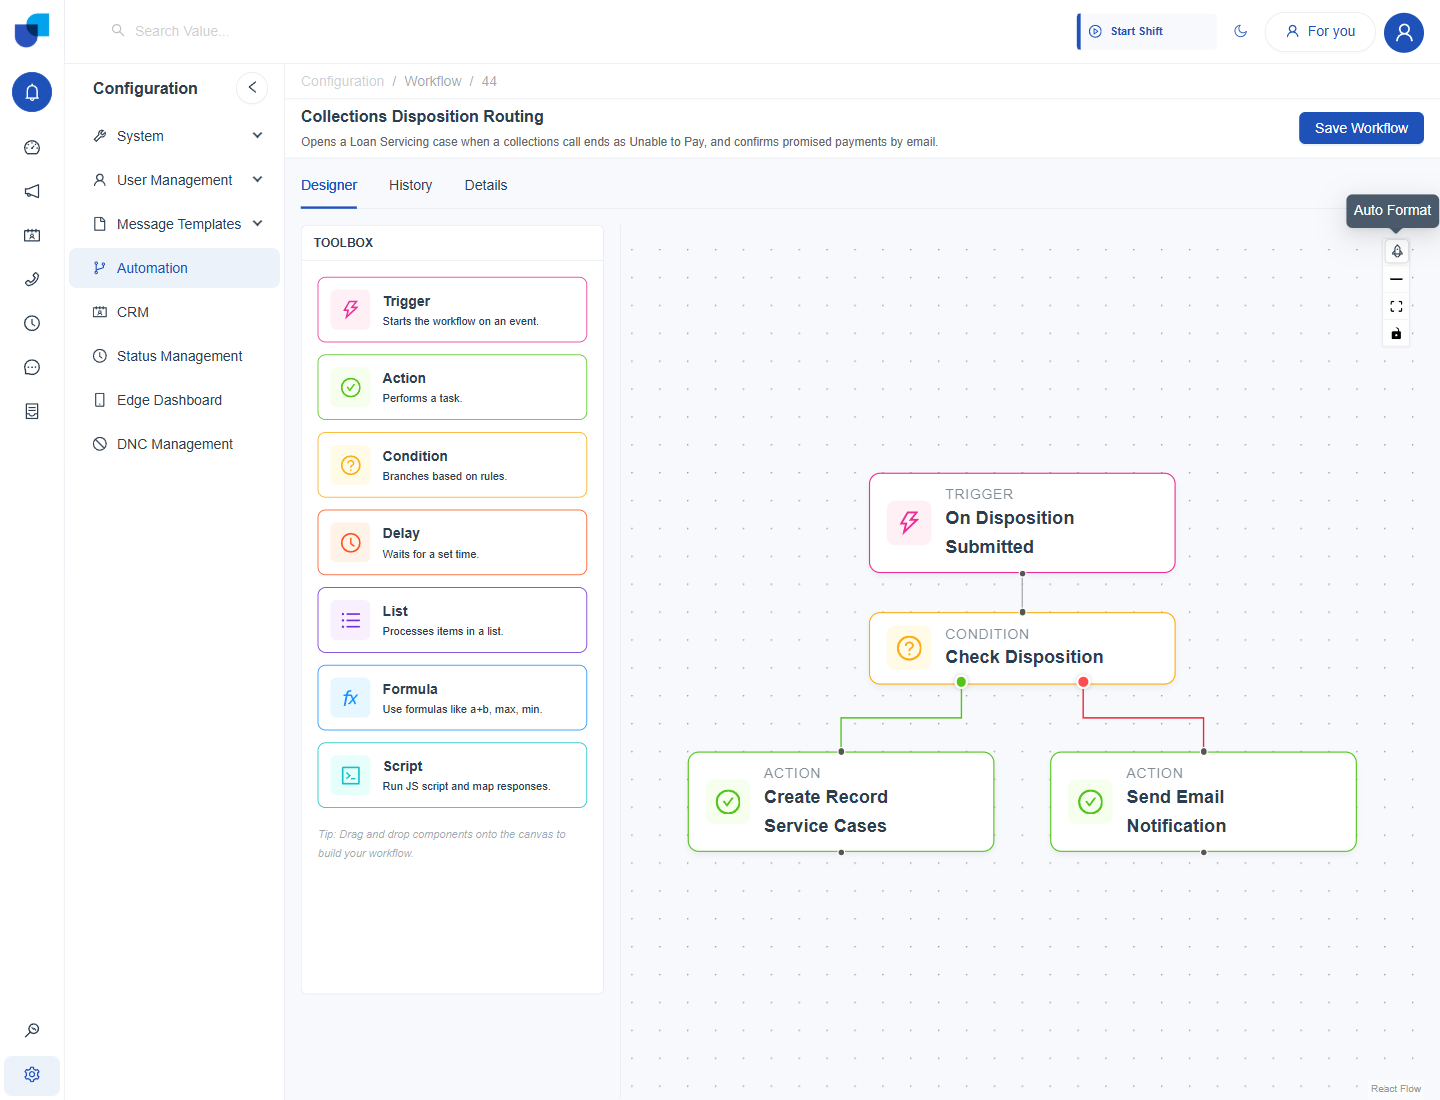
Figure 18. The finished workflow. The Trigger feeds the Condition, the true branch creates a Service Cases record, and the false branch sends a confirmation email.
When the true branch runs, a new record appears in Service Cases with the Case Type Loan Servicing, a Case Reason, and an Assigned Agent. From there it behaves like any case logged by hand.
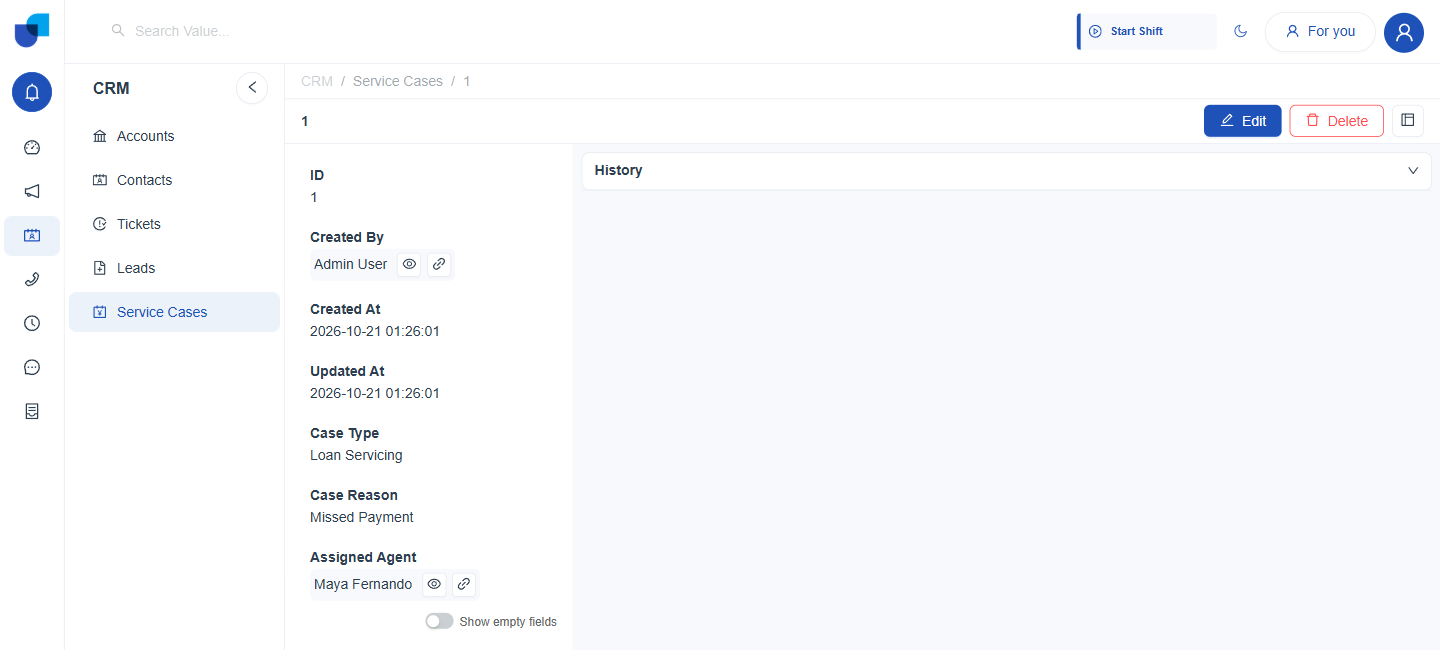
Figure 19. A Loan Servicing record in Service Cases, with its Case Type, Case Reason and Assigned Agent filled in.
Other node types, such as Script, Delay and Formula, are described in How to Configure Automation Use Cases in UNICONNECT AI.
Part 7: Reports and Dashboards
Requirement: see outcome trends every morning
- Open Dashboards → Contact Center, Outbound Campaigns Monitor. The dashboard needs no setup. It shows Running Campaigns, Total Campaign Leads, Connected Calls, Pending and Queued Leads, the Lead Statuses Breakdown and the Disposition Breakdown.
- Check the Campaign Date filter. The dashboard opens filtered to This Month. Change it from Filters when a different period is needed.
- Open Reports for a closer look at one customer or one campaign. Lead Detail Report shows each call result and the note the agent left. Campaign Summary shows the totals for a campaign.
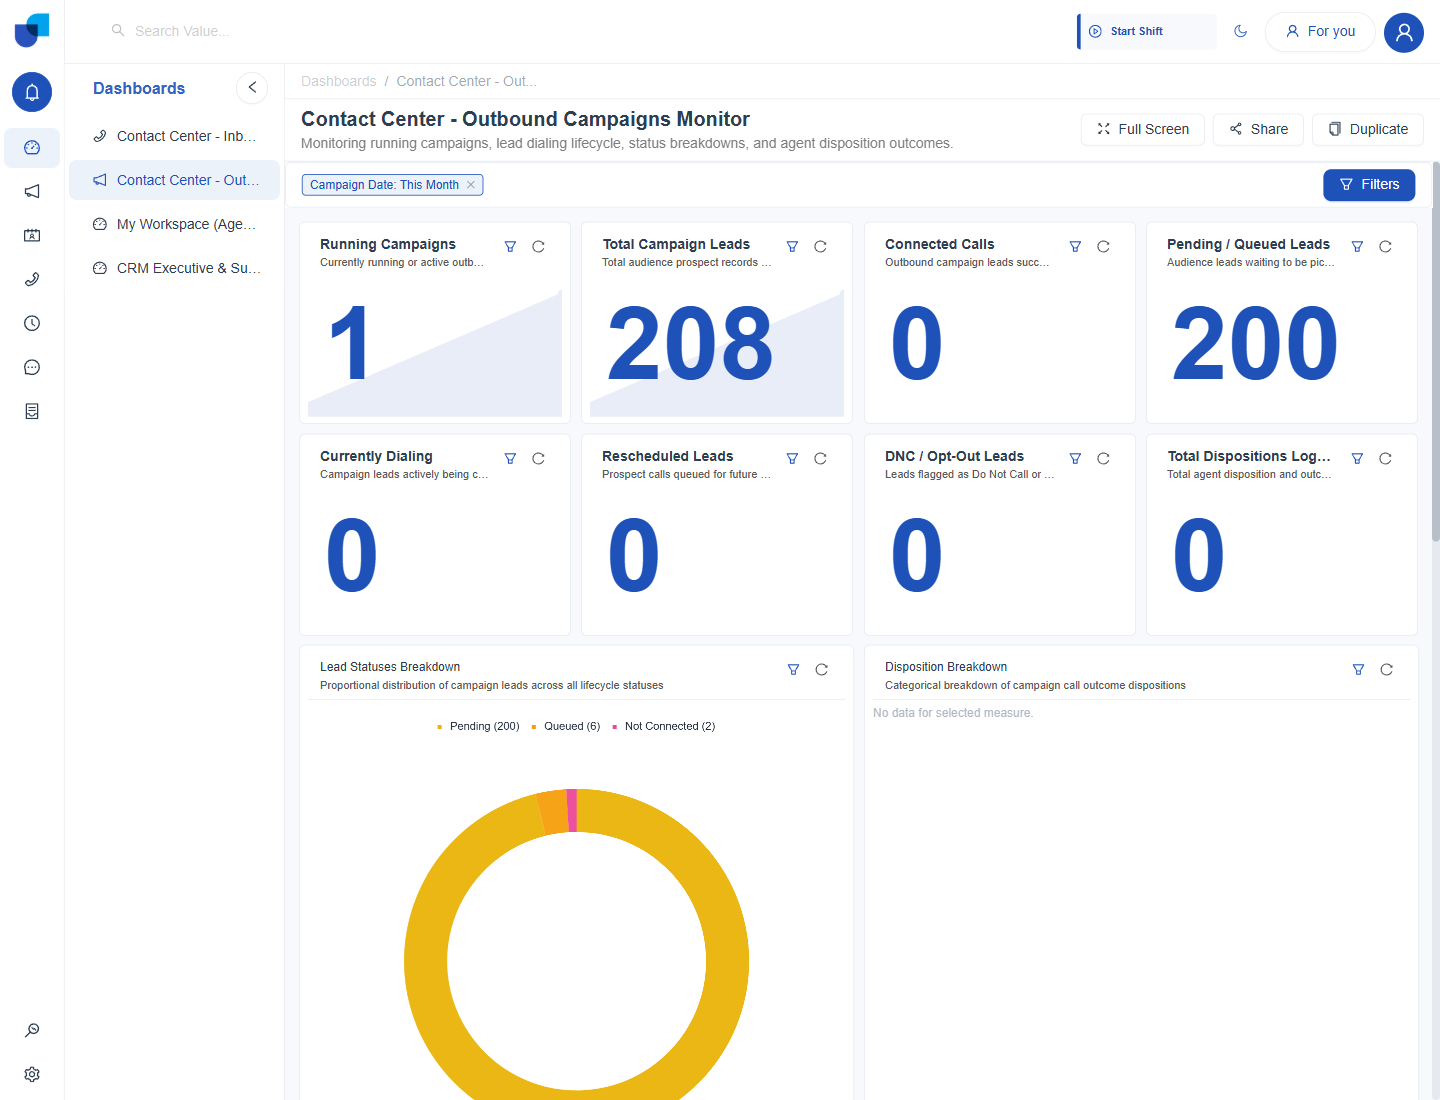
Figure 20. The Outbound Campaigns Monitor dashboard, with the Lead Statuses Breakdown showing the campaign's leads by status.
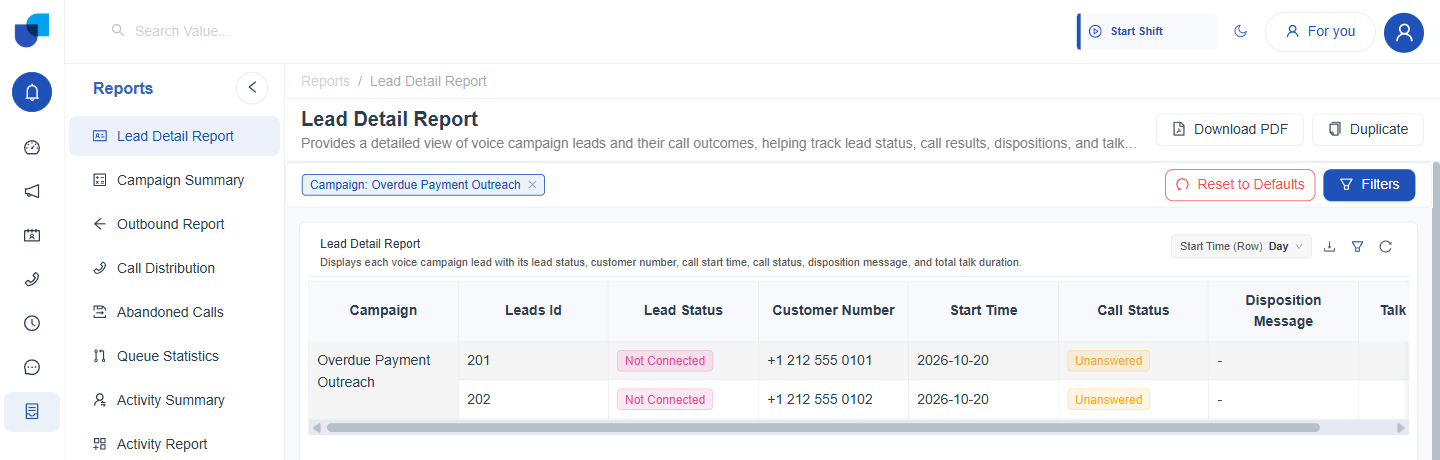
Figure 21. The Lead Detail Report filtered to the campaign, with one row per lead and its call result.
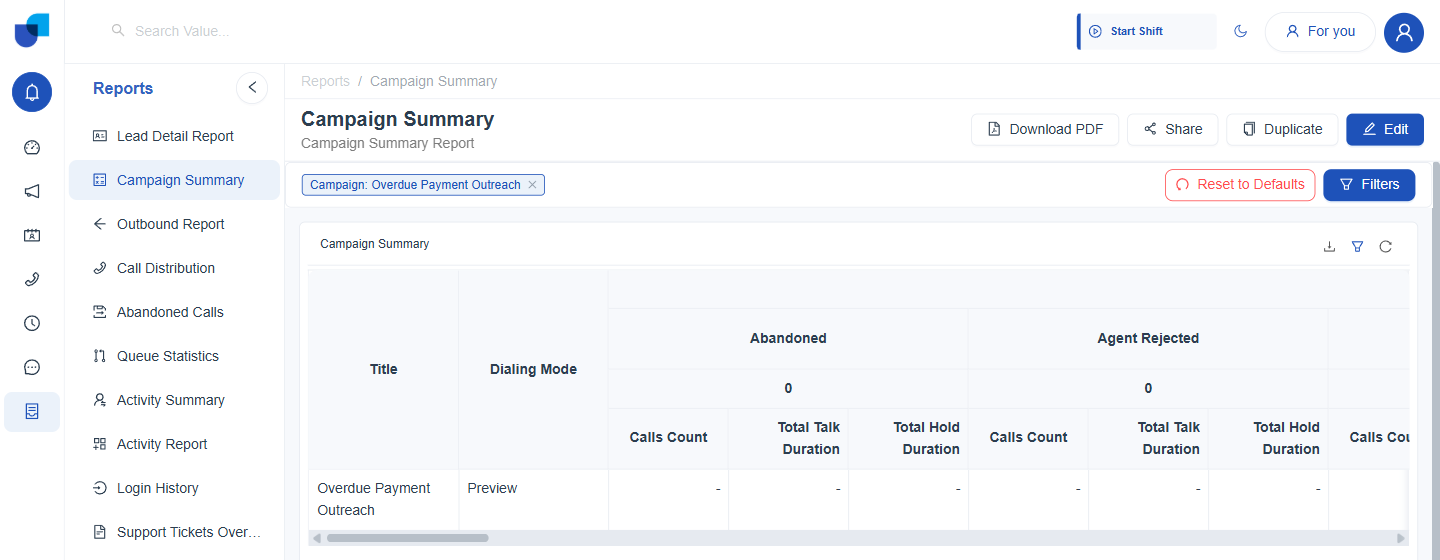
Figure 22. The Campaign Summary report filtered to the campaign, with its dialing mode and the call counts and durations under each call status.
The widgets and the built in reports are described in Campaign Reports and Dashboards.